Crispy Gluten-Free Corn Dogs: Your New Favorite!
Craving classic corn dogs? Learn how to make crispy, delicious gluten-free corn dogs at home with our easy hot dog stick recipe. Perfect for everyone!
- 1Introduction: Finally, a Gluten-Free Corn Dog Recipe That Tastes Like the Real Deal!
- 2Why You’ll Absolutely Love This Gluten-Free Corn Dog Recipe
- 3Why You’ll Absolutely Love This Gluten-Free Corn Dog Recipe
- 4Ingredients Overview
- 5Instructions
- 6Pro Tips for Perfect Gluten-Free Corn Dogs
- 7Storage
- 8Variations
- 9Essential Ingredients for Your Gluten-Free Corn Dogs: Understanding Each Component
- 10Equipment You’ll Need for Perfect Homemade Gluten-Free Corn Dogs
- 11Step-by-Step Instructions: Mastering Your Gluten-Free Hot Dog Stick Recipe
- 12Pro Tips & Tricks for the Best Gluten-Free Corn Dogs Every Time
Ingredients
For the Corn Dogs
- 8 all-beef hot dogs (gluten-free certified)
- 8 wooden skewers or hot dog sticks
- 6 cups neutral oil for frying (canola, vegetable, peanut)
For the Gluten-Free Batter
- 1 cup gluten-free cornmeal (medium grind)
- 1 cup gluten-free all-purpose flour blend (with xanthan gum)
- 2 tbsp granulated sugar
- 1 tbsp baking powder
- 1 tsp salt
- 1 large egg
- 1 1/4 cups buttermilk (or milk + 1 tbsp lemon juice/vinegar)
Instructions
Instructions
Prep hot dogs and skewers.
Instructions
Combine dry batter ingredients.
Instructions
Combine wet batter ingredients.
Instructions
Whisk wet into dry ingredients to form batter.
Instructions
Pour batter into a tall glass.
Instructions
Heat oil to 350-375°F (175-190°C).
Instructions
Dip hot dogs in batter, ensuring full coverage.
Instructions
Carefully fry corn dogs in batches until golden brown.
Instructions
Drain on paper towels and serve immediately.
Equipment You'll Need
Here's what I use to make this recipe perfectly every time:
- Deep Pot or Dutch Oven — This is essential for **safe and effective deep frying**. A heavy-bottomed pot with high sides minimizes splattering and helps maintain a consistent oil temperature. I always reach for my cast iron Dutch oven for its excellent heat retention. → Buy Now
- Candy/Deep Fry Thermometer — Trust me on this one; this is **crucial for maintaining consistent oil temperature**. Without it, you're guessing, and that leads to either soggy or burnt corn dogs. Aim for a steady 350-375°F (175-190°C) for optimal results. → Buy Now
- Whisk — A good whisk is your best friend for **combining dry and wet ingredients** smoothly. It helps eliminate lumps in your batter, ensuring a uniform coating on each hot dog. → Buy Now
- Large Mixing Bowls — You'll need at least two: one for your dry ingredients and another for your wet components, then a third for the final batter. This organizational step makes the process much cleaner. → Buy Now
- Tongs or Spider Skimmer — These tools are vital for **safely handling hot dogs in hot oil**. A spider skimmer is particularly good for gently lowering and removing them without damaging the coating. → Buy Now
- Paper Towel-Lined Plate/Wire Rack — After frying, you’ll want to place your finished treats on one of these to **drain excess oil**. A wire rack allows for air circulation, keeping them crisp. → Buy Now
- Measuring Cups and Spoons — For any baking, and especially with gluten-free flours, **accurate ingredient ratios** are paramount. Precision here ensures your batter has the right consistency. → Buy Now
- Tall Glass or Mason Jar — This is a **crucial tip** for dipping your hot dogs. A tall, narrow container filled with batter allows for an even, thick coating on the hot dogs, minimizing waste and mess. → Buy Now
- Wooden Skewers/Hot Dog Sticks — Of course, you can't have a hot dog stick recipe without the sticks! These provide the classic presentation and make them easy to eat. What I discovered is that sturdy, pointed sticks make insertion much easier. → Buy Now
Recipe FAQs
Are corn dogs gluten free if I just use cornmeal?
What kind of hot dogs should I use for gluten-free corn dogs?
Can I bake or air fry these gluten-free corn dogs instead of frying?
Why is my corn dog batter too thick or too thin?
How do I prevent the batter from falling off the hot dogs?
Can I make the batter ahead of time?
Crispy Gluten-Free Corn Dogs: Your New Favorite!
Craving classic corn dogs? Learn how to make crispy, delicious gluten-free corn dogs at home with our easy hot dog stick recipe. Perfect for everyone!
Prep Time
15 min
Cook Time
20 min
Total Time
35 min
For the Corn Dogs
- 8 all-beef hot dogs (gluten-free certified)
- 8 wooden skewers or hot dog sticks
- 6 cups neutral oil for frying (canola, vegetable, peanut)
For the Gluten-Free Batter
- 1 cup gluten-free cornmeal (medium grind)
- 1 cup gluten-free all-purpose flour blend (with xanthan gum)
- 2 tbsp granulated sugar
- 1 tbsp baking powder
- 1 tsp salt
- 1 large egg
- 1 1/4 cups buttermilk (or milk + 1 tbsp lemon juice/vinegar)
Introduction: Finally, a Gluten-Free Corn Dog Recipe That Tastes Like the Real Deal!
The scent of frying batter and sizzling hot dogs instantly transports me back to childhood carnivals and sun-drenched fairgrounds. There’s something undeniably magical about a perfectly golden corn dog on a stick, a handheld beacon of pure comfort food joy. For years, however, that nostalgic pleasure felt out of reach for many, myself included, who navigate a gluten-free lifestyle. The quest for a truly satisfying gluten free corn dogs experience often ends in disappointment, with store-bought versions falling short on texture or flavor, if they’re even available at all. What I discovered is that replicating that classic taste and feel at home is not only possible but surprisingly straightforward. This recipe isn’t just a gluten-free alternative; it’s a celebration of that iconic American snack, crafted to deliver all the crispy, savory goodness without compromise. Forget the days of longing glances at fair food; with a few simple ingredients and a little kitchen magic, you can recreate that beloved treat right in your own home. Trust me on this one, your taste buds are in for a delightful trip down memory lane, reimagined for modern dietary needs. This guide will walk you through every step to achieve that perfect golden crunch and juicy interior.
Why You’ll Absolutely Love This Gluten-Free Corn Dog Recipe
Finally, a gluten-free corn dog recipe that actually delivers on taste and texture! For years, I’ve been on a mission to recreate those childhood carnival memories without the gluten, and trust me, it wasn’t easy. Many attempts resulted in crumbly coatings or bland flavors, a far cry from the golden-brown perfection I remembered. What I discovered is that achieving that classic crispiness and soft, fluffy interior requires a careful balance of ingredients and technique. This recipe isn’t just a substitute; it’s a celebration of comfort food, reimagined for modern dietary needs. It brings back the joy of biting into a perfectly battered hot dog, complete with that satisfying crunch, all while being completely gluten-free. You’ll find yourself wondering why you ever settled for less, proving that dietary restrictions don’t mean sacrificing flavor or fun. This isn’t merely a recipe; it’s an invitation to reclaim a beloved classic, made accessible for everyone at your table. It’s about creating new memories around a familiar, comforting treat.
Why You’ll Absolutely Love This Gluten-Free Corn Dog Recipe
I always strive for recipes that don’t just meet dietary needs but truly excel in flavor and experience. This gluten-free corn dog recipe is a perfect example of that philosophy. You’ll notice that the exterior achieves that coveted golden-brown crispiness, a hallmark of a truly great corn dog, without any of the gluten-laden ingredients. The interior remains wonderfully fluffy and tender, providing a delightful contrast to the outer crunch. This textural harmony perfectly encases a juicy, flavorful hot dog, ensuring every bite is a nostalgic delight.
Here’s the thing, many gluten-free corndog recipes fall short on authenticity. They might taste “okay,” but they rarely capture the essence of the original. This recipe, however, was developed with an unwavering commitment to replicating that classic taste. It’s designed to be dietary friendly without asking you to compromise on the deliciousness you crave. We’re not just removing gluten; we’re enhancing the overall experience. This makes it an ideal choice for anyone with sensitivities or those simply looking for a healthier alternative to traditional fried foods. Building on this, the straightforward steps make it simple and fun to make. It’s an ideal project for a weekend afternoon with the family, allowing everyone to get involved in the cooking process. The simplicity also means less stress in the kitchen and more time enjoying your culinary creation.
The secret is its inherent customizability. You can easily adapt this recipe to suit various preferences. Experiment with different types of hot dogs – from all-beef to chicken or even plant-based options – to find your family’s favorite combination. Furthermore, the batter serves as a fantastic canvas for various dipping sauces, whether you prefer classic ketchup and mustard or something more adventurous like a sriracha mayo. This adaptability ensures that the recipe remains fresh and exciting every time you prepare it. In my kitchen, I’ve found that homemade always tastes better than store-bought, and this recipe reinforces that belief. You control the quality of every ingredient, from the hot dogs to the frying oil, ensuring a fresh, high-quality product free from questionable additives. This dedication to fresh ingredients translates directly into superior flavor and a more satisfying eating experience.
Ingredients Overview
Crafting the perfect gluten-free corn dog starts with understanding the role of each ingredient. The foundation of our batter is a careful blend of gluten-free all-purpose flour and fine cornmeal. Trust me on this one, the type of cornmeal matters significantly here. Using a fine-ground cornmeal ensures a smoother batter and a more consistent, less gritty texture in the final product. Coarse cornmeal can lead to a crumbly coating that doesn’t adhere well to the hot dogs. This combination provides the structure and classic corn flavor that defines a great corn dog.
Next, we incorporate leavening agents: baking powder and a touch of baking soda. These two work in tandem to give the batter its characteristic fluffy, airy texture. Without them, the coating would be dense and heavy, losing that light, crispy quality we’re aiming for. A common mistake is using too much leavening, which can lead to an overly bubbly batter that absorbs too much oil. We’re looking for just the right lift. Worth noting here is the addition of granulated sugar. While it might seem counterintuitive for a savory item, a small amount of sugar is crucial for two reasons: it enhances the cornmeal’s natural sweetness and, most importantly, it aids in achieving that beautiful golden-brown color during frying. Without it, the corn dogs can look pale and unappetizing.
For the liquid components, we use milk and an egg. The milk, whether dairy or a non-dairy alternative, binds the dry ingredients together, creating a smooth, pourable batter. The egg acts as a binder and also contributes to the batter’s richness and structure. It helps the coating adhere to the hot dogs and provides a slight tenderness. The key difference is the choice of hot dogs. I always recommend using all-beef hot dogs for their robust flavor and firm texture, which holds up well during frying. However, you can certainly experiment with chicken, turkey, or even plant-based frankfurters if you prefer. Just ensure they are of good quality and fully cooked before coating.
Finally, we need salt for seasoning and vegetable oil for frying. Salt balances the flavors in the batter, preventing it from tasting bland. For frying, a neutral-flavored oil with a high smoke point, like canola or sunflower oil, is essential. This ensures the corn dogs fry evenly without imparting any unwanted flavors. In practice, the oil temperature is paramount for achieving that perfectly crisp exterior. Too low, and the corn dogs will absorb excess oil; too high, and they’ll brown too quickly on the outside, leaving the inside raw. Each ingredient plays a vital role in creating this irresistible treat.
Instructions
Before you even think about mixing batter, proper hot dog preparation is essential. First, pat your hot dogs thoroughly dry with paper towels. Any excess moisture will prevent the batter from adhering properly, leading to a patchy, inconsistent coating. This simple step makes a huge difference. Next, insert a wooden skewer or popsicle stick about three-quarters of the way into each hot dog. Ensure the stick is firmly embedded to prevent the hot dog from slipping off during frying.
- In a large bowl, whisk together the gluten-free all-purpose flour, fine cornmeal, granulated sugar, baking powder, and salt. Make sure there are no lumps; a well-combined dry mix leads to a smooth batter.
- In a separate medium bowl, whisk the milk and egg until thoroughly combined. The egg should be fully incorporated into the milk for an even consistency.
- Pour the wet ingredients into the dry ingredients. Whisk until just combined. A few small lumps are acceptable; do not overmix, as this can develop the gluten-free flours too much, leading to a tough batter. The batter should be thick enough to coat a hot dog generously.
- Pour the batter into a tall, narrow glass or container. A pint glass or a tall measuring cup works perfectly for this, as it allows for easy and even coating of the hot dogs.
- Heat at least 3 inches of vegetable oil in a large, heavy-bottomed pot or Dutch oven to 350°F (175°C). Use a deep-fry thermometer to monitor the temperature precisely; maintaining a consistent temperature is crucial for perfectly cooked corn dogs. Learn more about safe deep-frying practices here.
- Carefully dip one hot dog at a time into the batter, ensuring it is completely coated. Let any excess batter drip off back into the container.
- Gently lower the coated hot dog into the hot oil. Fry 2-3 corn dogs at a time, depending on the size of your pot, to avoid overcrowding. Overcrowding lowers the oil temperature, resulting in greasy corn dogs.
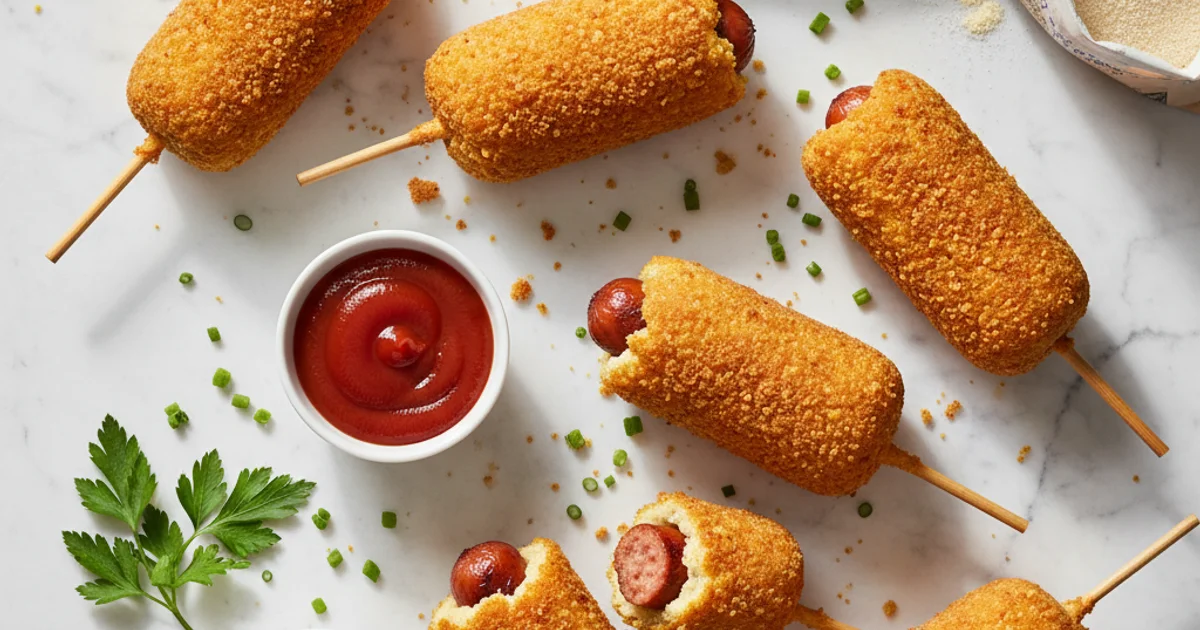
- Fry for 3-5 minutes, turning occasionally, until the batter is golden brown and crispy on all sides. The color should be rich and even.
- Using tongs, carefully remove the fried corn dogs from the oil. Transfer them to a wire rack set over a baking sheet to drain any excess oil.
- Repeat with the remaining hot dogs and batter. Serve immediately with your favorite dipping sauces.
Pro Tips for Perfect Gluten-Free Corn Dogs
Achieving the perfect gluten-free corn dog isn’t just about following the steps; it’s about understanding the nuances. Here’s what actually works in my kitchen. First, oil temperature is non-negotiable. I always use a reliable deep-fry thermometer and aim for a consistent 350°F (175°C). If the oil is too cool, your corn dogs will absorb too much oil, becoming greasy and heavy. If it’s too hot, the exterior will burn before the inside is cooked through, leaving a raw, doughy center. Constantly monitor and adjust the heat as needed to maintain that sweet spot.
Another crucial tip involves the hot dogs themselves. Make sure they are completely dry before dipping. I even give them a final pat down right before dipping them into the batter. Any moisture will create steam, preventing the batter from adhering properly and resulting in a patchy, uneven coating. This small detail truly impacts the final appearance and texture. Furthermore, consider chilling your hot dogs before battering. A colder hot dog helps the batter set more quickly when it hits the hot oil, leading to a crisper exterior.
Worth noting here is the batter consistency. It should be thick enough to cling to the hot dog without dripping off excessively, but not so thick that it becomes clumpy. If your batter seems too thick, add milk one teaspoon at a time until it reaches the right consistency – like a thick pancake batter. Conversely, if it’s too thin, a tablespoon of extra gluten-free flour can help. The secret is to find that perfect balance. Also, don’t underestimate the power of a tall, narrow dipping vessel. A pint glass or a tall measuring cup allows you to fully submerge the hot dog in one smooth motion, ensuring a complete and even coating. This avoids the frustration of trying to roll a hot dog in a shallow bowl of batter.
Finally, don’t overcrowd the pot. Frying too many corn dogs at once will drastically drop the oil temperature, leading to undercooked, greasy results. Fry in small batches, typically 2-3 at a time, allowing the oil to recover its temperature between batches. This patience is rewarded with beautifully golden, uniformly cooked treats. These small adjustments elevate your homemade gluten-free corn dogs from good to truly exceptional.
Storage
Proper storage is key to enjoying your homemade gluten-free corn dogs beyond their initial serving. Once fried, allow them to cool completely on a wire rack. This prevents condensation, which can make the coating soggy. Never store them while still warm.
Here’s how I handle leftovers in my kitchen:
- Refrigeration: Place cooled corn dogs in an airtight container or a resealable bag. They will keep well in the refrigerator for up to 3-4 days. For best results, separate layers with parchment paper to prevent sticking.
- Freezing: For longer storage, these corn dogs freeze beautifully. Once completely cool, arrange them in a single layer on a baking sheet and freeze until solid (about 2-3 hours). This flash-freezing prevents them from sticking together. Transfer the frozen corn dogs to a freezer-safe bag or container, removing as much air as possible. They can be stored in the freezer for up to 2-3 months.
When reheating, avoid the microwave, as it tends to make the coating soft and chewy. For the best texture, I always recommend using either an oven or an air fryer.
- Oven Reheating: Preheat your oven to 375°F (190°C). Place frozen corn dogs directly on a baking sheet. Bake for 15-20 minutes, or until heated through and crispy. If reheating from thawed, reduce baking time to 10-12 minutes.
- Air Fryer Reheating: Preheat your air fryer to 350°F (175°C). Place frozen corn dogs in a single layer in the air fryer basket. Cook for 8-12 minutes, flipping halfway through, until hot and crispy. Thawed corn dogs will take 5-8 minutes.
Following these storage and reheating guidelines ensures that your gluten-free corn dogs retain their delicious crispiness and flavor, making them a convenient treat even days or weeks later.
Variations
What I love about this recipe is its incredible versatility. While the classic gluten-free corn dog is fantastic on its own, you can easily adapt it to suit different tastes and occasions. Here are a few variations I’ve explored in my kitchen.
- Mini Corn Dogs: For appetizers or party snacks, simply cut standard hot dogs into thirds or quarters before skewering. Adjust frying time to 2-3 minutes, watching carefully for that golden brown perfection. These are always a hit at gatherings.
- Spicy Kick: Infuse the batter with a little heat by adding a teaspoon of smoked paprika, a pinch of cayenne pepper, or even a dash of your favorite hot sauce. This adds a subtle warmth that complements the savory hot dog beautifully.
- Cheese-Stuffed: For an extra layer of indulgence, carefully make a slit lengthwise down the center of each hot dog (without cutting all the way through). Insert a thin strip of cheddar or mozzarella cheese. This creates a gooey, cheesy surprise inside the crispy coating.
- Herb-Infused Batter: Elevate the flavor profile by incorporating finely chopped fresh herbs into the batter. Chives, parsley, or even a hint of thyme can add a fragrant, gourmet touch. Start with a tablespoon of fresh herbs and adjust to your preference.
- Sweet & Savory: For a truly unique twist, add an extra tablespoon of sugar to the batter and serve with a side of maple syrup or a honey-mustard dipping sauce. The slight sweetness of the batter pairs surprisingly well with the savory hot dog.
- Vegetarian/Vegan Option: Replace the hot dogs with your favorite plant-based frankfurters. For a fully vegan version, substitute the milk with a non-dairy milk (like almond or soy) and use a flax egg (1 tablespoon ground flaxseed meal mixed with 3 tablespoons water, let sit for 5 minutes) instead of a chicken egg. Ensure your plant-based frankfurters are suitable for frying.
Each of these variations offers a distinct flavor or presentation, making this recipe endlessly adaptable. Experiment and find your new favorite way to enjoy this comforting classic.
Essential Ingredients for Your Gluten-Free Corn Dogs: Understanding Each Component
Let’s dive into the core components that make this recipe sing, especially when considering the “are corn dogs gluten free” question. Each ingredient plays a vital role in achieving that classic, comforting taste and texture. I always recommend sourcing the best quality ingredients you can find; it truly makes a difference in the final product.
First up is Gluten-Free Cornmeal. This isn’t just any cornmeal; for the best texture in your gluten free corn dogs, I specifically recommend a medium-grind yellow cornmeal. Fine-ground can make the batter too dense, while coarse can be gritty. The medium grind provides that ideal balance of slight chewiness and tender crumb that defines a great corn dog. It’s naturally gluten-free, but always double-check packaging for cross-contamination warnings if you have severe sensitivities. This forms the backbone of our batter, imparting that signature sweet corn flavor.
Next, we have a Gluten-Free All-Purpose Flour Blend. Here’s the thing: you can’t just substitute regular wheat flour with a single gluten-free flour like rice flour. Most successful gluten-free baking relies on a blend of different flours and starches. Look for a commercial blend that typically contains rice flour, tapioca starch, and potato starch. These blends are formulated to mimic the structure and texture of wheat flour. Using a single gluten-free flour will likely result in a crumbly or overly dense batter, which we definitely want to avoid for a perfect hot dog stick recipe.
Baking Powder is our essential leavening agent. It’s what gives the batter its lift and creates those delightful, airy pockets within the coating. Without it, your corn dogs would be flat and heavy. Worth noting here, always ensure your baking powder is fresh; old baking powder loses its potency, and your corn dogs won’t get the rise they deserve.
A touch of Sugar is crucial. It doesn’t make the corn dogs overtly sweet, but rather balances the savory hot dog and the earthy cornmeal. It also aids in achieving that beautiful golden-brown color during frying, giving the crust a lovely caramelized finish. In practice, just a small amount makes a big impact on overall flavor complexity.
Salt is another flavor enhancer. It brings out the best in all the other ingredients, from the cornmeal to the hot dog itself. Don’t skip it, even if you’re watching your sodium intake; a little goes a long way in making this dish truly satisfying.
For binding and richness, we incorporate Eggs. They act as an emulsifier, holding the batter together and contributing to a tender texture. They also add a subtle richness that complements the other flavors. I always use large eggs for consistency in my recipes.
Buttermilk is a secret weapon in many fried batters. Its acidity reacts with the baking powder, creating extra lift and tenderness. It also imparts a subtle tang that brightens the entire flavor profile. If you’re dairy-free, you can easily make a substitute by adding a tablespoon of lemon juice or white vinegar to regular plant-based milk (like almond or soy milk) and letting it sit for five minutes until it curdles slightly. This simple swap ensures everyone can enjoy this classic treat.
The star of the show, of course, is the Hot Dog. This is where the “are corn dogs gluten free” question is most critical for many. While many hot dogs are naturally gluten-free, you must always check the label to ensure there are no hidden gluten-containing ingredients or cross-contamination warnings. I prefer all-beef hot dogs for their robust flavor, but feel free to use your favorite variety, as long as it’s certified gluten-free. Trust me on this one, a good quality hot dog elevates the entire experience.
You’ll also need Wooden Skewers or Hot Dog Sticks. These are essential for handling and frying your gluten free corn dogs. I recommend using 6-inch skewers. If you plan on deep-frying, it’s a good idea to pre-soak them in water for at least 30 minutes. This prevents them from burning in the hot oil and makes them easier to handle.
Finally, Oil for Frying is paramount. You need an oil with a high smoke point to achieve that perfect crispy exterior without burning. My go-to choices include canola oil, vegetable oil, or peanut oil. Make sure you have enough oil to submerge the corn dogs completely for even cooking and that satisfying sizzle. Each component, carefully selected, builds towards the ultimate nostalgic bite.
Equipment You’ll Need for Perfect Homemade Gluten-Free Corn Dogs
In my kitchen, having the right tools makes all the difference, especially when tackling a classic like this. Achieving that perfectly crisp, golden exterior on your homemade gluten-free corn dogs truly hinges on a few key pieces of equipment. You might already have many of these on hand, but a couple are non-negotiable for safety and success.
- Deep Pot or Dutch Oven: This is essential for safe and effective deep frying. A heavy-bottomed pot with high sides minimizes splattering and helps maintain a consistent oil temperature. I always reach for my cast iron Dutch oven for its excellent heat retention.
- Candy/Deep Fry Thermometer: Trust me on this one; this is crucial for maintaining consistent oil temperature. Without it, you’re guessing, and that leads to either soggy or burnt corn dogs. Aim for a steady 350-375°F (175-190°C) for optimal results.
- Whisk: A good whisk is your best friend for combining dry and wet ingredients smoothly. It helps eliminate lumps in your batter, ensuring a uniform coating on each hot dog.
- Large Mixing Bowls: You’ll need at least two: one for your dry ingredients and another for your wet components, then a third for the final batter. This organizational step makes the process much cleaner.
- Tongs or Spider Skimmer: These tools are vital for safely handling hot dogs in hot oil. A spider skimmer is particularly good for gently lowering and removing them without damaging the coating.
- Paper Towel-Lined Plate/Wire Rack: After frying, you’ll want to place your finished treats on one of these to drain excess oil. A wire rack allows for air circulation, keeping them crisp.
- Measuring Cups and Spoons: For any baking, and especially with gluten-free flours, accurate ingredient ratios are paramount. Precision here ensures your batter has the right consistency.
- Tall Glass or Mason Jar: This is a crucial tip for dipping your hot dogs. A tall, narrow container filled with batter allows for an even, thick coating on the hot dogs, minimizing waste and mess.
- Wooden Skewers/Hot Dog Sticks: Of course, you can’t have a hot dog stick recipe without the sticks! These provide the classic presentation and make them easy to eat. What I discovered is that sturdy, pointed sticks make insertion much easier.
Having these items ready before you start will streamline your cooking process and contribute significantly to the success of this recipe.
Step-by-Step Instructions: Mastering Your Gluten-Free Hot Dog Stick Recipe
-
Prep the Hot Dogs & Skewers: Begin by gently patting the hot dogs completely dry with a paper towel to ensure the batter adheres properly, then carefully insert a wooden skewer into the center of each hot dog, and if you plan on deep frying, remember to pre-soak your wooden skewers in water for at least 30 minutes to prevent them from burning.
-
Whisk Dry Ingredients: In a large mixing bowl, combine the gluten-free cornmeal, your preferred gluten-free all-purpose flour blend, baking powder, granulated sugar, and a pinch of salt, then whisk these dry ingredients thoroughly until they are well combined and lump-free.
-
Whisk Wet Ingredients: In a separate medium-sized bowl, crack in your eggs and pour in the buttermilk, then whisk these wet ingredients together until they are smooth and fully incorporated.
-
Combine Wet & Dry: Pour the wet ingredients into the bowl with the dry ingredients. Mix gently with a whisk or spatula until just combined. A few small lumps are perfectly fine; overmixing can lead to tough corn dogs.
-
Prepare for Dipping: Carefully pour the prepared batter into a tall, narrow glass or mug. This will make it much easier to fully coat your hot dogs.
-
Heat the Oil: In a large, heavy-bottomed pot or deep fryer, heat about 3-4 inches of vegetable oil (or your preferred frying oil) to a temperature of 350-375°F (175-190°C). Use a candy thermometer or deep-fry thermometer to accurately monitor the temperature, and always exercise extreme caution when working with hot oil.
-
Dip & Fry: Carefully dip each hot dog, ensuring it is evenly coated with the cornmeal batter. Gently place the coated hot dog into the preheated oil, being mindful not to overcrowd the pot. Fry the corn dogs for 2-4 minutes, or until they achieve a beautiful golden brown color and the batter is cooked through. Fry in small batches to maintain optimal oil temperature and ensure even cooking.
-
Drain & Serve: Once golden brown, carefully remove the corn dogs from the hot oil using tongs and transfer them to a paper towel-lined plate or a wire rack set over a baking sheet to drain any excess oil. Serve these delicious gluten-free corn dogs immediately with your favorite dipping sauces.
Pro Tips & Tricks for the Best Gluten-Free Corn Dogs Every Time
Here’s the thing, achieving that perfect golden-brown crust and juicy interior for your gluten free corn dogs isn’t just about following the steps; it’s about understanding the nuances. I always tell my readers that small details make a big difference in the kitchen. In my kitchen, paying attention to these specific elements has consistently elevated this dish from good to truly exceptional.
Oil Temperature is Key: Trust me on this one, using a thermometer is non-negotiable for frying. Maintaining a consistent temperature, ideally between 350-375°F (175-190°C), prevents your corn dogs from becoming either greasy and undercooked or burnt on the outside and raw inside. A common mistake is guessing the oil temperature, which leads to inconsistent results and a less enjoyable treat. For more on proper deep-frying techniques, you might find this guide helpful: Deep Frying Basics.
Don’t Overmix the Batter: The secret is to mix your batter just until the dry and wet ingredients are combined. Overmixing develops the starches in the gluten-free flour, leading to a tough and chewy coating rather than the light, crispy texture you desire. You’ll notice that a slightly lumpy batter is actually preferable here; it ensures a tender finish.
Pat Hot Dogs Dry: This step is crucial for ensuring the batter adheres properly to the hot dogs. Any residual moisture will create a barrier, causing the batter to slide off during dipping or frying. I always use paper towels to thoroughly dry each hot dog stick recipe candidate before it goes anywhere near the batter.
Use a Tall Glass for Dipping: In practice, a tall, narrow glass or container is far superior to a wide bowl for dipping. This shape allows for an even, consistent coating of batter around the entire hot dog. It minimizes waste and ensures every part of the hot dog is perfectly enrobed in that delicious batter.
Don’t Overcrowd the Pot: This is a golden rule of frying. Adding too many corn dogs at once drastically lowers the oil temperature. This leads to soggy, oil-logged results because the batter doesn’t cook quickly enough to form a crisp crust. Fry in batches, giving each corn dog enough space to cook undisturbed.
Choose the Right Hot Dogs: What I discovered is that the quality of your hot dog truly shines through in this recipe. Opt for high-quality, all-beef hot dogs that are certified gluten-free. This ensures both a superior flavor and peace of mind for those with dietary restrictions. Building on this, make sure they are standard size, as jumbo hot dogs can be difficult to coat evenly.
Test Batch: Worth noting here is the importance of a test fry. Always fry one corn dog first to check both your batter consistency and oil temperature. This allows you to make any necessary adjustments before committing your entire batch. It’s a small step that saves a lot of potential frustration.
Skewers: The key difference is using sturdy wooden skewers that can withstand the frying process without burning or breaking. If you’re using very thin skewers, you might consider pre-soaking them in water for about 30 minutes. This helps prevent them from scorching in the hot oil, ensuring they remain intact for easy handling.
Enjoyed this recipe? Share it with a friend or save it to your board for later. Leave a comment below — I love hearing how it turned out!
You May Also Enjoy





You Might Also Love These 🍽️
Recipes picked just for you based on what you’re cooking