Fluffy Gluten-Free Muffins: Your New Go-To Recipe
Discover the ultimate gluten free muffin mix recipe for fluffy, flavorful muffins. Perfect for gluten free dairy free muffins and even gluten free mini muffins!
- 1Introduction: Say Goodbye to Dry, Crumbly Gluten-Free Muffins!
- 2Why You’ll Love This Homemade Gluten Free Muffin Mix Recipe
- 3Ingredients Overview: Crafting the Perfect Gluten Free Muffin Mix Base
- 4Essential Equipment You’ll Need for Flawless Gluten Free Muffins
- 5Step-by-Step Instructions: From Mix to Delicious Gluten Free Muffins
- 6Pro Tips & Tricks for the Best Gluten Free Muffin Recipes
- 7Pro Tips & Tricks for the Best Gluten Free Muffin Recipes
Ingredients
For the Gluten-Free Muffin Mix (Dry Ingredients)
- 1 ½ cups (180g) gluten-free all-purpose flour blend (with xanthan gum)
- ½ cup (60g) tapioca starch
- ½ cup (60g) potato starch (not flour)
- ½ cup (100g) granulated sugar
- 2 tsp baking powder
- ½ tsp baking soda
- ½ tsp salt
- 1 tsp xanthan gum (if not in your flour blend)
For the Muffins (Wet Ingredients & Add-ins)
- 1 large egg, room temperature
- ¾ cup (180ml) milk (dairy or non-dairy for gluten free dairy free muffins)
- ¼ cup (60ml) neutral oil (e.g., canola, melted coconut oil, or melted butter)
- 1 tsp vanilla extract
- 1 cup fresh or frozen berries (e.g., blueberries, raspberries)
Instructions
Instructions
Whisk together dry gluten-free muffin mix ingredients.
Instructions
Store dry mix or proceed to bake.
Instructions
Preheat oven and prepare muffin tin.
Instructions
Whisk wet ingredients in a separate bowl.
Instructions
Add dry mix to wet ingredients; mix until just combined.
Instructions
Gently fold in berries or other add-ins.
Instructions
Fill muffin cups ¾ full.
Instructions
Bake until golden and cooked through.
Instructions
Cool on a wire rack.
Equipment You'll Need
Here's what I use to make this recipe perfectly every time:
- Large Mixing Bowls — I always use at least two. One for your dry ingredients, allowing ample space for whisking without spills, and another for your wet components. This separation prevents any lumps and ensures everything is properly incorporated. → Buy Now
- Whisk — A good whisk is indispensable. It aerates your dry ingredients, breaking up any clumps in the flours and distributing leavening agents evenly. This step is crucial for light, airy gluten free muffins near me. → Buy Now
- Rubber Spatula or Wooden Spoon — The secret is in gentle mixing. These tools help you fold the wet into the dry without overworking the batter, which can lead to tough muffins. Over-mixing is a common mistake in gluten-free baking. → Buy Now
- Measuring Cups & Spoons — Accuracy is paramount in baking, particularly with gluten-free flours. Precise measurements ensure the correct balance of ingredients, leading to consistent results every time. Trust me on this one; slight variations can alter the final texture significantly. → Buy Now
- Muffin Tin (Standard or Mini) — A standard 12-cup muffin tin is a kitchen staple. If you’re making gluten free mini muffins, a mini muffin tin is essential, but remember that baking times will be much shorter. What I love about this is the versatility. → Buy Now
- Paper Liners or Non-Stick Spray — These prevent sticking and make cleanup a breeze. I prefer paper liners for easy grab-and-go treats, but a good non-stick spray works just as well for gluten free dairy free muffins. This ensures your beautiful creations release cleanly from the pan. → Buy Now
- Wire Rack — Cooling your muffins on a wire rack is critical. It allows air to circulate around them, preventing the bottoms from becoming soggy due to trapped steam. This simple step preserves that perfect texture. → Buy Now
Recipe FAQs
What is the best gluten free flour for muffins?
Can I make these gluten free dairy free muffins?
How do I prevent my gluten-free muffins from being dry or crumbly?
Can I use this gluten free muffin mix to make gluten free mini muffins?
How long do homemade gluten-free muffins last?
Why is xanthan gum important in gluten-free muffin recipes?
Fluffy Gluten-Free Muffins: Your New Go-To Recipe
Discover the ultimate gluten free muffin mix recipe for fluffy, flavorful muffins. Perfect for gluten free dairy free muffins and even gluten free mini muffins!
Prep Time
15 min
Cook Time
25 min
Total Time
40 min
For the Gluten-Free Muffin Mix (Dry Ingredients)
- 1 ½ cups (180g) gluten-free all-purpose flour blend (with xanthan gum)
- ½ cup (60g) tapioca starch
- ½ cup (60g) potato starch (not flour)
- ½ cup (100g) granulated sugar
- 2 tsp baking powder
- ½ tsp baking soda
- ½ tsp salt
- 1 tsp xanthan gum (if not in your flour blend)
For the Muffins (Wet Ingredients & Add-ins)
- 1 large egg, room temperature
- ¾ cup (180ml) milk (dairy or non-dairy for gluten free dairy free muffins)
- ¼ cup (60ml) neutral oil (e.g., canola, melted coconut oil, or melted butter)
- 1 tsp vanilla extract
- 1 cup fresh or frozen berries (e.g., blueberries, raspberries)
Introduction: Say Goodbye to Dry, Crumbly Gluten-Free Muffins!
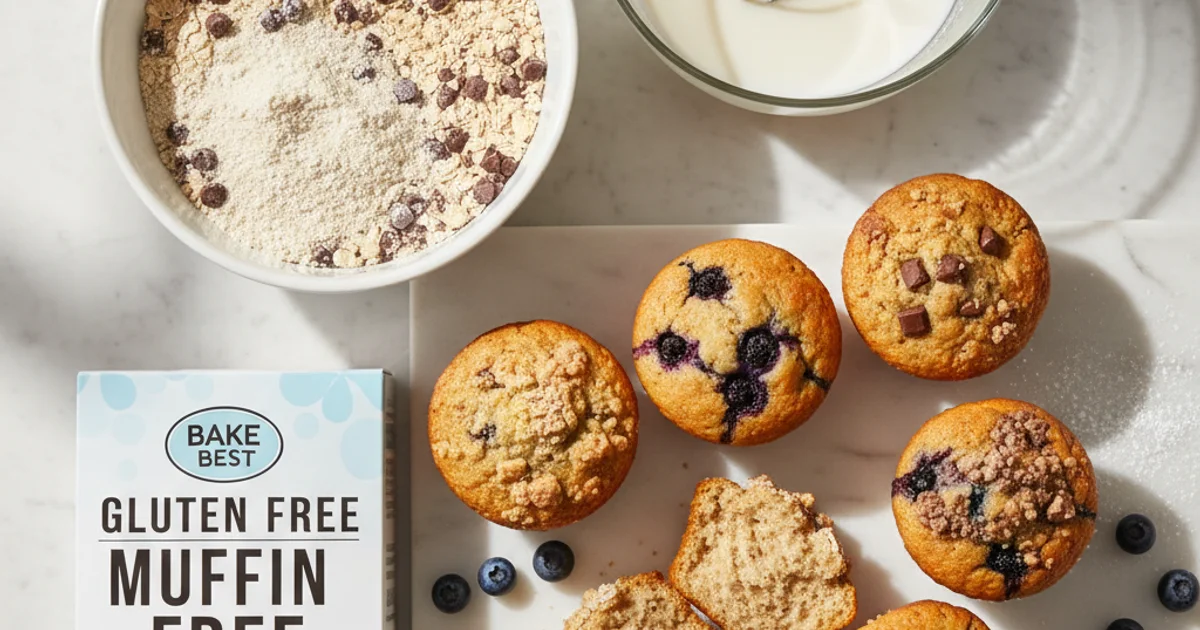
Finding truly satisfying gluten-free baked goods can often feel like a quest, especially when it comes to muffins. I’ve heard countless stories, and experienced it myself, of dense, crumbly, or frankly flavorless attempts that leave you wishing you’d just stuck to fruit. The supermarket shelves are full of options, but often store-bought versions are either loaded with sugar or have an unappealing, gummy texture. What I love about baking at home is the control it gives you over ingredients and, crucially, the final product’s quality. This is particularly true when you’re dealing with specific dietary needs.
Here’s the thing, many people assume that “gluten-free” automatically means a compromise on taste or texture. That’s simply not true anymore. With the right blend of flours and a thoughtful approach, you can create treats that rival, and often surpass, their gluten-containing counterparts. This recipe isn’t just about avoiding gluten; it’s about crafting a genuinely delightful muffin experience. We’re talking about muffins that are wonderfully moist, boast a tender crumb, and are bursting with flavor. The secret lies in a well-balanced homemade gluten free muffin mix, which allows for incredible convenience. Imagine having a ready-to-go base that transforms into bakery-worthy muffins with just a few wet ingredients. This foundational mix takes the guesswork out of gluten-free baking and ensures consistently excellent results every single time. Get ready to bake muffins that will impress everyone, regardless of their dietary preferences. This simple approach to creating your own mix makes baking accessible and truly enjoyable.
Why You’ll Love This Homemade Gluten Free Muffin Mix Recipe
Here’s the thing, many store-bought options for this treat often disappoint. They can be dry, dense, or have an odd aftertaste. My recipe, however, guarantees a consistently soft, airy crumb that rivals any traditional bakery muffin. You’ll notice that the texture is never gummy, which is a common pitfall when working with alternative flours.
Building on this, what I genuinely appreciate about this recipe is its incredible versatility. Once you have this foundational blend, you can explore countless flavor profiles. Imagine starting with this base and effortlessly transforming it into rich chocolate chip muffins one day, then savory herb and cheese muffins the next. It’s perfect for whipping up a batch of gluten free mini muffins for a party, or full-sized ones for breakfast.
The key difference is how this blend caters to various dietary preferences without sacrificing flavor or quality. I always strive for recipes that are inclusive, and this one shines. You can easily adapt it to create gluten free dairy free muffins by simply swapping out milk and butter for plant-based alternatives. This makes it an excellent choice for those navigating multiple food sensitivities, ensuring everyone can enjoy a warm, homemade treat.
In practice, making your own mix at home is also incredibly budget-friendly. Pre-made mixes, especially specialized ones, can be quite expensive. By assembling your own, you save money and gain complete control over the ingredients. This means no artificial flavors, preservatives, or excessive sugars that are often found in commercial products. It’s a fresher, healthier option all around.
What I discovered is that even novice bakers will find this recipe incredibly straightforward. I’ve designed it with clarity in mind, breaking down each step to ensure success. From measuring your flours to understanding how to properly combine wet and dry ingredients, I walk you through it. This ensures that every batch of these delicious muffins turns out perfectly, building your confidence in gluten-free baking.
Ingredients Overview: Crafting the Perfect Gluten Free Muffin Mix Base
In my kitchen, I’ve learned that the foundation of any outstanding bake lies in understanding your ingredients. For this particular recipe, selecting the right components for your gluten free muffin mix is paramount. We’re aiming for a texture that rivals traditional muffins, not just a passable substitute.
Building on this, let’s break down the core elements. Our gluten-free flour blend is where the magic truly begins. I always opt for a combination of flours because no single gluten-free flour can replicate the complex properties of wheat. White rice flour provides structure without being too heavy, giving your muffins a sturdy yet tender crumb. It’s a workhorse in gluten-free baking. Then there’s tapioca starch, which contributes a lovely chewiness and helps bind everything together. It gives that slight elasticity we miss when gluten is absent. Finally, potato starch is key for moisture retention, ensuring your muffins stay soft and don’t dry out quickly. This trio works in harmony to create a balanced base.
The key difference is the inclusion of xanthan gum. This isn’t just an optional extra; it’s a vital gluten substitute. It provides the necessary elasticity and binding power that gluten typically offers. Without it, your muffins would be crumbly and fall apart. A small amount makes a huge impact on the final texture, giving that satisfying springiness.
For lift and tenderness, we rely on both baking powder and baking soda. Baking powder is a double-acting leavening agent, creating gas bubbles when wet and again when heated. Baking soda, on the other hand, needs an acid to react with, which we’ll introduce later in the wet ingredients. Together, they ensure a beautifully risen, airy muffin.
Next, sugar plays multiple roles beyond just sweetness. Whether you choose granulated sugar or coconut sugar, it contributes to browning, giving your muffins those appealing golden edges. It also helps retain moisture, keeping them soft for longer. I find that a moderate amount strikes the perfect balance.
Finally, salt might seem minor, but it’s crucial for balancing all the flavors. It enhances the sweetness and prevents the muffins from tasting bland. Just a pinch can elevate the entire profile. For added convenience, I often pre-mix spices like cinnamon or nutmeg directly into my dry mix. This means less measuring later when you’re ready to bake, making quick gluten free muffin recipes even quicker.
Essential Equipment You’ll Need for Flawless Gluten Free Muffins
In my kitchen, having the right tools makes all the difference, especially when tackling a new recipe. You don’t need a professional setup to create delectable treats. Here’s what actually works: a few basic items ensure your baking journey is smooth and successful.
- Large Mixing Bowls: I always use at least two. One for your dry ingredients, allowing ample space for whisking without spills, and another for your wet components. This separation prevents any lumps and ensures everything is properly incorporated.
- Whisk: A good whisk is indispensable. It aerates your dry ingredients, breaking up any clumps in the flours and distributing leavening agents evenly. This step is crucial for light, airy gluten free muffins near me.
- Rubber Spatula or Wooden Spoon: The secret is in gentle mixing. These tools help you fold the wet into the dry without overworking the batter, which can lead to tough muffins. Over-mixing is a common mistake in gluten-free baking.
- Measuring Cups & Spoons: Accuracy is paramount in baking, particularly with gluten-free flours. Precise measurements ensure the correct balance of ingredients, leading to consistent results every time. Trust me on this one; slight variations can alter the final texture significantly.
- Muffin Tin (Standard or Mini): A standard 12-cup muffin tin is a kitchen staple. If you’re making gluten free mini muffins, a mini muffin tin is essential, but remember that baking times will be much shorter. What I love about this is the versatility.
- Paper Liners or Non-Stick Spray: These prevent sticking and make cleanup a breeze. I prefer paper liners for easy grab-and-go treats, but a good non-stick spray works just as well for gluten free dairy free muffins. This ensures your beautiful creations release cleanly from the pan.
- Wire Rack: Cooling your muffins on a wire rack is critical. It allows air to circulate around them, preventing the bottoms from becoming soggy due to trapped steam. This simple step preserves that perfect texture.
Step-by-Step Instructions: From Mix to Delicious Gluten Free Muffins
Here are steps 1 to 3 for your recipe:
-
Prepare Your Gluten Free Muffin Mix: In a large bowl, whisk together 2 cups of your chosen gluten-free flour blend (ensure it contains xanthan gum or add 1/2 teaspoon separately), 1/2 cup granulated sugar, 2 teaspoons baking powder, 1/2 teaspoon baking soda, and 1/4 teaspoon salt until thoroughly combined. For future use, store this dry mix in an airtight container at room temperature for up to 3 months, ready to be transformed into delicious muffins at a moment’s notice.
-
Preheat & Prep: Preheat your oven to 375°F (190°C). Line a 12-cup muffin tin with paper liners or grease each cup thoroughly with non-stick cooking spray or butter to prevent sticking.
-
Combine Wet Ingredients: In a separate medium bowl, whisk together 1 cup of your preferred dairy-free milk (such as almond, soy, or oat milk), 2 large eggs, and 1/3 cup of a neutral-flavored oil (like vegetable, canola, or melted coconut oil) until the mixture is smooth and well-incorporated, forming the liquid base for your gluten-free, dairy-free muffins.
-
Incorporate Dry Mix: Gradually add the prepared gluten-free muffin mix to the wet ingredients. Using a spatula, gently fold the dry into the wet until just combined. It’s crucial not to overmix; a few lumps are perfectly fine and will result in a more tender muffin. Overmixing develops gluten (even in gluten-free flours, it can make baked goods tough) and can lead to a dense, chewy texture.
-
Add Flavorings (Optional): If you’re adding extras like fresh berries, chocolate chips, nuts, or citrus zest, gently fold them into the batter now. Do this with a light hand to avoid crushing delicate ingredients like berries or overmixing the batter.
-
Fill Muffin Cups: Evenly distribute the batter among your prepared muffin cups. For standard-sized muffins, fill each cup about two-thirds full, allowing room for them to rise. If you’re making gluten-free mini muffins, fill each cup about three-quarters full.
-
Bake: Carefully transfer the muffin tin to the preheated oven. For standard-sized muffins, bake for 18-22 minutes. For mini muffins, bake for 12-15 minutes. For jumbo muffins, bake for 25-30 minutes. Muffins are done when a wooden skewer or toothpick inserted into the center of a muffin comes out clean or with a few moist crumbs attached, and the tops are golden brown and spring back lightly when touched.
-
Cool: Once baked, remove the muffin tin from the oven and allow the muffins to cool in the pan for 5 minutes. After 5 minutes, carefully transfer the muffins from the pan to a wire rack to cool completely, which helps prevent them from becoming soggy on the bottom.
Pro Tips & Tricks for the Best Gluten Free Muffin Recipes
Pro Tips & Tricks for the Best Gluten Free Muffin Recipes
Achieving bakery-quality muffins, especially when working with alternative flours, requires a few insider secrets. I always tell my students in baking workshops that the devil is in the details, and this holds especially true for gluten-free baking. One of the most common pitfalls I see is overmixing the batter. While traditional wheat flour develops gluten when agitated, leading to structure, overmixing gluten-free batters can introduce too much air, which then collapses during baking, resulting in a dense, gummy texture. Mix just until the ingredients are combined; a few small lumps are perfectly fine.
Here’s the thing: accurate measurement is paramount. In my kitchen, I always weigh my flours using a digital scale. Volumetric measurements (cups) can vary wildly depending on how packed the flour is, leading to inconsistent results. Trust me on this one, especially when making gluten free muffin recipes, precision makes all the difference for that perfect crumb. Another essential tip involves your ingredients’ temperature. Room temperature ingredients — especially eggs and any dairy or liquid fats — emulsify much more easily. This creates a smoother, more homogenous batter, which in turn leads to a lighter, more evenly textured muffin. Cold ingredients can cause the batter to seize up, making it harder to mix properly and potentially affecting the rise.
When you’re filling your muffin tins, strive for even distribution. This ensures that all your muffins bake at the same rate, preventing some from being overdone while others are still raw in the middle. I use an ice cream scoop to achieve consistent portions every time. What I discovered is that a short stint at a higher oven temperature initially can give your muffins a fantastic boost. For example, starting at 425°F (220°C) for the first five minutes before reducing to 375°F (190°C) helps create a beautiful domed top and a lovely crust. This initial burst of heat activates the leavening agents quickly.
Worth noting here, resting the batter for 10-15 minutes before baking can significantly improve the texture of your gluten free dairy free muffins. This allows the flours to fully hydrate, resulting in a more tender crumb. It’s a simple step that yields surprisingly good results. A common mistake is opening the oven door too frequently during baking. This causes a sudden drop in temperature, which can make your muffins collapse. Resist the urge to peek until at least two-thirds of the way through the baking time. For more tips on achieving perfect results every time, check out this guide on baking principles. These little adjustments can transform your baking from good to truly exceptional.
Enjoyed this recipe? Share it with a friend or save it to your board for later. Leave a comment below — I love hearing how it turned out!
You May Also Enjoy





You Might Also Love These 🍽️
Recipes picked just for you based on what you’re cooking