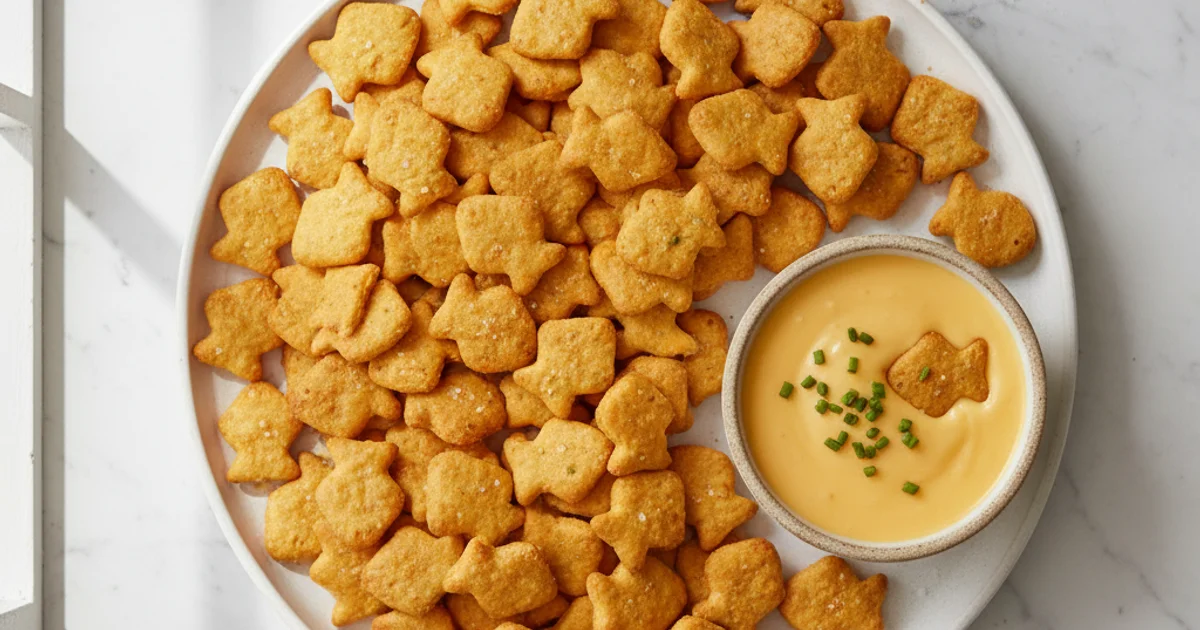
Homemade Gluten-Free Goldfish: Cheesy Crunch!
Craving that iconic cheesy crunch? Learn how to make delicious, perfectly golden gluten free goldfish crackers at home! Are goldfish gluten free? Not store-bought, but ours are!
- 1Introduction: Are Goldfish Crackers Gluten-Free? The Cheesy Truth!
- 2Why You’ll Absolutely Love These Homemade Gluten Free Goldfish Crackers
- 3Ingredients Overview: Crafting Your Perfect Gluten Free Gold Fish Crackers
- 4Essential Equipment You’ll Need for Perfect Gluten Free Goldfish
- 5Step-by-Step Instructions: Making Your Own Gluten Free Goldfish Crackers
- 6Pro Tips & Tricks for the Crispiest Gluten Free Goldfish Crackers
- 7Pro Tips & Tricks for the Crispiest Gluten Free Goldfish Crackers
Ingredients
Cracker Dough
- 1 ½ cups (180g) gluten-free all-purpose flour blend (with xanthan gum)
- 1 teaspoon salt
- ½ teaspoon smoked paprika (optional)
- ¼ teaspoon onion powder (optional)
- ½ cup (1 stick / 113g) unsalted butter, very cold and cubed
- 1 ½ cups (170g) sharp cheddar cheese, freshly grated
- 3-5 tablespoons ice water
Instructions
Instructions
Preheat oven and prepare baking sheets.
Instructions
Combine dry ingredients in a food processor.
Instructions
Pulse in cold butter until pea-sized crumbs form.
Instructions
Add grated cheese and pulse briefly.
Instructions
Add ice water, 1 tablespoon at a time, until dough just comes together.
Instructions
Form dough into a disk, wrap, and chill for 30 minutes.
Instructions
Roll dough thinly between parchment paper.
Instructions
Cut out fish shapes with a cutter or knife.
Instructions
Transfer crackers to baking sheets and prick with a fork.
Instructions
Bake until golden and crisp.
Instructions
Cool completely on a wire rack before serving or storing.
Recipe FAQs
Are original Goldfish crackers truly gluten-free?
Can I use any gluten-free flour blend for this recipe?
How do I make these vegan goldfish crackers?
Why did my homemade gluten-free goldfish crackers turn out soft instead of crispy?
Can I make the dough ahead of time?
What's the best way to store these crackers to keep them fresh?
Homemade Gluten-Free Goldfish: Cheesy Crunch!
Craving that iconic cheesy crunch? Learn how to make delicious, perfectly golden gluten free goldfish crackers at home! Are goldfish gluten free? Not store-bought, but ours are!
Prep Time
25 min
Cook Time
15 min
Total Time
40 min
Cracker Dough
- 1 ½ cups (180g) gluten-free all-purpose flour blend (with xanthan gum)
- 1 teaspoon salt
- ½ teaspoon smoked paprika (optional)
- ¼ teaspoon onion powder (optional)
- ½ cup (1 stick / 113g) unsalted butter, very cold and cubed
- 1 ½ cups (170g) sharp cheddar cheese, freshly grated
- 3-5 tablespoons ice water
Introduction: Are Goldfish Crackers Gluten-Free? The Cheesy Truth!
Recreate Childhood Bliss: The Best Homemade Gluten Free Goldfish Crackers Recipe
For anyone who grew up with that iconic smiling fish cracker, the question often arises: are Goldfish crackers gluten-free? The simple, and often disappointing, answer is no. Standard Goldfish crackers contain wheat flour, making them a no-go for those managing celiac disease or gluten sensitivity. I remember the frustration of watching friends enjoy that familiar cheesy crunch, knowing it was off-limits for me. What I discovered was a way to reclaim that nostalgic snack. This recipe isn’t just a substitute; it’s a celebration of flavor and a testament to how incredible homemade alternatives can be. You won’t believe how closely this homemade version mimics the original, bringing back those cherished childhood memories without any of the gluten-related worries. Making your own also means you control every ingredient, ensuring a wholesome snack free from artificial colors or preservatives. This truly is the ultimate solution for anyone craving the classic cheesy cracker experience in a safe and delicious format. You’ll find yourself reaching for these crunchy, cheesy bites again and again. Here’s the thing, recreating that specific shape and texture takes a little patience, but the payoff is immense. This gluten free goldfish recipe allows you to enjoy that beloved snack once more.
Why You’ll Absolutely Love These Homemade Gluten Free Goldfish Crackers
Here’s the thing, while many store-bought snacks claim to be gluten-free, they often lack the authentic taste and texture we crave. This recipe changes all that. You’ll discover a homemade version that genuinely captures that iconic cheesy, salty crunch you remember from childhood. It’s a game-changer for anyone who has missed this beloved snack due to dietary needs.
What I love about this particular recipe is how it delivers on both flavor and health. We use real cheese and simple ingredients, avoiding the artificial colors and preservatives often found in commercial products. This means you can feel good about what you’re serving your family. Plus, it’s an excellent way to introduce kids to baking; they’ll love helping to cut out those adorable fish shapes. The process is surprisingly straightforward, making it accessible even for novice bakers.
Building on this, the versatility of this recipe is another huge draw. While designed for a classic cheesy flavor, it’s easily adaptable. You can experiment with different cheese varieties or even explore options like vegan goldfish crackers by substituting dairy products. This flexibility ensures that almost everyone can enjoy this delightful treat, regardless of specific dietary preferences. The satisfaction of creating something so close to the original, yet tailored to your needs, is truly rewarding. It brings back that nostalgic feeling without any of the worry. This recipe ensures that the question “are goldfish crackers gluten free?” can finally be answered with a resounding “yes, when you make them yourself!”.
Ingredients Overview: Crafting Your Perfect Gluten Free Gold Fish Crackers
Let’s dive into the core components that make this recipe sing. Understanding each ingredient’s purpose is key to achieving that classic cracker crunch and cheesy goodness. I always find that knowing the “why” behind an ingredient choice empowers you in the kitchen.
Gluten-Free All-Purpose Flour Blend (with xanthan gum) forms the structural foundation of these delightful crackers. Unlike traditional wheat flour, a specialized blend is crucial for replicating the desired texture. These blends often combine rice flour, potato starch, and tapioca starch, each contributing a unique quality. The inclusion of xanthan gum is non-negotiable here; it acts as a binder, mimicking the elasticity that gluten provides. Without it, your crackers would be crumbly and fall apart rather than holding their iconic shape. Trust me on this one, a good quality blend makes all the difference.
Next up, Sharp Cheddar Cheese is the undisputed flavor hero. For the best results, I strongly recommend grating your own block of sharp cheddar. Pre-shredded cheese often contains anti-caking agents like cellulose, which can hinder proper melting and dilute the cheesy intensity. Freshly grated cheddar melts more smoothly and delivers a more robust, authentic cheese flavor, reminiscent of traditional goldfish crackers. This small effort pays huge dividends in taste.
Cold Butter is absolutely essential for achieving that desirable flaky, tender texture. The colder the butter, the better. When small pieces of cold butter are incorporated into the flour, they create pockets that release steam during baking. This steam pushes the dough layers apart, resulting in a light, airy, and crisp cracker. A common mistake is using softened butter, which can lead to a dense, tough final product.
A small amount of Ice Water brings the dough together. Using ice water helps keep the butter cold, further contributing to flakiness. It also prevents overworking the dough, which could, theoretically, develop too much structure in a gluten-free context if not handled carefully, though the primary concern here is maintaining butter integrity. The key difference is that it hydrates the flour without warming the butter.
Finally, Salt is more than just a seasoning; it amplifies all the other flavors, especially the rich cheddar. A good pinch truly brings out the savory notes. For an extra layer of complexity, I love adding Smoked Paprika. It provides a subtle, smoky depth that elevates the cheesy profile, giving these crackers a gourmet touch often found in higher-end snacks. Additionally, a dash of Onion Powder or Garlic Powder can introduce an extra savory kick, mirroring the umami notes found in many commercial cheese crackers. What I discovered is that these optional spices can really transform a good cracker into a truly memorable one.
Essential Equipment You’ll Need for Perfect Gluten Free Goldfish
Achieving that classic cracker texture and shape requires a few specific tools. In my kitchen, I always make sure these items are at hand before I even think about mixing ingredients. Having the right equipment streamlines the process and helps avoid frustration.
First up, a food processor is practically non-negotiable for this recipe. While you can do it by hand, a food processor makes quick work of blending the butter and cheese into the flour mixture. It ensures a consistently crumbly texture, which is vital for a tender, flaky cracker. This also helps prevent overworking the dough, which can lead to tough crackers.
Next, you’ll need a good rolling pin. Uniform thickness is paramount for even baking. If your crackers are different thicknesses, some will burn while others remain soft. I prefer a French-style rolling pin for better control, but any sturdy rolling pin will do the job beautifully.
Parchment paper is another essential. I always roll my dough directly between two sheets of parchment. This prevents sticking, eliminates the need for extra flour (which can dry out the dough), and makes transferring the cut crackers to the baking sheet incredibly easy. It’s a simple trick that saves a lot of cleanup.
Of course, baking sheets are necessary for, well, baking! I recommend using light-colored baking sheets to prevent over-browning on the bottom of the crackers. Darker sheets absorb more heat, often leading to a crispier, sometimes burnt, bottom. Having two on hand allows for a continuous baking process.
The most iconic tool for this recipe is, without a doubt, a small fish-shaped cookie cutter. This is what gives this treat its signature look. If you don’t have one, don’t fret! You can use a small round cutter or even a sharp knife to cut tiny squares or rectangles. They’ll still taste just as good, even if they don’t swim in a bowl.
A spatula or bench scraper is very useful for gathering the dough and transferring the delicate cutouts. It minimizes handling the dough with warm hands, which can melt the butter and change the dough’s consistency. I find a bench scraper particularly helpful for portioning the dough evenly.
Finally, if you’re not buying pre-shredded cheese, a cheese grater is essential. Freshly grated cheese melts more evenly and often has a superior flavor. I always grate my own sharp cheddar for the best results in this recipe. Measuring cups and spoons are, of course, standard kitchen equipment you’ll need for accurate ingredient ratios.
Step-by-Step Instructions: Making Your Own Gluten Free Goldfish Crackers
Here are the first three steps for your recipe:
-
Prep Ingredients: Begin by grating your cheddar cheese until you have the specified amount, then cube your very cold butter into small, even pieces, ensuring it stays chilled until ready to use.
-
Make the Dough (Food Processor Method): In the bowl of a food processor, combine the gluten-free all-purpose flour blend, salt, and baking powder, pulsing a few times to mix thoroughly; then add the cold cubed butter and pulse until the mixture resembles coarse crumbs, followed by the grated cheese, pulsing again until just combined, and finally, with the food processor running, gradually add the ice water, a tablespoon at a time, until a shaggy dough forms and just comes together.
-
Chill the Dough: Carefully transfer the dough onto a piece of plastic wrap, flatten it into a disk, wrap tightly, and refrigerate for at least 30 minutes (or up to 2 hours); this chilling process is crucial as it firms up the butter, preventing the crackers from spreading too much during baking, and makes the dough much easier to roll out evenly without sticking.
-
Roll Out the Dough: Lightly flour your work surface and the top of your dough ball. Place the dough between two sheets of parchment paper. Using a rolling pin, roll the dough evenly until it is approximately 1/8 inch thick for optimal crispiness.
-
Cut the Crackers: Carefully peel back the top layer of parchment paper. Use your fish-shaped cookie cutter to cut out as many crackers as possible, pressing firmly to ensure clean edges. Gently gather any dough scraps, form them into a ball, and re-roll them between the parchment paper to cut out additional crackers.
-
Arrange on Baking Sheets: Carefully transfer the cut crackers to the prepared baking sheets, ensuring there is a small space between each cracker to allow for even baking and crisping.
-
Bake to Golden Perfection: Preheat your oven to 375°F (190°C). Carefully transfer the baking sheets to the preheated oven and bake for 12-15 minutes, or until the crackers are a beautiful golden brown and feel firm to the touch. For even baking, rotate the baking sheets halfway through the baking time.
-
Cool for Ultimate Crispiness: Once baked, remove the crackers from the oven and transfer them immediately to a wire rack to cool completely. This crucial step allows the crackers to fully crisp up and achieve that satisfying crunch we all remember.
Pro Tips & Tricks for the Crispiest Gluten Free Goldfish Crackers
Pro Tips & Tricks for the Crispiest Gluten Free Goldfish Crackers
Achieving that signature crispness in this recipe requires a few insider tricks. Trust me on this one; after countless batches, I’ve refined the process for truly superior results. One of the most crucial elements is to avoid overworking the dough. Even with gluten-free flours, excessive handling can develop the starches too much, leading to a cracker that’s more tough than tender. Mix just until the ingredients are combined and a cohesive ball forms. Building on this, the temperature of your ingredients plays a significant role in the final texture. I always ensure my butter is straight from the fridge and my water is ice cold. This keeps the fat solid, which creates steam during baking, resulting in those desirable flaky layers. This technique is similar to making pastry dough, where cold butter is essential for a tender, flaky crust.
The key difference is in how you handle the dough once it’s mixed. Once the dough comes together, wrap it tightly and chill it for at least 30 minutes. This resting period allows the flours to fully hydrate, making the dough easier to roll and less prone to crumbling. When it’s time to roll, aim for a very thin and even sheet. Uneven thickness means some crackers will burn while others remain soft. I find that rolling the dough between two sheets of parchment paper helps achieve uniform thinness without adding extra flour. This also prevents sticking and makes transferring the cut shapes much easier. You’ll notice that rolling it to about 1/16th of an inch is ideal for that perfect snap.
Worth noting here, once you’ve cut your shapes, prick each cracker with a fork. This simple step is vital. Without it, the crackers will puff up excessively during baking, becoming airy rather than dense and crisp. A common mistake is to skip this, thinking it’s just for aesthetics. In practice, it releases steam, ensuring the cracker stays flat and achieves its characteristic crunch. The secret is to bake these until they are deep golden brown. Don’t be afraid of color; a pale cracker will be soft and chewy, not crisp. Keep a close eye on them, especially towards the end of the baking time, as they can go from golden to burnt quickly.
Here’s what actually works: once they’re out of the oven, immediately transfer them to a wire rack to cool completely. Cooling on a solid surface can trap moisture, making them soft. Air circulation is your best friend here for maximum crispness. For those looking to customize, experiment with different cheeses. While sharp cheddar is classic for this treat, you could try Gruyere for a nuttier flavor or even a blend of Parmesan and Pecorino Romano for a saltier, more complex profile. Understanding cheese types can help you pick the perfect substitute. Finally, don’t shy away from seasoning generously. A sprinkle of garlic powder, onion powder, or even a pinch of smoked paprika can elevate the flavor significantly.
Enjoyed this recipe? Share it with a friend or save it to your board for later. Leave a comment below — I love hearing how it turned out!
You May Also Enjoy





You Might Also Love These 🍽️
Recipes picked just for you based on what you’re cooking