Sacred & Simple: Perfect Gluten-Free Communion Bread
Craft tender, symbolic gluten-free communion bread at home. This easy recipe uses simple ingredients for a meaningful experience. Perfect for home cooks!
- 1Introduction: Why Gluten-Free Communion Bread Matters
- 2Why You’ll Love This Easy Gluten-Free Communion Bread Recipe
- 3Ingredients Overview: Crafting Your Gluten-Free Communion Bread
- 4Essential Equipment You’ll Need for Perfect Results
- 5Step-by-Step Instructions: Baking Your Sacred Bread
- 6Pro Tips & Tricks for Gluten-Free Communion Bread Success
Ingredients
Dry Ingredients
- 1 cup (120g) Gluten-Free All-Purpose Flour Blend (with xanthan gum)
- 1/2 teaspoon Salt
Wet Ingredients
- 1/2 cup (120ml) Warm Water
- 2 tablespoons Olive Oil
Instructions
Instructions
Preheat oven to 375°F (190°C) and line a baking sheet with parchment paper.
Instructions
In a medium bowl, whisk together gluten-free flour blend and salt.
Instructions
In a separate small bowl, combine warm water and olive oil.
Instructions
Gradually add the wet ingredients to the dry ingredients, mixing with a spatula until a shaggy dough forms.
Instructions
Turn the dough out onto a lightly floured surface (using gluten-free flour) and knead gently for 1-2 minutes until it comes together.
Instructions
Roll the dough out very thinly, about 1/8 inch (3mm) thick, into a rectangle or circle.
Instructions
Score the dough into desired communion bread sizes (e.g., 1x1 inch squares) or cut into shapes using a small cookie cutter.
Instructions
Carefully transfer the dough to the prepared baking sheet.
Instructions
Bake for 15-20 minutes, or until lightly golden brown and crisp. Baking time may vary depending on thickness.
Instructions
Remove from oven and let cool completely on the baking sheet. The bread will crisp up further as it cools.
Recipe FAQs
Can I use any gluten-free flour blend for this recipe?
Why is my gluten-free communion bread crumbly?
How thin should I roll the dough for the best results?
Can I make this recipe in a cast iron skillet instead of baking?
How long does homemade gluten-free communion bread last?
Is there a way to make this recipe yeast-free?
Sacred & Simple: Perfect Gluten-Free Communion Bread
Craft tender, symbolic gluten-free communion bread at home. This easy recipe uses simple ingredients for a meaningful experience. Perfect for home cooks!
Prep Time
10 min
Cook Time
20 min
Total Time
30 min
Dry Ingredients
- 1 cup (120g) Gluten-Free All-Purpose Flour Blend (with xanthan gum)
- 1/2 teaspoon Salt
Wet Ingredients
- 1/2 cup (120ml) Warm Water
- 2 tablespoons Olive Oil
Introduction: Why Gluten-Free Communion Bread Matters
For many, the act of communion is a deeply meaningful and cherished part of their spiritual journey. It’s a moment of reflection, connection, and remembrance, often centered around the sharing of bread. However, for individuals living with celiac disease, gluten sensitivity, or other dietary restrictions, this sacred tradition can present a significant challenge. Finding a suitable, reverent, and palatable option for gluten free communion bread has long been a struggle, often leading to feelings of exclusion or frustration. I’ve heard countless stories from people who felt unable to fully participate, or who resorted to less-than-ideal alternatives. What I discovered is that there’s a profound desire for a homemade solution that honors the spiritual significance while ensuring safety and taste. This recipe isn’t just about avoiding gluten; it’s about restoring full participation and peace of mind. It’s about crafting a simple, pure bread that truly allows everyone to partake. This method ensures that preparing this special bread is a straightforward process, allowing you to focus on its deeper meaning. You’ll find that making your own offers not just dietary compliance, but also a beautiful, personal touch to your communion practice.
Why You’ll Love This Easy Gluten-Free Communion Bread Recipe
Here’s the thing, I’ve spent countless hours in my kitchen perfecting recipes. What I love about this particular recipe is its sheer simplicity. You won’t need to hunt down obscure flours or spend a fortune on specialty ingredients. This recipe relies on common pantry staples, making it accessible to everyone. It’s designed for efficiency, meaning you can whip up a batch even when time is short.
Building on this, the texture and taste are paramount for communion. This recipe delivers a tender, slightly crisp bread with a neutral flavor profile. It’s exactly what you want for such a significant occasion. Many commercially available options can be dry or have an off-putting taste. This homemade version avoids those pitfalls entirely. It’s a truly inclusive option for those with dietary needs.
What I discovered is that preparing this yourself adds a layer of personal meaning. It fosters a deeper connection to the tradition. Making it at home ensures freshness and quality. You control every ingredient, which is incredibly reassuring. This recipe ensures that everyone can partake safely and comfortably. It’s a small but significant detail that makes a big difference.
Ingredients Overview: Crafting Your Gluten-Free Communion Bread
Crafting the perfect gluten free communion bread begins with understanding each component. In my kitchen, I’ve found that high-quality ingredients make all the difference in both texture and taste. You’ll notice that this recipe relies on a few key players to achieve its desired outcome.
The cornerstone of this recipe is a good gluten-free all-purpose flour blend (with xanthan gum). Here’s the thing: using a pre-blended mix designed for baking is crucial. Single flours like just rice flour or just tapioca starch won’t provide the necessary structure and elasticity. A blend combines various flours such as rice flour, tapioca starch, and potato starch, each contributing unique properties. Rice flour offers structure, while tapioca and potato starches add lightness and a tender crumb. It’s important to differentiate potato starch from potato flour; they behave differently. The xanthan gum included in most blends is vital; it acts as a binder, mimicking the elasticity that gluten provides in traditional bread. If your chosen blend doesn’t contain xanthan gum, you’ll need to add about ½ teaspoon per cup of flour to ensure the bread holds together properly. Without it, your bread might be crumbly.
Next up, water plays a fundamental role in hydration and binding all these dry ingredients together. The right amount of water ensures a pliable dough that’s easy to work with and bakes evenly. Too little, and your dough will be stiff and dry; too much, and it will be sticky and hard to handle. I always use filtered water to avoid any off-flavors that might come from tap water. The temperature of the water can also subtly affect the dough’s consistency, with room temperature being ideal for most baking.
Olive oil (or another neutral oil like grapeseed or avocado) contributes significantly to the tenderness of the bread. It also imparts a very subtle flavor that complements the other ingredients without overpowering them. The fat in the oil helps to keep the bread from drying out too quickly, ensuring it remains soft and palatable. Using a good quality extra virgin olive oil can add a nuanced depth, but any neutral oil works well. This oil also aids in achieving that lovely golden-brown crust.
A pinch of salt is more than just a seasoning; it’s a flavor enhancer. It balances the sweetness (if you choose to add any) and brings out the natural flavors of the flours. Without salt, bread can taste bland and flat. I always use fine sea salt because it dissolves easily and distributes evenly throughout the dough. It also plays a minor role in controlling yeast activity, although this recipe is unleavened.
Finally, an optional touch of sugar or honey can be included for very slight browning and a hint of flavor. However, for traditional purposes, I emphasize keeping it minimal. Just a quarter teaspoon can make a difference in color without making the bread sweet. This is not about making a sweet bread, but rather about promoting a little caramelization on the surface during baking. The key difference is that this small amount won’t make the bread taste like a dessert. These ingredients combine to create a simple yet meaningful gluten free communion bread.
Essential Equipment You’ll Need for Perfect Results
In my kitchen, I always find that having the right tools makes all the difference, especially when baking. You don’t need a professional setup for this recipe, but a few key items will ensure your success. First up, a good mixing bowl is essential. I prefer a medium-sized one, around 2-3 quarts, for easy stirring without spills. You’ll also need a whisk or a sturdy spatula for combining your dry and wet ingredients thoroughly. The trick is to incorporate everything without overmixing.
Here’s the thing, achieving that uniform thinness for this bread is crucial. For this, a rolling pin is indispensable. Any standard rolling pin will do, but I find a French-style rolling pin gives me better control. Once rolled, your dough will need a place to bake. A standard baking sheet, lined with parchment paper, is perfect. This prevents sticking and makes cleanup a breeze. Trust me on this one, parchment paper is a lifesaver.
After baking, you’ll want to cut your bread into neat, uniform pieces. A pizza cutter works wonderfully for this, allowing for quick, straight lines. Alternatively, a sharp knife will also do the job. What I discovered is that precision in cutting helps maintain the bread’s integrity. For accurate measurements, which are vital in gluten-free baking, you’ll need a set of measuring cups and measuring spoons. This isn’t a recipe where you can eyeball quantities; consistency is key.
Worth noting here, while an oven is the primary cooking method, you can experiment with alternative techniques for a slightly different texture. For instance, if you’re looking for a chewier, more rustic finish, a flat skillet cast iron can be used on the stovetop. This method gives the bread a lovely golden crust. If you’re feeling adventurous and want to evoke a different kind of communal experience, a campfire sandwich maker can also be adapted. Just be sure to press the dough thinly between the plates. These alternative methods can be quite fun to explore, offering a unique take on this recipe.
Step-by-Step Instructions: Baking Your Sacred Bread
-
Preheat your oven to 350°F (175°C) and line a baking sheet with parchment paper, ensuring it lies flat.
-
In a large bowl, whisk together the gluten-free flour blend and salt until thoroughly combined and lump-free.
-
In a separate medium-sized bowl, mix the water and olive oil until they are well incorporated.
-
Form Dough: Gradually add the wet mixture to the dry ingredients, mixing with a sturdy spoon or your hands until a cohesive dough forms.
-
Knead (briefly): Lightly knead the dough on a floured surface for just a minute or two, enough to bring it together smoothly.
-
Roll Out: On a lightly floured surface, use a rolling pin to roll out the dough thinly and evenly, aiming for approximately 1/8 inch thickness.
-
Score/Cut: Carefully score the dough into your desired shapes, such as squares or rectangles, using a sharp knife or a pastry wheel. Alternatively, for smaller, more uniform pieces, use a small, floured cookie cutter to create individual communion wafers.
-
Bake: Bake the bread in the preheated oven at 350°F (175°C) for 15-20 minutes, or until the edges are lightly golden brown and the bread is firm to the touch. Keep a close eye on the bread as baking times can vary, ensuring it doesn’t overbake and become too dry.
-
Cool: Remove the communion bread from the oven and transfer it to a wire rack to cool completely. Allowing it to cool thoroughly is crucial for achieving the desired crisp yet tender texture and prevents the bread from becoming gummy.
Pro Tips & Tricks for Gluten-Free Communion Bread Success
Here’s the thing: mastering gluten free communion bread isn’t just about following steps; it’s about understanding the nuances of gluten-free baking. I’ve learned over a decade that a few insider tricks can elevate your results from good to truly exceptional. One of the most common pitfalls I see home bakers make is over-handling the dough. Unlike wheat-based doughs that benefit from extensive kneading to develop gluten, gluten-free doughs behave differently. You want to mix just until combined. Building on this, excessive mixing can activate starches in your gluten-free flour blend, leading to a gummy or dense texture rather than the light, crisp finish we’re aiming for. Think of it like making a delicate pastry; a gentle touch yields the best outcome. The goal is to create a cohesive dough without developing toughness.
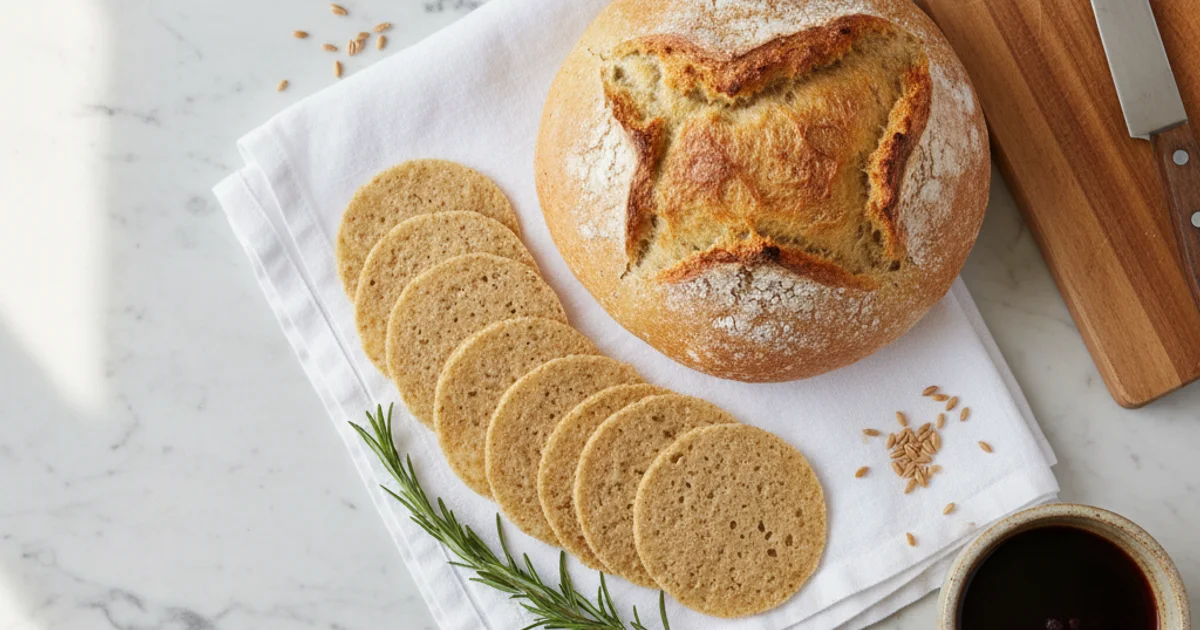
The secret is in the thinness. For that authentic, wafer-like texture, rolling the dough out as thinly as possible is crucial. I always aim for something akin to lavash bread. If it’s too thick, the bread will be chewy and less fragile, which isn’t what we want for this sacred purpose. Investing in a good rolling pin and perhaps even a pastry mat with measurements can truly help here. You’ll notice that a thin dough bakes more evenly and crisps up beautifully. In practice, I often divide my dough into smaller portions to make rolling easier, ensuring each piece is uniformly thin. This also prevents the dough from drying out while you work.
Worth noting here, achieving even baking is paramount for a consistent texture and appearance. I always rotate my baking sheet halfway through the baking time. This simple action prevents one side from browning too quickly while the other remains pale. Ovens often have hot spots, and rotating ensures every piece of your gluten free communion bread receives consistent heat exposure. Another consideration is how you prepare the dough for individual pieces. You can score the dough before baking, which allows for easy breaking along predefined lines once baked, or you can cut precise pieces after baking. Scoring works well if you prefer a more rustic, hand-broken appearance, while cutting offers uniform shapes, which can be important for presentation. For more on the science of gluten-free baking, you can explore resources like this comprehensive guide on gluten-free flours.
Flour type truly matters when it comes to the success of this recipe. Not all gluten-free all-purpose blends are created equal. Some are primarily rice flour-based, while others incorporate a higher percentage of starches like tapioca or potato starch. What I discovered is that a blend with a good balance of different flours and starches, often including some xanthan gum, yields the best texture for this recipe. If your blend doesn’t contain xanthan gum, adding about ¼ teaspoon per cup of flour can significantly improve the dough’s elasticity and prevent crumbling. A common mistake is using a single gluten-free flour, like just almond or coconut flour, which often leads to vastly different results than intended. These flours have unique absorption properties and require specific adjustments. For example, some people wonder about using lavash bread gluten free products as a base, but for this specific recipe, making it from scratch ensures the right consistency and ingredients.
Finally, environmental factors like altitude and humidity can play a role in your baking success. At higher altitudes, liquids evaporate faster, and leavening agents work more quickly, often requiring slight adjustments to liquid and baking powder amounts. In humid environments, doughs can absorb more moisture, sometimes needing a touch more flour to reach the right consistency. I’ve found that starting with the recipe as written and making small, incremental adjustments based on your local conditions is the best approach. Keep an eye on the dough’s texture and adjust as needed, adding a tiny bit more liquid if it’s too dry, or a sprinkle of flour if it’s too sticky. This attention to detail will ensure your bread turns out perfectly every time.
Enjoyed this recipe? Share it with a friend or save it to your board for later. Leave a comment below — I love hearing how it turned out!
You May Also Enjoy





You Might Also Love These 🍽️
Recipes picked just for you based on what you’re cooking