Fluffy GF Biscuits: Easy Homemade Recipe!
Craving warm, fluffy biscuits? Learn how to make the best gluten-free canned biscuits from scratch! Perfect for breakfast or dinner.
- 1Introduction: The Quest for Perfect Gluten-Free Canned Biscuits
- 2Why You’ll Absolutely Love This Gluten-Free Biscuit Recipe
- 3Ingredients Overview: Crafting Your Gluten-Free Drop Biscuits
- 4Essential Equipment You’ll Need for Perfect Biscuits
- 5Step-by-Step Instructions: Making Your Gluten-Free Canned Biscuits
- 6Pro Tips & Tricks for Fluffy Gluten-Free Frozen Biscuits (and Fresh!)
Ingredients
Dry Ingredients
- 2 ½ cups gluten-free all-purpose flour blend (with xanthan gum)
- 1 tbsp baking powder
- ½ tsp baking soda
- 1 tsp granulated sugar
- ½ tsp salt
Wet Ingredients
- ½ cup (1 stick) unsalted butter, very cold and cut into small cubes
- 1 cup buttermilk, cold
For Brushing (Optional)
- 2 tbsp melted butter
Instructions
Instructions
Preheat oven and prepare baking sheet.
Instructions
Whisk dry ingredients in a large bowl.
Instructions
Cut in cold butter until pea-sized.
Instructions
Add cold buttermilk, mixing just until combined.
Instructions
Drop spoonfuls of dough onto baking sheet.
Instructions
Bake until golden brown.
Instructions
Brush with melted butter (optional) and cool slightly before serving.
Recipe FAQs
Can I use a different gluten-free flour blend?
My biscuits didn't rise well. What went wrong?
How do I make these dairy-free?
Can I make the dough ahead of time?
What's the difference between drop biscuits and cut biscuits?
Why is cold butter so important in biscuit recipes?
Fluffy GF Biscuits: Easy Homemade Recipe!
Craving warm, fluffy biscuits? Learn how to make the best gluten-free canned biscuits from scratch! Perfect for breakfast or dinner.
Prep Time
15 min
Cook Time
20 min
Total Time
35 min
Dry Ingredients
- 2 ½ cups gluten-free all-purpose flour blend (with xanthan gum)
- 1 tbsp baking powder
- ½ tsp baking soda
- 1 tsp granulated sugar
- ½ tsp salt
Wet Ingredients
- ½ cup (1 stick) unsalted butter, very cold and cut into small cubes
- 1 cup buttermilk, cold
For Brushing (Optional)
- 2 tbsp melted butter
Introduction: The Quest for Perfect Gluten-Free Canned Biscuits
Finding truly satisfying gluten free canned biscuits can feel like searching for a unicorn. For years, I’ve navigated the grocery aisles, hoping to stumble upon a ready-to-bake option that doesn’t taste like cardboard or crumble into a dry mess. The store-bought versions often fall short, leaving much to be desired in terms of texture, flavor, and even affordability. It’s a common frustration for anyone avoiding gluten but still craving that warm, flaky biscuit experience.
What I discovered is that the best solution doesn’t come from a can at all, but from your own kitchen. This recipe delivers all the convenience and joy of those classic pop-can biscuits, but with a homemade touch and, crucially, no gluten. You’ll be surprised how simple it is to whip up a batch that rivals, and often surpasses, anything you could buy. This method brings back the comfort food aspect of biscuits, making them accessible again for everyone.
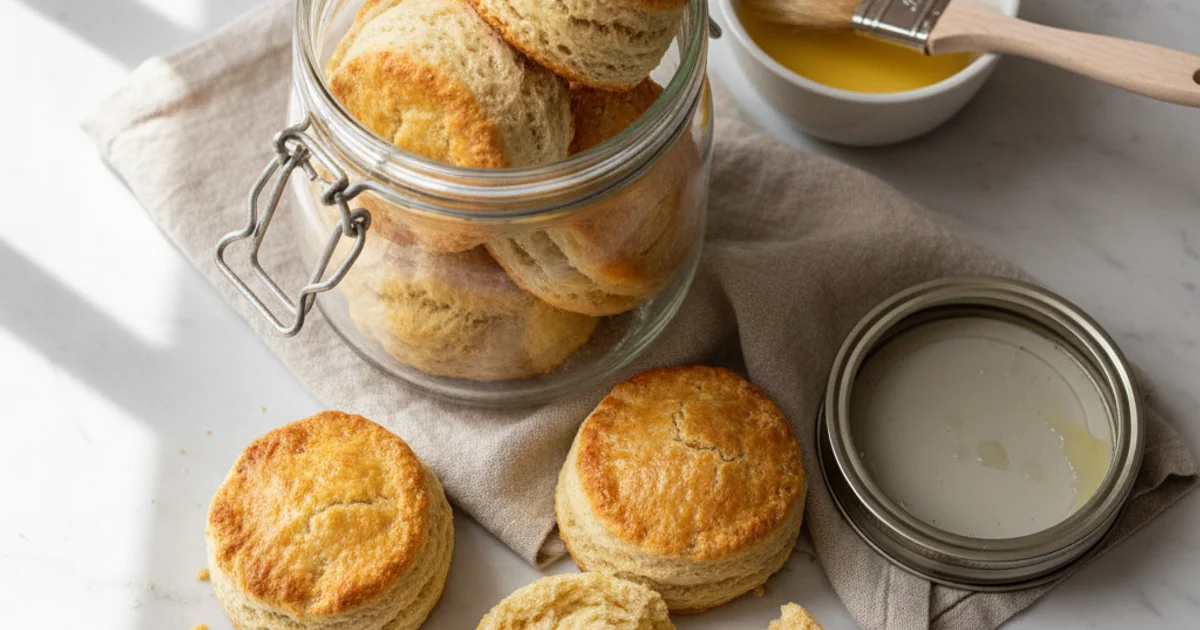
I always aim for that perfect balance: a golden-brown exterior giving way to a tender, fluffy interior. This recipe achieves just that, ensuring a delightful treat every single time. It’s about enjoying a familiar favorite without compromise. Get ready to transform your breakfast or dinner with these easy, flavorful, and wonderfully satisfying biscuits.
Why You’ll Absolutely Love This Gluten-Free Biscuit Recipe
Building on this, I always found myself searching for a reliable, easy recipe. This recipe is a true game-changer, delivering that nostalgic comfort food experience. You won’t believe how simple it is to achieve such a satisfying result in your own kitchen.
What I love about this particular recipe is its ability to produce an incredibly light and airy texture. Many gluten-free baked goods can turn out dense or crumbly. Here, you get that perfect tender crumb with slightly golden edges, reminiscent of the best traditional biscuits. It’s a texture that truly elevates any meal. This process makes homemade gluten free drop biscuits accessible to everyone.
Furthermore, this recipe offers remarkable convenience. Forget spending hours in the kitchen for a simple side; these come together quickly, much like their conventional counterparts. It’s ideal for those busy weeknights when you still crave something homemade and comforting. The ease of preparation makes it a staple in my home.
In practice, this recipe is also incredibly versatile. You can easily adapt it for a sweet breakfast treat or a savory dinner accompaniment. A common mistake is thinking gluten-free means limited options. Not so here; a few simple tweaks can transform its character entirely. This adaptability ensures it fits seamlessly into various meal plans.
The secret is that you’re creating something wholesome and delicious, often at a fraction of the cost of specialty store-bought alternatives. Using common pantry ingredients means you know exactly what’s going into your food. This economical aspect, combined with its crowd-pleasing appeal, makes it a superior choice. Even those without dietary restrictions will genuinely enjoy this treat.
Ingredients Overview: Crafting Your Gluten-Free Drop Biscuits
When I set out to create this recipe, I knew the ingredients were key. Achieving that classic biscuit texture without gluten requires a thoughtful approach. Here’s what actually works.
Understanding each component helps in mastering the art of the gluten free drop biscuits. The foundation of any great biscuit, especially a gluten free canned biscuits alternative, lies in its flour blend. I always recommend using a high-quality gluten-free all-purpose flour blend that already contains xanthan gum. This gum is crucial; it mimics gluten’s elasticity, preventing crumbly, dry biscuits. If your chosen blend lacks it, add about 1/2 teaspoon per cup of flour. Many blends combine rice flour for structure, tapioca starch for chewiness, and potato starch for tenderness, creating a balanced profile. This careful combination ensures your biscuits don’t fall flat or taste gritty.
Next, cold butter is non-negotiable for flakiness. The tiny pockets of butter melt during baking, releasing steam that creates those coveted layers. I prefer to grate my butter directly into the flour mixture, which distributes it more evenly and keeps it colder than cubing. Alternatively, you can cut it into small pieces and work it quickly into the flour. The trick is to handle it as little as possible to prevent it from warming up. This attention to temperature is vital for achieving a light, airy crumb, unlike the dense texture you might find in some gluten free frozen biscuits.
For leavening, we rely on both baking powder and baking soda. Baking powder provides an initial lift, while baking soda reacts with the acidity in the buttermilk, creating additional carbon dioxide bubbles. This double-action ensures a substantial rise, giving your biscuits that satisfying puff. Buttermilk is another star ingredient. Its tang not only adds depth of flavor but also tenderizes the dough by breaking down proteins. If you don’t have buttermilk on hand, a simple DIY substitute works perfectly: add one tablespoon of white vinegar or lemon juice to a liquid measuring cup, then fill the rest with milk to make one cup. Let it sit for five minutes until it curdles slightly.
Finally, a touch of sugar balances the flavors, enhancing the richness without making the biscuits sweet. Salt is equally important; it brings out all the other flavors, preventing a bland result. Worth noting here, for those who enjoy a savory twist, this recipe is incredibly versatile. You can easily incorporate optional add-ins like shredded cheddar cheese, fresh chives, or even a pinch of dried herbs like rosemary or thyme. These additions transform the basic biscuit into something truly special, offering a delightful variation for any meal. Each ingredient plays a specific role, contributing to the overall success of this beloved treat.
Essential Equipment You’ll Need for Perfect Biscuits
Building on this, having the right tools makes all the difference for a smooth baking experience. In my kitchen, I’ve found that even simple recipes benefit from proper preparation. You’ll notice that gathering your equipment beforehand streamlines the entire process.
Here’s the thing, you don’t need a gourmet kitchen to make exceptional gluten free drop biscuits. A few essential items will ensure your success. First, a large mixing bowl is indispensable; it provides ample space for combining your dry and wet ingredients without making a mess. Trust me on this one, trying to mix in a small bowl leads to flour explosions. Second, a pastry blender or fork is crucial for cutting cold butter into the flour, creating those delightful flaky layers. Alternatively, your clean hands work just as effectively to achieve that sandy texture.
What I discovered is that precision matters, especially with gluten-free biscuit mix. Measuring cups and spoons are non-negotiable for accurate ingredient proportions, which directly impacts the texture and rise of your biscuits. A common mistake is eyeballing measurements, but that can lead to dense or crumbly results. For baking, a baking sheet is essential, and I always line mine with parchment paper. This prevents sticking, ensures even browning, and makes cleanup a breeze. An oven, preheated to the correct temperature, provides the consistent heat needed for proper rising and golden perfection. After baking, transfer your biscuits to a wire rack for cooling. This prevents the bottoms from becoming soggy, a common issue if left on a hot pan. While this recipe focuses on easy ‘drop’ style biscuits, an optional biscuit cutter can create uniform shapes if you prefer a more traditional look. Another optional tool is a food processor for quickly cutting in butter, but be careful not to overmix, as this can overdevelop the flour. These tools are the foundation for consistently delicious biscuits.
Step-by-Step Instructions: Making Your Gluten-Free Canned Biscuits
-
Prep Oven & Pan: Preheat your oven to 425°F (220°C) and line a baking sheet with parchment paper to prevent sticking.
-
Combine Dry Ingredients: In a large mixing bowl, whisk together the gluten-free all-purpose flour blend, baking powder, baking soda, granulated sugar, and salt until thoroughly combined.
-
Cut in Cold Butter: Add the cold, cubed unsalted butter to the dry ingredients and cut it in using a pastry blender, your fingertips, or a grater until the mixture resembles coarse crumbs with pea-sized pieces of butter throughout.
-
Add Wet Ingredients: Pour the buttermilk into the dry ingredients and mix gently with a spoon or spatula just until combined, being careful not to overmix, as this can lead to tough biscuits.
-
Form Biscuits: For a rustic “drop biscuit” style, drop generous spoonfuls of dough onto the prepared baking sheet, leaving about an inch between each biscuit. Alternatively, for a more traditional look, gently pat the dough out to about ¾-inch thickness on a lightly floured surface and use a round biscuit cutter to cut out individual biscuits, re-rolling scraps as needed.
-
Bake: Place the baking sheet in the preheated oven and bake for 12-15 minutes, or until the biscuits are beautifully golden brown on top and lightly browned on the bottom, indicating they are cooked through.
-
Cool the biscuits on the baking sheet for about 5 minutes to allow them to set slightly before carefully transferring them to a wire rack to cool completely, ensuring they don’t become soggy on the bottom.
Pro Tips & Tricks for Fluffy Gluten-Free Frozen Biscuits (and Fresh!)
Building on this, achieving that coveted light and airy texture in gluten-free baking requires a few specific techniques. I always tell people that temperature is your best friend when making biscuits. Keeping your fat and liquid ingredients very cold is paramount. This prevents the butter from melting too quickly before it hits the oven, ensuring those beautiful pockets of steam that create flakiness. The colder the ingredients, the better the rise and the more tender the crumb of your gluten free drop biscuits.
The key difference is how gluten-free flours behave compared to traditional wheat flour. While wheat flour develops gluten when overmixed, leading to tough biscuits, overmixing gluten-free dough can also result in a dense, brick-like texture. Therefore, a light hand is crucial. Mix just until the ingredients are barely combined; a few lumps are perfectly fine. This gentle approach helps maintain the delicate structure we’re aiming for. In my kitchen, I often use a fork or my fingertips to combine, avoiding any heavy-handed kneading.
Worth noting here, the freshness of your leavening agents directly impacts your biscuits’ lift. Baking powder and baking soda lose their potency over time, leading to flat results. I always recommend checking the expiration dates on these ingredients before you start baking. A simple test for baking powder involves mixing a teaspoon with a little hot water; if it fizzes vigorously, it’s good to go. For baking soda, use vinegar instead of hot water. Understanding the science behind leavening agents can really elevate your baking game.
In practice, if you’re using a biscuit cutter, resist the urge to twist it. Twisting seals the edges of the biscuit, hindering its ability to rise fully. Instead, press the cutter straight down firmly and lift it straight up. This creates clean cuts that allow for maximum expansion in the oven. For those who prefer softer, pull-apart biscuits, arranging them close together on the baking sheet is the way to go. This proximity helps them steam each other slightly, resulting in wonderfully tender sides.
Here’s what actually works for a golden-brown finish and added richness. A quick brush with melted butter just before baking, or even right after they come out of the oven, adds a lovely sheen and enhances the flavor profile. This step is particularly effective for gluten free frozen biscuits as it helps to rehydrate the surface slightly. Finally, high heat is your ally for a quick, dramatic rise. Baking biscuits at a higher temperature initially helps them puff up rapidly before the butter has a chance to completely melt and seep out, locking in that airy texture. This rapid heat transfer is essential for achieving light and fluffy results.
Enjoyed this recipe? Share it with a friend or save it to your board for later. Leave a comment below — I love hearing how it turned out!
You May Also Enjoy





You Might Also Love These 🍽️
Recipes picked just for you based on what you’re cooking