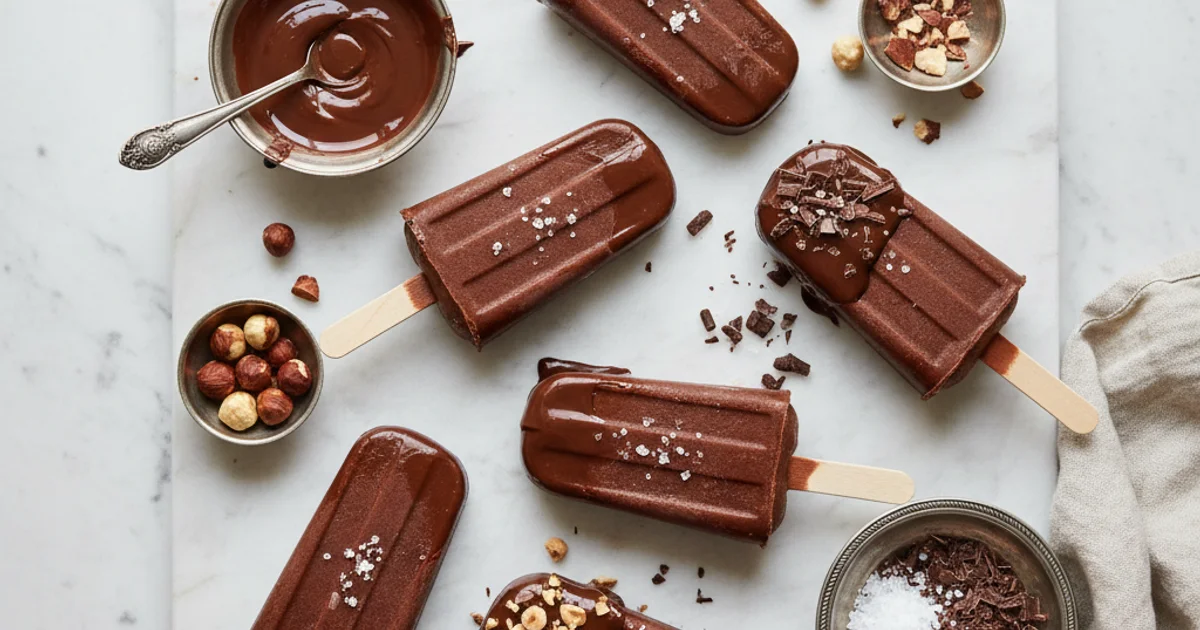
Dreamy Fudgesicles: Your Homemade Chocolate Fix!
Indulge in the best homemade fudgesicles! This easy recipe delivers creamy, rich chocolatey goodness with simple ingredients. Learn about fudgesicle nutrition and expert molding cream tips.
- 1Introduction: Why Homemade Fudgesicles Are Your New Favorite Treat
- 2Why You’ll Absolutely Love This Fudgesicle Recipe
- 3Ingredients Overview: Crafting the Perfect Fudgesicle Base
- 4Equipment You’ll Need for Flawless Fudgesicles
- 5Step-by-Step Instructions: Your Guide to Perfect Homemade Fudgesicles
- 6Pro Tips & Tricks for the Best Fudgesicles Ever
Ingredients
Fudgesicle Base
- 2 cups whole milk (or heavy cream for extra richness)
- 1/2 cup unsweetened cocoa powder (Dutch-processed recommended)
- 1/2 cup granulated sugar (or brown sugar for deeper flavor)
- 2 tablespoons cornstarch
- 1/4 teaspoon salt
- 1 teaspoon pure vanilla extract
Optional Add-ins
- 1/4 teaspoon espresso powder
- 1/4 cup mini chocolate chips
- 2 tablespoons peanut butter swirl
Instructions
Instructions
Whisk dry ingredients (cocoa, sugar, cornstarch, salt) in a saucepan.
Instructions
Gradually whisk in milk until smooth and lump-free.
Instructions
Cook over medium heat, stirring constantly, until mixture thickens (about 5-7 minutes).
Instructions
Remove from heat and stir in vanilla extract (and espresso powder if using).
Instructions
Let the mixture cool completely to room temperature, stirring occasionally.
Instructions
Pour mixture into popsicle molds, leaving a small space at the top.
Instructions
Insert popsicle sticks and freeze for at least 4-6 hours, or overnight.
Instructions
To unmold, briefly run molds under warm water, then gently pull out fudgesicles.
Recipe FAQs
What makes homemade fudgesicles so much creamier than store-bought?
Can I make these fudgesicles dairy-free or vegan?
How can I prevent my fudgesicles from turning icy?
What's the best type of mold (molding cream) for fudgesicles?
How long do homemade fudgesicles last in the freezer?
Is there a way to boost the fudgesicle nutrition in this recipe?
Dreamy Fudgesicles: Your Homemade Chocolate Fix!
Indulge in the best homemade fudgesicles! This easy recipe delivers creamy, rich chocolatey goodness with simple ingredients. Learn about fudgesicle nutrition and expert molding cream tips.
Prep Time
15 min
Cook Time
10 min
Total Time
25 min
Fudgesicle Base
- 2 cups whole milk (or heavy cream for extra richness)
- 1/2 cup unsweetened cocoa powder (Dutch-processed recommended)
- 1/2 cup granulated sugar (or brown sugar for deeper flavor)
- 2 tablespoons cornstarch
- 1/4 teaspoon salt
- 1 teaspoon pure vanilla extract
Optional Add-ins
- 1/4 teaspoon espresso powder
- 1/4 cup mini chocolate chips
- 2 tablespoons peanut butter swirl
Introduction: Why Homemade Fudgesicles Are Your New Favorite Treat
Remember those long summer days, the sun beating down, and the pure joy of a frosty treat? For many of us, that treat was a classic fudgesicle, a simple pleasure that marked the arrival of warmer weather. But if you’re like me, you’ve probably noticed that the store-bought versions just don’t hit the same anymore. They often taste artificial, lack that deep chocolate richness, and can be disappointingly icy rather than creamy. What I discovered is that re-creating this childhood favorite at home is not only incredibly simple but also yields a far superior result.
This recipe brings back all that nostalgic comfort without any of the commercial shortcuts. You gain complete control over the ingredients, ensuring a rich, authentic chocolate flavor and a wonderfully smooth texture. No more thin, watery ice pops masquerading as a creamy delight. Making this treat from scratch is a rewarding experience, transforming basic pantry staples into a luxurious dessert. It’s perfect for cooling down on a hot afternoon, a delightful addition to any backyard gathering, or simply a sweet, satisfying indulgence after dinner. This homemade version elevates a humble dessert into something truly special, proving that the best things often come from your own kitchen. You’ll find that the effort is minimal, but the payoff in flavor and satisfaction is immense.
Why You’ll Absolutely Love This Fudgesicle Recipe
Here’s the thing, many store-bought frozen treats often fall short. They can be watery, lack depth of flavor, or contain a long list of unpronounceable ingredients. My recipe for this treat completely sidesteps those issues. You’ll notice that the texture is exceptionally smooth, a far cry from the icy, brittle experience you might be used to. This is due to a careful balance of ingredients, ensuring a truly decadent and satisfying bite every time.
Building on this, the chocolate intensity in this recipe is truly remarkable. I always reach for a premium unsweetened cocoa powder, which provides a deep, complex chocolate note without being overly sweet. It’s that rich, dark chocolate character that truly elevates this simple dessert. What I love about this recipe is how straightforward it is. You don’t need any fancy equipment or advanced culinary skills. The steps are intuitive, making it a perfect project for a relaxed afternoon in the kitchen. In my kitchen, simplicity often leads to the most rewarding results. Trust me on this one, even if you’re a novice in the kitchen, you’ll feel like a seasoned pro crafting these. This recipe is also wonderfully adaptable. Whether you’re looking to adjust sweetness, add a hint of coffee, or even explore dairy-free options, the base is incredibly forgiving. It offers a fantastic canvas for your own culinary creativity, allowing you to tailor this classic to your exact preferences.
Ingredients Overview: Crafting the Perfect Fudgesicle Base
Building on this, let’s dive into the core components that make this recipe so special. In my kitchen, I always focus on understanding why each ingredient matters. This approach helps me achieve that perfectly balanced taste and texture every time.
For the liquid base, we’re using a combination of whole milk and heavy cream. The whole milk provides a foundational creaminess, while the heavy cream elevates the richness to another level. It’s the secret to that luxurious, melt-in-your-mouth feel that distinguishes homemade treats from store-bought versions. If you’re exploring dairy-free options, full-fat coconut milk can be a fantastic substitute; it offers a similar richness, though with a subtle coconut undertone. Just ensure it’s well-shaken to incorporate the thick cream at the top.
Next up is unsweetened cocoa powder. This is where the deep chocolate flavor truly comes from. Quality matters immensely here. I lean towards Dutch-processed cocoa powder for a darker color and milder, less acidic chocolate taste. Natural cocoa powder, on the other hand, is more acidic and yields a lighter color with a sharper chocolate punch. Both work, but the Dutch-processed variety contributes significantly to that classic fudgesicle appearance and mellow chocolate depth.
Moving to sweeteners, we use a blend of granulated sugar and a touch of brown sugar. Granulated sugar provides straightforward sweetness, while brown sugar adds a subtle molasses note and contributes to a softer texture, helping to prevent the formation of large ice crystals. This dual approach ensures a balanced sweetness without being cloyingly sweet. The secret is that sugar doesn’t just sweeten; it also interferes with water molecule crystallization, which is crucial for a smooth treat.
Here’s the thing about texture: cornstarch or arrowroot powder are your best friends. These aren’t just thickeners; they are the unsung heroes preventing iciness. They create a smooth, almost pudding-like consistency before freezing, which translates into a wonderfully creamy frozen dessert. Without them, you’d end up with a much harder, more icy treat. I prefer cornstarch for its consistent thickening power, but arrowroot is a great grain-free alternative.
A splash of pure vanilla extract is non-negotiable. It doesn’t just add vanilla flavor; it brightens and deepens the chocolate notes, making them more complex and rounded. Trust me on this one, don’t skip it. A small pinch of salt also plays a critical role, balancing the sweetness and intensifying the chocolate flavor, much like it does in baking. It prevents the treat from tasting one-dimensional.
Finally, consider optional add-ins to customize your experience. A tablespoon of espresso powder can further enhance the chocolate flavor without making it taste like coffee. For an extra textural element, finely chopped chocolate chips can be stirred in just before pouring into your molding cream. When thinking about fudgesicle nutrition, your choices here make a difference. Opting for less sugar or using a dairy-free milk alternative will alter the caloric and fat content.
Equipment You’ll Need for Flawless Fudgesicles
Building on this, having the right tools makes all the difference when crafting these delightful frozen treats. You don’t need a professional kitchen, but a few key items will ensure a smooth process and perfect results. I always recommend gathering everything before you start to avoid any mid-recipe scrambling. This preparation allows you to focus on the fun part: making deliciousness.
Here’s the thing, a good quality medium saucepan is essential for gently heating your base mixture. It ensures even heat distribution, preventing scorching. You’ll also want a sturdy whisk to combine your ingredients thoroughly, creating a silky-smooth liquid free of any lumps. Trust me on this one, a lumpy mixture leads to a grainy treat. For precise measurements, which are crucial in baking and frozen desserts, measuring cups and spoons are non-negotiable. Accuracy here dictates the final texture and sweetness of your treat.
What I discovered is that the choice of molding cream – what I affectionately call the mold itself – significantly impacts your experience. You have options like flexible silicone, rigid plastic, or even sleek stainless steel. Silicone molds are fantastic for easy release, often requiring just a gentle flex. Plastic molds are durable and widely available, though sometimes release can be a bit trickier. Stainless steel offers a professional look and feel, but they can be pricier. No matter your choice, ensure it has a good lid or stand to keep your sticks upright during freezing. Of course, popsicle sticks are fundamental; they provide the handle for enjoying your creation. They come in various sizes, so match them to your mold.
In practice, a funnel or a liquid measuring cup with a spout can be incredibly helpful for neatly pouring the mixture into your molds, minimizing spills and waste. This keeps your workspace clean and prevents frustration. For an extra-velvety texture, especially if you’re aiming for peak smoothness, an immersion blender or a standard blender can be used to process the mixture before pouring. This step breaks down any tiny solids and incorporates air for a lighter feel. While not strictly necessary, it elevates the texture to a gourmet level. These tools, from the basic whisk to specialized molds, contribute to the overall quality and enjoyment of making this recipe.
Step-by-Step Instructions: Your Guide to Perfect Homemade Fudgesicles
Here are steps 1 to 3 of the instructions section for “The Ultimate Homemade Fudgesicle Recipe: Creamy, Dreamy & Delicious!”:
-
Combine Dry Ingredients: In a medium-sized saucepan, whisk together the cocoa powder, granulated sugar, cornstarch, and a pinch of salt until well combined and no lumps remain.
-
Add Wet Ingredients: Gradually pour in the milk or cream, whisking continuously to ensure a smooth mixture without any clumps forming.
-
Cook the Mixture: Place the saucepan over medium heat, stirring constantly with a whisk or rubber spatula, until the mixture thickens significantly, coats the back of a spoon, and holds a trail when you run your finger through it.
-
Remove from Heat & Add Vanilla: Once the chocolate has fully melted and the mixture is smooth and uniform, remove the saucepan from the heat. Stir in the vanilla extract thoroughly until it is completely incorporated, ensuring an even distribution of its aromatic flavor throughout the fudgesicle base.
-
Cool Slightly: Allow the warm fudgesicle mixture to cool down at room temperature for at least 15-20 minutes, or until it is no longer steaming hot. This step is crucial to prevent the mixture from melting your molds or creating an uneven texture in the final product.
-
Fill Molds: Carefully and slowly pour the slightly cooled fudgesicle mixture into your chosen ice pop molds, filling each cavity almost to the top but leaving a small amount of headspace (about 1/4 inch) to allow for expansion during freezing.
-
Insert Sticks & Freeze: Carefully insert a popsicle stick into the center of each fudgesicle mold. Ensure the sticks are straight and positioned well before transferring the molds to your freezer. Freeze for a minimum of 4-6 hours, or ideally overnight, to allow them to set completely and achieve their perfect fudgy texture.
-
Unmold & Enjoy: Once fully frozen, remove the fudgesicles from the freezer. To easily release them from their molds, run the bottom of each mold under warm water for about 10-15 seconds. Gently pull the popsicle stick, and your creamy, dreamy fudgesicles should slide out effortlessly, ready to be devoured!
Pro Tips & Tricks for the Best Fudgesicles Ever
Building on this, mastering a few key techniques elevates this recipe from good to truly exceptional. One common pitfall is the formation of ice crystals, which can make your frozen treats less enjoyable. To combat this, I always ensure my mixture is thoroughly cooked, allowing the cornstarch to fully activate. This creates a smoother, more stable base that resists crystallization during freezing. Additionally, cooling the mixture completely before pouring it into your molding cream is crucial; warmth introduces moisture that can later freeze into unwanted ice.
Here’s the thing, achieving that signature, velvety texture is all about fat content and careful freezing. I lean heavily on whole milk in this recipe, sometimes even a splash of heavy cream, to boost richness and creaminess. The higher fat content prevents the water molecules from forming large ice crystals, resulting in a much smoother treat. What I discovered is that you really want to avoid over-freezing these. While they need to be solid, leaving them in the freezer for weeks can sometimes dry them out slightly or make them too hard. Aim for a solid freeze, then enjoy them within a week or two for optimal texture.
The secret is in the details, especially when it comes to flavor. To deepen the chocolate notes without making the treat bitter, I often add a tiny pinch of espresso powder or instant coffee to the base mixture. This doesn’t make it taste like coffee; instead, it amplifies the chocolate, bringing out its complexity. Trust me on this one, it’s a subtle but powerful enhancement. Another practical tip involves easy unmolding. If your frozen treats are sticking, a quick dip of the mold in warm water for a few seconds will loosen them right up. This gentle warmth allows the outer layer to melt just enough for a clean release without compromising the treat’s integrity. For more on the science of freezing and food preservation, you might find this article on food freezing techniques helpful.
Worth noting here, proper filling of your molding cream is more important than you might think. Always leave a small amount of headspace at the top. As liquids freeze, they expand, and if your molds are overfilled, you’ll end up with misshapen treats or even overflows. In my kitchen, I usually leave about a quarter-inch from the top. Before you commit to freezing the entire batch, I always recommend a taste test. After the mixture has cooked and cooled a bit, taste a small spoonful. This is your last chance to adjust the sweetness or chocolate intensity to your liking. A common mistake is assuming it will taste the same once frozen; cold temperatures can slightly mute flavors, so you might want it a touch stronger than you think. Finally, the quality of your ingredients truly shines through in this recipe. Using a good quality cocoa powder and pure vanilla extract makes a noticeable difference in the final flavor profile. It’s an investment that pays off in every creamy, chocolatey bite.
Enjoyed this recipe? Share it with a friend or save it to your board for later. Leave a comment below — I love hearing how it turned out!
You May Also Enjoy





You Might Also Love These 🍽️
Recipes picked just for you based on what you’re cooking