Homemade Gluten-Free Ravioli: A Delicious Guide
Master the art of homemade gluten-free ravioli with this easy recipe! Enjoy delicious, tender pasta shells filled with your favorite fillings.
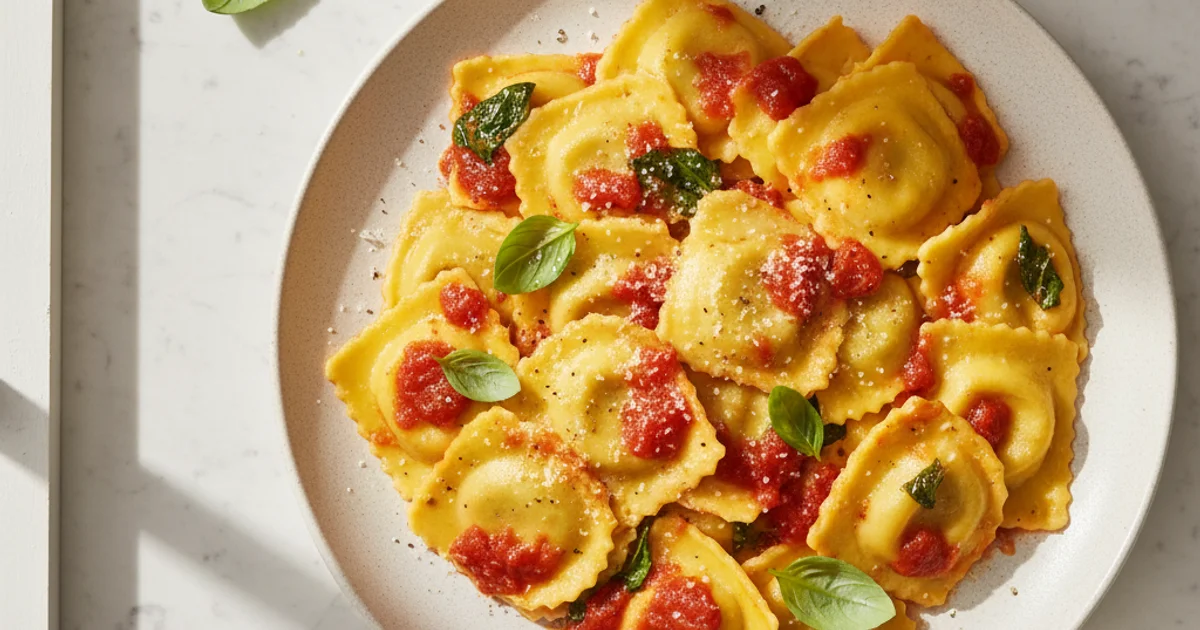
- 1Introduction: Savoring Gluten-Free Ravioli Without Compromise
- 2Why You’ll Absolutely Love This Gluten-Free Ravioli Recipe
- 3Ingredients Overview: Crafting Your Gluten-Free Ravioli Dough
- 4Essential Equipment You’ll Need for Homemade Gluten-Free Ravioli
- 5Step-by-Step Instructions: Mastering Your Gluten-Free Ravioli Recipe
- 6Pro Tips & Tricks for Perfect Gluten-Free Ravioli Every Time
- 7Pro Tips & Tricks for Perfect Gluten-Free Ravioli Every Time
Ingredients
For the Gluten-Free Pasta Dough
- 2 cups (240g) Gluten-Free All-Purpose Flour Blend (with xanthan gum)
- 1/2 teaspoon salt
- 2 large eggs
- 2 tablespoons olive oil
- 2-4 tablespoons cold water (as needed)
For the Ricotta & Spinach Filling
- 1 cup (250g) whole milk ricotta cheese, drained
- 1/2 cup (50g) cooked spinach, squeezed dry and finely chopped
- 1/4 cup (25g) grated Parmesan cheese
- 1/4 teaspoon ground nutmeg
- Salt and freshly ground black pepper to taste
For Serving
- Your favorite sauce (e.g., brown butter & sage, marinara)
- Fresh Parmesan cheese, for grating
- Fresh basil or parsley, for garnish
Instructions
Instructions
Prepare the Gluten-Free Pasta Dough.
Instructions
Rest the Dough.
Instructions
Prepare the Ricotta & Spinach Filling.
Instructions
Roll out the Dough.
Instructions
Fill and Shape the Ravioli.
Instructions
Cook the Ravioli.
Instructions
Serve Immediately with Sauce and Garnish.
Recipe FAQs
Why is my gluten-free ravioli dough so sticky?
Can I make gluten-free ravioli without a pasta machine?
How do I prevent my gluten-free ravioli from breaking during cooking?
What's the best gluten-free flour blend for ravioli?
Can I freeze homemade gluten-free ravioli?
How long does fresh gluten-free ravioli last in the fridge?
Homemade Gluten-Free Ravioli: A Delicious Guide
Master the art of homemade gluten-free ravioli with this easy recipe! Enjoy delicious, tender pasta shells filled with your favorite fillings.
Prep Time
45 min
Cook Time
10 min
Total Time
55 min
For the Gluten-Free Pasta Dough
- 2 cups (240g) Gluten-Free All-Purpose Flour Blend (with xanthan gum)
- 1/2 teaspoon salt
- 2 large eggs
- 2 tablespoons olive oil
- 2-4 tablespoons cold water (as needed)
For the Ricotta & Spinach Filling
- 1 cup (250g) whole milk ricotta cheese, drained
- 1/2 cup (50g) cooked spinach, squeezed dry and finely chopped
- 1/4 cup (25g) grated Parmesan cheese
- 1/4 teaspoon ground nutmeg
- Salt and freshly ground black pepper to taste
For Serving
- Your favorite sauce (e.g., brown butter & sage, marinara)
- Fresh Parmesan cheese, for grating
- Fresh basil or parsley, for garnish
Introduction: Savoring Gluten-Free Ravioli Without Compromise
For anyone navigating the world of gluten-free eating, the search for truly satisfying pasta can feel like a quest. Store-bought options often fall short, sacrificing texture and flavor for dietary compliance. I’ve been there, staring at shelves, hoping to find something that doesn’t turn to mush or taste like cardboard. That’s why I started perfecting my own approach to this classic dish. Making pasta from scratch might sound daunting, but trust me, the reward is immeasurable. There’s a profound satisfaction in creating something so comforting with your own hands, especially when it caters to specific dietary needs. This recipe for gluten free ravioli is more than just a meal; it’s a revelation for anyone who has missed the simple pleasure of a perfectly al dente bite. It opens up a whole new world of culinary possibilities, proving that dietary restrictions don’t mean sacrificing deliciousness. Get ready to rediscover the joy of pasta night with this incredible homemade version.
Why You’ll Absolutely Love This Gluten-Free Ravioli Recipe
In my kitchen, I always strive for dishes that bring comfort without compromise. This particular recipe for homemade ravioli perfectly embodies that philosophy. You might think making pasta from scratch, especially without gluten, sounds like a monumental task, but trust me on this one: it’s surprisingly straightforward. What I love about this approach is how it demystifies the process, making it accessible even for those new to pasta making.
Here’s the thing: the specific blend of gluten-free flours I’ve perfected over years ensures a pasta dough that’s both pliable and robust. You won’t end up with brittle edges or a gummy texture; instead, you’ll achieve a tender bite that holds its shape beautifully during cooking. This means your carefully crafted pockets of flavor will remain intact, delivering that satisfying burst with every forkful. The trick is in the ratios, which we’ll explore in detail. This approach ensures a truly satisfying experience, proving that gluten-free doesn’t mean sacrificing quality. This recipe offers a delightful culinary adventure.
Beyond its incredible texture, this dish shines in its versatility. You can fill these delicate pasta parcels with almost anything your heart desires, from classic ricotta and spinach to more adventurous butternut squash and sage. This adaptability extends to sauces too, allowing you to pair them with a simple marinara, a rich brown butter, or a creamy pesto. This endless customizability means you can enjoy a different meal every time you prepare this recipe. It truly rivals any traditional pasta dish.
Ingredients Overview: Crafting Your Gluten-Free Ravioli Dough
Here’s the thing, creating a truly exceptional gluten free ravioli starts with understanding each ingredient’s purpose. It’s not just about mixing things; it’s about a delicate balance. I always approach ingredient selection with precision, especially when working with alternative flours.
The foundation of our dough is a Gluten-Free All-Purpose Flour Blend. This isn’t just any flour; it’s specifically formulated. What I discovered is that a good blend typically combines lighter flours like rice flour with starches such as tapioca or potato starch. This combination mimics the texture and structure of wheat flour surprisingly well. The real magic, though, often comes from xanthan gum, which is usually pre-mixed into commercial blends. Xanthan gum acts as a binder, replacing the elasticity that gluten provides. Without it, your dough would be crumbly and impossible to roll. If your blend doesn’t include it, you’ll need to add about ½ teaspoon per cup of flour. Trust me on this one; it’s non-negotiable for a pliable dough. Brands like Bob’s Red Mill 1-to-1 Baking Flour or King Arthur Gluten-Free Measure for Measure Flour are excellent choices that already contain xanthan gum and are formulated for direct substitution.
Next up, Eggs play a multi-faceted role in this recipe. They are crucial for binding the dough ingredients together, providing structure, and adding richness. The yolks contribute to the beautiful golden hue of the pasta, while the whites help create a cohesive, workable dough. Their high protein content also helps the dough hold its shape during cooking, preventing tears. In my kitchen, I always use large eggs for consistency.
A touch of Olive Oil is essential for adding elasticity to the dough. It also contributes a subtle, desirable flavor. This fat helps prevent the dough from becoming too stiff or dry, making it easier to roll and shape. It also assists in preventing the dough from sticking to your hands or the pasta machine, which is a common challenge with gluten-free doughs.
Water is our hydration hero. Its primary function is to bring all the ingredients together into a cohesive dough. You might find that the exact amount needed varies slightly depending on your flour blend and the humidity in your kitchen. Sometimes, I’ve even used a splash of ricotta water from the filling, which adds an extra layer of flavor.
Finally, Salt is not just for flavor. It also strengthens the gluten-free dough structure by interacting with the proteins in the eggs. It enhances all the other flavors in the dough, ensuring the pasta itself tastes delicious, even before considering the filling.
For the classic Ricotta & Spinach Filling, each component has a vital role. Ricotta cheese provides the creamy, luscious texture that defines a good ravioli filling. Its mild flavor is a perfect canvas for other ingredients. Freshly cooked and squeezed spinach adds a touch of earthy flavor, vibrant color, and some welcome nutrients. Grated Parmesan cheese brings a salty, umami depth that elevates the entire filling. A hint of freshly grated nutmeg is a classic pairing with spinach and ricotta; it adds warmth and a subtle, aromatic spice. Lastly, salt and pepper are crucial for seasoning, bringing all these delicious elements into perfect harmony.
Essential Equipment You’ll Need for Homemade Gluten-Free Ravioli
In my kitchen, having the right tools makes all the difference, especially when working with specialty flours. You don’t need a professional pasta setup, but a few key items will ensure your homemade efforts are successful. Trust me on this one; trying to improvise with the wrong tools can lead to frustration and a less-than-ideal outcome.
A large mixing bowl is absolutely essential for combining your dough ingredients. I always choose one that gives me plenty of room to work without flour spilling over the sides. This prevents a messy countertop and allows for thorough incorporation of your dry and wet components. A sturdy bowl also helps when you need to knead the dough, providing a stable base.
For flattening the dough, you have a couple of options. A rolling pin is the classic choice, and a good heavy one makes the job much easier. I prefer a French-style rolling pin without handles for better control and even pressure. Alternatively, a pasta machine can be a real time-saver, especially for achieving consistently thin sheets. What I love about a pasta machine is the uniform thickness it provides, which is crucial for even cooking. For this particular recipe, a pasta machine can simplify the process significantly, but a rolling pin works perfectly too if you’re patient.
To shape your individual pieces, a ravioli stamp or cutter is incredibly useful. These come in various sizes and shapes, allowing for uniformity. If you don’t have one, a sharp knife and a ruler will do the trick, though it requires a bit more precision. I often use a simple square cutter, but round or fluted stamps add a lovely touch. A pastry wheel is an optional but nice addition, creating those traditional fluted edges that make homemade pasta look so professional. It seals the edges beautifully and adds visual appeal.
You’ll also need baking sheets or trays, which should be lined with parchment paper. These are vital for resting and slightly drying your formed pieces before cooking. Laying them out flat prevents sticking and helps them maintain their shape. This step is often overlooked but contributes significantly to the final texture. A large pot is necessary for boiling your creations; ensure it’s big enough to allow them to swim freely without clumping.
Finally, a slotted spoon or spider is indispensable for carefully removing the cooked pasta from the boiling water without damaging it. These tools allow the water to drain quickly, preventing your delicate pieces from becoming waterlogged. Accurate measuring cups and spoons are also critical; gluten-free baking is often more precise than traditional baking, so exact measurements truly matter. Building on this, having everything prepped and measured before you start makes the whole process smoother and more enjoyable.
Step-by-Step Instructions: Mastering Your Gluten-Free Ravioli Recipe
-
Making the Dough: In a large bowl, whisk together the gluten-free flour blend, xanthan gum (if not included in your blend), and salt. In a separate smaller bowl, whisk the eggs and olive oil until well combined. Gradually pour the wet ingredients into the dry ingredients, mixing with a fork or your hands until a shaggy dough forms. Turn the dough out onto a lightly floured surface (using gluten-free flour) and knead gently for 5-7 minutes. Unlike traditional wheat dough, gluten-free dough will not develop elasticity; instead, focus on bringing it together into a smooth, cohesive ball.
-
Resting the Dough: Form the dough into a disc, wrap it tightly in plastic wrap, and refrigerate for at least 30 minutes, or up to 2 hours. This crucial resting period allows the gluten-free flours to fully hydrate, resulting in a more pliable and less crumbly dough that is easier to roll.
-
Preparing the Filling: While the dough rests, combine the ricotta cheese, grated Parmesan cheese, chopped fresh spinach (squeezed dry if using thawed frozen spinach), egg yolk, a pinch of nutmeg, salt, and black pepper in a medium bowl. Mix thoroughly until all ingredients are evenly distributed and the filling has a creamy, scoopable consistency, firm enough to hold its shape.
-
Rolling the Dough: Lightly flour your work surface and rolling pin with gluten-free flour or rice flour to prevent sticking. Gluten-free dough can be a bit more delicate and sticky than traditional dough, so work quickly and gently. Roll out small portions of the dough to a thickness of about 1/16 to 1/8 inch (1.5 to 3 mm); you should be able to see your hand faintly through it.
-
Filling and Shaping the Ravioli: Lay a rolled dough sheet on your floured surface. Spoon about 1-2 teaspoons of your desired filling onto one half of the dough, leaving about 1 inch (2.5 cm) of space between each dollop. Lightly brush the edges of the dough around the filling with a little water or egg wash to help with sealing. Carefully fold the other half of the dough over the filling, aligning the edges. Gently press down around each mound of filling, pushing out any air pockets to prevent the ravioli from bursting during cooking. Use a fluted pastry wheel or a sharp knife to cut out individual ravioli, ensuring all edges are firmly sealed.
-
Cooking the Ravioli: Bring a large pot of salted water to a rolling boil. Carefully drop the ravioli into the boiling water, making sure not to overcrowd the pot; cook them in batches if necessary. Allow the water to return to a gentle simmer. Cook for 3-5 minutes, or until the ravioli float to the surface and the dough is tender but still has a slight bite (al dente).
-
Once the ravioli float to the surface and are tender, use a slotted spoon to carefully transfer them directly into your prepared sauce, tossing gently to coat.
Pro Tips & Tricks for Perfect Gluten-Free Ravioli Every Time
Pro Tips & Tricks for Perfect Gluten-Free Ravioli Every Time
Achieving that perfect texture with gluten free ravioli can feel like a culinary puzzle. Trust me, I’ve had my share of sticky messes and burst pockets. Here’s what actually works to ensure your homemade ravioli turns out beautifully every single time. The secret is understanding the unique characteristics of gluten-free flours.
Dough Consistency is Key: The texture of your dough is paramount. It should be pliable but not sticky. If your dough feels too dry and crumbly, add water, half a teaspoon at a time. Conversely, if it’s too wet and adheres to your fingers, dust in a little more gluten-free flour blend. You’ll notice that different brands of gluten-free flour absorb liquid differently, so always assess by feel. I always aim for a consistency similar to playdough.
Don’t Overwork the Dough: This is a crucial distinction from traditional pasta making. Unlike wheat flour dough, which develops elasticity with kneading, gluten-free dough does not benefit from extensive working. Over-kneading can make it tough and prone to cracking. Mix until just combined and smooth. Building on this, once your dough comes together, a brief rest helps the flours hydrate fully.
Flouring Your Workspace: A generous dusting of gluten-free flour or fine rice flour on your work surface is essential. This prevents the dough from sticking during rolling and shaping. I always keep a small bowl of flour nearby for easy access. This simple step saves a lot of frustration.
Sealing is Crucial: Nothing is more disheartening than a burst ravioli, losing its delicious filling into the boiling water. To prevent this, ensure a strong seal. After placing your filling, lightly moisten the edges of the dough with a little water before pressing them together. You can use a fork to crimp the edges, or a ravioli stamp for a neat finish. This creates a secure barrier.
Don’t Overcrowd the Pot: Cooking ravioli in batches is non-negotiable. Overcrowding lowers the water temperature too quickly, leading to uneven cooking and potential sticking. Give each delicate parcel plenty of room to swim freely. This ensures they cook evenly and maintain their shape.
Cooking Al Dente: Knowing when this recipe is perfectly cooked takes a little practice. Unlike wheat pasta, gluten-free pasta can go from perfectly tender to mushy very quickly. I always recommend tasting a single ravioli after about 2-3 minutes of boiling. It should be tender but still have a slight bite. For more guidance on achieving perfect pasta, check out this helpful guide on cooking pasta al dente.
Preventing Sticking: Raw ravioli can be surprisingly clingy. Once formed, place your ravioli on a lightly floured baking sheet in a single layer. If you need to stack them, separate layers with parchment paper dusted with flour. This prevents them from fusing together before they hit the pot. A common mistake is piling them up, which guarantees a sticky mess.
Enjoyed this recipe? Share it with a friend or save it to your board for later. Leave a comment below — I love hearing how it turned out!
You May Also Enjoy





You Might Also Love These 🍽️
Recipes picked just for you based on what you’re cooking