Easy Gelatin Treats: Gluten-Free Delight!
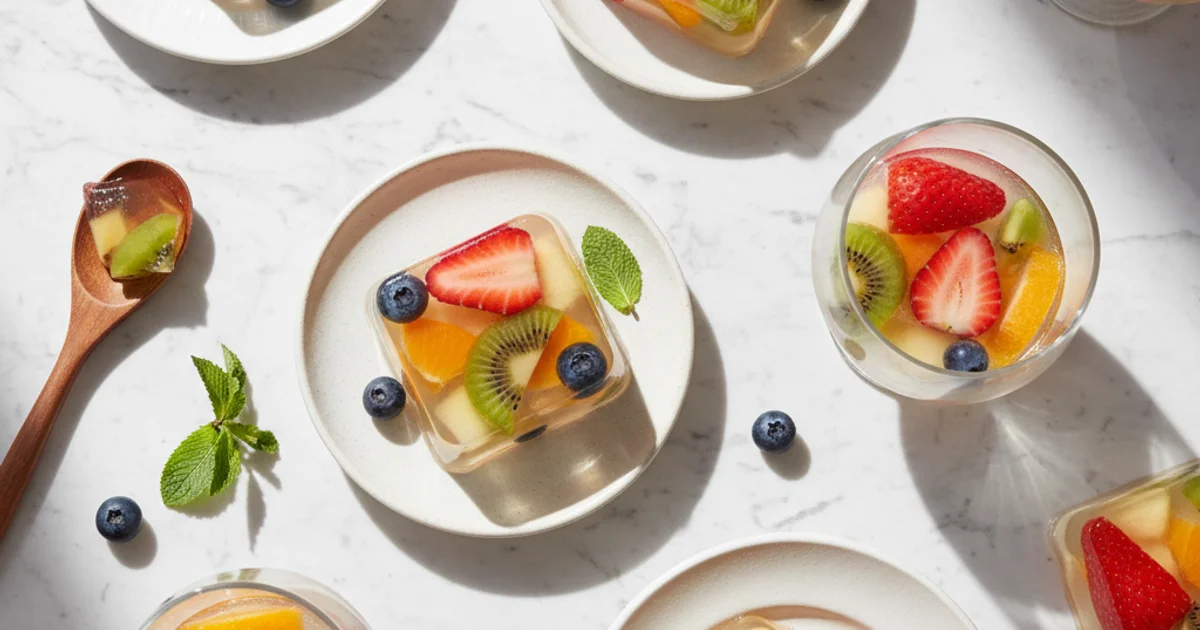
Discover a delicious and easy gelatin recipe that's naturally gluten-free. Learn if gelatin is gluten-free and explore recipes using gelatin for tasty desserts!
- 1Introduction: Unlocking the Magic of Gelatin in Your Kitchen
- 2Why You’ll Love This Easy Gelatin Recipe
- 3Ingredients Overview: Crafting Your Gluten-Free Gelatin Treat
- 4Essential Equipment You’ll Need for Homemade Gelatin
- 5Step-by-Step Instructions: Your Perfect Gluten-Free Gelatin Recipe
- 6Pro Tips & Tricks for the Best Gelatin Results
- 7Pro Tips & Tricks for the Best Gelatin Results
Ingredients
Gelatin Base
- 2 packets (0.25 oz each) unflavored gelatin powder
- 1/2 cup cold water (for blooming)
- 1 1/2 cups hot water or fruit juice (for dissolving)
Flavor & Sweetener
- 1 1/2 cups cold fruit juice (e.g., apple, grape, cranberry) OR 1 1/2 cups cold water + 1/4 cup sugar (or to taste)
- 1/2 tsp vanilla extract (optional)
- 1 cup chopped fresh fruit (berries, peaches, grapes - avoid fresh pineapple, kiwi, papaya)
Instructions
Instructions
Lightly grease a 9x5 inch loaf pan or 6 individual ramekins/molds with a neutral oil or cooking spray. Set aside.
Instructions
In a medium heatproof bowl, sprinkle the unflavored gelatin powder evenly over 1/2 cup of cold water. Let it sit for 5-10 minutes to 'bloom' and soften. It will look like a thick, lumpy paste.
Instructions
Meanwhile, heat 1 1/2 cups of water or fruit juice until hot but not boiling. You can do this in a saucepan on the stove or in the microwave.
Instructions
Pour the hot liquid over the bloomed gelatin. Whisk continuously until the gelatin is completely dissolved and no granules remain. This should take 1-2 minutes.
Instructions
Stir in the 1 1/2 cups of cold fruit juice (or cold water + sugar) and vanilla extract (if using). Taste and adjust sweetness if necessary.
Instructions
If adding fresh fruit, gently fold it into the gelatin mixture.
Instructions
Carefully pour the gelatin mixture into your prepared loaf pan or individual molds.
Instructions
Refrigerate for at least 4 hours, or preferably overnight, until the gelatin is completely set and firm to the touch.
Instructions
To unmold, briefly dip the bottom of the mold in warm water (about 10-15 seconds), then invert onto a serving plate. If using a pan, you can cut into squares.
Instructions
Serve chilled and enjoy!
Recipe FAQs
Is gelatin gluten-free?
Does Jell-O have gluten?
What can I use instead of gelatin for a vegan option?
Why didn't my gelatin set properly?
Can I use sugar-free juice for this gelatin recipe?
How long does homemade gelatin last in the refrigerator?
Easy Gelatin Treats: Gluten-Free Delight!
Discover a delicious and easy gelatin recipe that's naturally gluten-free. Learn if gelatin is gluten-free and explore recipes using gelatin for tasty desserts!
Prep Time
15 min
Cook Time
5 min
Total Time
20 min
Gelatin Base
- 2 packets (0.25 oz each) unflavored gelatin powder
- 1/2 cup cold water (for blooming)
- 1 1/2 cups hot water or fruit juice (for dissolving)
Flavor & Sweetener
- 1 1/2 cups cold fruit juice (e.g., apple, grape, cranberry) OR 1 1/2 cups cold water + 1/4 cup sugar (or to taste)
- 1/2 tsp vanilla extract (optional)
- 1 cup chopped fresh fruit (berries, peaches, grapes - avoid fresh pineapple, kiwi, papaya)
Introduction: Unlocking the Magic of Gelatin in Your Kitchen
Remember those wobbly, vibrant desserts from childhood? For many, gelatin conjures images of artificial colors and sugary sweetness. But what if I told you there’s a whole world beyond that, a realm where gelatin transforms into sophisticated, naturally wholesome treats? I’ve spent years in my kitchen exploring the incredible versatility of this ingredient. It’s not just for setting fruit molds; it’s a powerhouse for adding body to sauces, creating silky panna cottas, and even crafting nutrient-dense snacks.
Here’s the thing: many home cooks overlook the true potential of gelatin. They might assume it’s complicated or only for specific, old-fashioned desserts. What I discovered is that a simple gelatin recipe can be an elegant solution for a light dessert or a fun, healthy snack. It’s also a fantastic way to incorporate beneficial proteins into your diet without even trying.
A common question I get is about dietary restrictions, specifically, “is gelatin gluten-free?” The answer is a resounding yes! Pure gelatin, derived from collagen, is naturally free from gluten, making it a safe and enjoyable option for those with celiac disease or gluten sensitivities. This opens up a world of possibilities for creating delightful, worry-free desserts. This particular treat embraces that simplicity, offering a refreshingly light and naturally gluten-free option everyone can enjoy.
Why You’ll Love This Easy Gelatin Recipe
In my kitchen, I always gravitate towards recipes that offer both simplicity and versatility. This particular gelatin recipe ticks both boxes beautifully. You’ll find it incredibly straightforward, requiring minimal ingredients and even less fuss. It’s the kind of treat you can whip up on a whim, perfect for satisfying a sweet craving without spending hours in the kitchen.
Here’s the thing, many people wonder, “is gelatin gluten free?” The answer is a resounding yes, making this a fantastic option for anyone with dietary restrictions or those simply looking for naturally gluten-free desserts. This specific treat addresses that common query directly, offering peace of mind along with its delightful flavor. What I love about this is how easily it adapts. Whether you’re using fresh fruit purees or experimenting with different extracts, the base remains simple, allowing your creativity to shine. It’s a blank canvas for flavor. Building on this, it’s also a wonderfully light and refreshing dessert. Unlike heavy cakes or rich pastries, this offers a delicate sweetness that cleanses the palate, especially welcome after a substantial meal. It’s a guilt-free pleasure that doesn’t weigh you down. This dish proves that healthy can also be incredibly satisfying and easy to prepare.
Ingredients Overview: Crafting Your Gluten-Free Gelatin Treat
In my kitchen, I always emphasize understanding ingredients. This helps achieve consistent results. Knowing the role of each component transforms cooking into an informed process.
Here’s the thing: making this treat involves a few simple elements, each playing a vital part. You’ll notice that the quality of these ingredients directly impacts the final texture and flavor.
Ingredients Overview: Crafting Your Gluten-Free Gelatin Treat
The foundation of this delightful dish rests on unflavored gelatin powder. This isn’t just any powder; it’s a protein derived from collagen, typically from animal sources. Its magical property is its ability to create a stable, wobbly structure when cooled. While pure gelatin is inherently gluten free gelatin, those with severe sensitivities might seek brands explicitly labeled as such to avoid cross-contamination during processing. This ensures your treat remains safe for everyone.
Building on this, cold water plays a surprisingly crucial role. It’s used for “blooming” the gelatin. This means sprinkling the powder over cold water and letting it sit for a few minutes. This rehydrates the gelatin granules, allowing them to swell evenly. Skipping this step can lead to clumpy, undissolved bits in your final product. Trust me on this one; patience here pays off.
Next, we introduce hot water or fruit juice. This liquid is essential for fully dissolving the bloomed gelatin. The heat breaks down the rehydrated granules, turning them into a smooth, clear liquid. What I discovered is that using fruit juice, like apple or grape, adds a natural sweetness and vibrant color, eliminating the need for artificial dyes. This is how you make gelatin that isn’t just set, but also flavorful.
Sweetener is an optional, yet often desired, addition. You can use granulated sugar, honey, maple syrup, or even artificial sweeteners like stevia. The trick is to add it while the liquid is still warm, ensuring it dissolves completely. Adjusting the sweetness to your personal preference is key; I always taste and adjust as I go. This allows for a completely customizable experience.
Finally, consider flavorings and add-ins to elevate your creation. Fresh fruit pieces, like berries or diced peaches, can be folded in once the mixture has slightly cooled but before it fully sets. Citrus zest, such as lemon or orange, adds a bright aromatic note. Extracts, like vanilla or almond, can also enhance the overall profile. These additions allow for endless variations, making this recipe a versatile canvas for your culinary imagination.
Essential Equipment You’ll Need for Homemade Gelatin
In my kitchen, having the right tools makes all the difference, especially when creating something as delicate as this treat. You don’t need a professional chef’s arsenal, but a few key items will ensure your homemade gelatin recipe comes out perfectly every time. First up, measuring cups and spoons are non-negotiable. Precision is paramount when working with proportions, particularly for the liquid-to-gelatin ratio. Too much liquid, and your treat won’t set; too little, and it becomes rubbery.
Next, a heatproof bowl is essential. I always reach for a glass or stainless steel one for blooming the gelatin and later for dissolving it in hot liquid. This prevents any unwanted reactions with plastic and allows for even heat distribution. A good whisk is another must-have. It’s crucial for ensuring the gelatin powder dissolves completely without any pesky lumps. What I discovered is that a small, balloon whisk works best for reaching into the corners of your bowl.
For heating liquids, a sturdy saucepan is indispensable. Choose one with a heavy bottom to prevent scorching, especially if you’re simmering fruit juices or other ingredients for your base. Then, consider your serving dish or molds. A classic 9x13 inch pan works wonderfully for a large, shareable slab, but individual ramekins or fun silicone molds can elevate the presentation. I love using silicone molds for easy removal and playful shapes, especially if I’m making this for kids. Finally, a flexible spatula is incredibly useful for scraping down the sides of your bowl and ensuring all the liquid is transferred. These simple tools set you up for success.
Step-by-Step Instructions: Your Perfect Gluten-Free Gelatin Recipe
Here are steps 1 to 3 of the instructions section:
-
Bloom the Gelatin. To begin, pour the specified amount of cold water into a medium-sized, heatproof bowl. Evenly sprinkle the gelatin powder over the surface of the cold water. Do not stir it in. Allow the gelatin to sit undisturbed for 5-10 minutes, or until it has fully absorbed the water and become a thick, opaque, and slightly jiggly mass. This process is crucial for preventing lumps and ensuring a smooth final product.
-
Dissolve the Gelatin. Once the gelatin has bloomed, carefully add the hot liquid (such as boiling water or heated fruit juice) to the bowl with the bloomed gelatin. Whisk continuously and gently until the gelatin is completely dissolved and no granules remain. The mixture should be clear and free of any visible gelatin particles.
-
Add Flavor & Sweetener. Now, incorporate your desired fruit juice, sweetener (like honey, maple syrup, or sugar), and any additional flavorings such as extracts (vanilla, almond, etc.) or zest. Stir thoroughly until all ingredients are well combined and the sweetener has fully dissolved, ensuring a uniformly flavored gelatin.
-
Pour & Chill. Carefully pour the gelatin mixture into your prepared molds or a single serving dish. If using individual molds, fill them almost to the top, leaving a small space for expansion. Transfer the molds to the refrigerator and chill for at least 3-4 hours, or until the gelatin is completely firm and set.
-
Unmold & Serve. Once fully set, gently unmold your gelatin treats. For easier release from molds, you can briefly dip the bottom of the mold in warm water (being careful not to get water into the gelatin) for a few seconds before inverting onto a plate. Serve immediately and enjoy your delightful, naturally gluten-free treats!
Pro Tips & Tricks for the Best Gelatin Results
Pro Tips & Tricks for the Best Gelatin Results
Here’s the thing: achieving that perfectly set, crystal-clear treat isn’t just about following the steps. It’s about understanding the science behind it. I always emphasize the importance of blooming your gelatin. This crucial first step ensures a smooth, lump-free consistency. You’ll notice that properly bloomed gelatin dissolves evenly, preventing those grainy bits no one enjoys. This is especially important for anyone wondering how made gelatin becomes so smooth. Building on this, patience is truly a virtue when working with this ingredient. Rushing the blooming process can lead to an uneven texture in your final product.
The key difference is in temperature control. A common mistake is introducing gelatin to boiling liquids. Avoid boiling the mixture once the gelatin has been added. High heat can actually degrade the protein structure of the gelatin. This degradation reduces its ability to set properly, resulting in a weaker, less firm treat. Instead, gently warm your liquid ingredients before stirring in the bloomed gelatin until fully dissolved. For those curious about recipes using gelatin, this temperature sensitivity is a universal rule across all applications. Trust me on this one; a gentle hand with heat makes all the difference for a robust set.
What I discovered is that chilling time is non-negotiable. Patience with chilling is paramount for a firm set. While it might be tempting to peek or even try to speed things up in the freezer, resist the urge. This treat needs ample time in the refrigerator to fully solidify. Typically, this means at least 4 hours, but often overnight yields the best results. The secret is allowing the protein molecules to properly link and form a stable gel network. This adequate chilling prevents a wobbly or unset dessert. In my kitchen, I always plan ahead to give it plenty of time to firm up.
Worth noting here are the specific considerations for fruit. While fruit adds wonderful flavor and color, some fresh varieties are problematic. Fresh pineapple, kiwi, and papaya contain enzymes (like bromelain in pineapple) that break down gelatin’s proteins. This means your treat simply won’t set if these fruits are added raw. For a deeper dive into how enzymes affect gelatin, check out this informative article on Serious Eats. If you wish to use these fruits, you must cook them first to deactivate these enzymes, or opt for canned versions, which have already been heat-treated. This is a common pitfall for those making this dish for the first time.
Here’s what actually works for achieving a beautifully clear treat. If you desire a perfectly translucent result, consider straining your liquid after the gelatin has dissolved. A fine-mesh sieve or even cheesecloth can remove any tiny impurities or undissolved particles. This step is particularly useful when making layered desserts where clarity enhances the visual appeal. While not strictly necessary for flavor, it certainly elevates the presentation. This extra effort can make your homemade gluten free gelatin truly shine.
Enjoyed this recipe? Share it with a friend or save it to your board for later. Leave a comment below — I love hearing how it turned out!
You May Also Enjoy





You Might Also Love These 🍽️
Recipes picked just for you based on what you’re cooking