Bao Wrappers: Buy or DIY? Plus Meat Bao Recipe!
Wondering, "can I buy bao wrappers?" Yes! Learn where to find them or make them, plus a delicious recipe for bao buns with meat. Are bao buns gluten free? Find out!
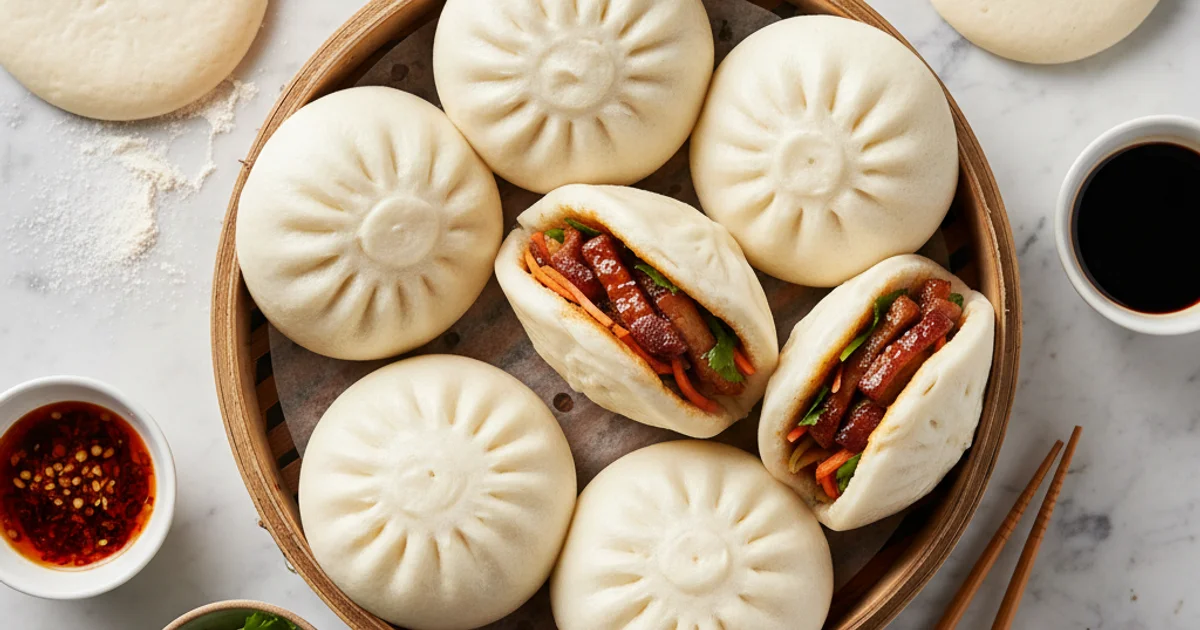
- 1Introduction: Unlocking the Secret to Perfect Steamed Buns at Home
- 2Why You’ll Love This Easy Bao Bun Recipe
- 3Ingredients Overview: Crafting Your Fluffy Bao Buns and Savory Filling
- 4Essential Equipment You’ll Need for Perfect Steamed Buns
- 5Step-by-Step Instructions: From Dough to Delicious Bao Buns with Meat
- 6Pro Tips & Tricks for Fluffy, Flavorful Bao Buns
- 7Pro Tips & Tricks for Fluffy, Flavorful Bao Buns
Ingredients
For the Bao Dough (Homemade)
- 1 cup warm milk (105-115°F / 40-46°C)
- 1 packet (2 1/4 tsp) active dry yeast
- 1/4 cup granulated sugar
- 3 cups all-purpose flour (plus more for dusting)
- 1 tbsp baking powder
- 1 tbsp vegetable oil
- 1/2 tsp salt
For the Pork Filling
- 1 lb ground pork
- 2 tbsp soy sauce
- 1 tbsp oyster sauce
- 1 tsp rice wine vinegar
- 1 tsp sesame oil
- 1 tbsp brown sugar
- 2 cloves garlic, minced
- 1 tbsp fresh ginger, grated
- 2 tbsp chopped scallions
- 1 tbsp cornstarch
- 2 tbsp water (for slurry)
For Assembly & Steaming
- Parchment paper, cut into 3-inch squares
Instructions
Instructions
Activate yeast in warm milk with sugar.
Instructions
Combine flour, baking powder, and salt in a bowl.
Instructions
Add yeast mixture and oil to dry ingredients; mix and knead until smooth dough forms (approx. 8-10 mins).
Instructions
Let dough rise in a warm place until doubled (approx. 1-1.5 hours).
Instructions
While dough rises, prepare the filling: mix all filling ingredients (except cornstarch slurry) and cook until browned.
Instructions
Add cornstarch slurry to filling, cook until thickened. Let cool.
Instructions
Punch down dough, divide into 12 equal pieces.
Instructions
Roll each piece into a 4-5 inch circle.
Instructions
Place 1-2 tbsp of filling in the center of each wrapper; fold and pleat to seal.
Instructions
Place each bao on a parchment square.
Instructions
Let buns rise again for 20-30 minutes.
Instructions
Steam buns in a preheated steamer for 10-12 minutes until cooked through and fluffy.
Equipment You'll Need
Here's what I use to make this recipe perfectly every time:
- Steamer — → Buy Now
- Large Mixing Bowl — For combining your dough ingredients, a spacious bowl is essential. You'll need room for the yeast to activate and the dough to rise without spilling over. I always opt for a sturdy, non-reactive material like glass or stainless steel. → Buy Now
- Rolling Pin — Even if you're not making your own wrappers from scratch, a rolling pin is incredibly useful for gently shaping the dough. For those venturing into homemade wrappers, a small, tapered Chinese-style rolling pin offers precision, but a standard Western rolling pin works perfectly too. → Buy Now
- Parchment Paper Squares — Trust me on this one, these are your best friends for preventing sticking. Cutting small squares of parchment paper to place under each bun before steaming ensures they lift off easily without tearing. You can buy pre-cut squares or cut your own from a roll. → Buy Now
- Measuring Cups & Spoons — Accuracy is paramount in baking, and making bao is no exception. Precise measurements of flour, liquid, and leavening agents are crucial for the dough's texture. I always use a digital scale for flour for the most consistent results. → Buy Now
- Wok or Large Pot — This is what your steamer basket will sit in or on. Ensure it's wide enough to accommodate your steamer without it touching the water directly, but also deep enough to hold a good amount of water for steaming. A tight-fitting lid is crucial to build up and retain steam. → Buy Now
- Optional: Stand Mixer with Dough Hook — If you're making your own dough, a stand mixer can save your arms a lot of work. The dough hook attachment kneads the dough efficiently, developing the gluten for that perfect chewiness. However, hand kneading is entirely doable and quite therapeutic. → Buy Now
- Optional: Food Processor — For the filling, a food processor can quickly mince vegetables or finely chop meat, saving prep time. This is especially helpful if you're making a large batch of buns with meat. → Buy Now
Recipe FAQs
Can I buy bao wrappers at a regular grocery store?
Are bao buns gluten free?
What kind of meat is best for bao buns with meat?
How do I prevent my bao buns from sticking to the steamer?
Why did my bao buns turn out dense or hard?
Can I bake bao buns instead of steaming them?
Bao Wrappers: Buy or DIY? Plus Meat Bao Recipe!
Wondering, "can I buy bao wrappers?" Yes! Learn where to find them or make them, plus a delicious recipe for bao buns with meat. Are bao buns gluten free? Find out!
Prep Time
45 min
Cook Time
20 min
Total Time
65 min
For the Bao Dough (Homemade)
- 1 cup warm milk (105-115°F / 40-46°C)
- 1 packet (2 1/4 tsp) active dry yeast
- 1/4 cup granulated sugar
- 3 cups all-purpose flour (plus more for dusting)
- 1 tbsp baking powder
- 1 tbsp vegetable oil
- 1/2 tsp salt
For the Pork Filling
- 1 lb ground pork
- 2 tbsp soy sauce
- 1 tbsp oyster sauce
- 1 tsp rice wine vinegar
- 1 tsp sesame oil
- 1 tbsp brown sugar
- 2 cloves garlic, minced
- 1 tbsp fresh ginger, grated
- 2 tbsp chopped scallions
- 1 tbsp cornstarch
- 2 tbsp water (for slurry)
For Assembly & Steaming
- Parchment paper, cut into 3-inch squares
Introduction: Unlocking the Secret to Perfect Steamed Buns at Home
The thought of biting into a perfectly steamed bao bun, pillowy soft and bursting with savory filling, is enough to make anyone’s stomach rumble. For many home cooks, however, the idea of creating these culinary masterpieces from scratch can feel daunting. The dough, the steaming process, the intricate folds – it all seems like a lot, leading to a common question I hear in my kitchen: can I buy bao wrappers? It’s a completely valid inquiry, as the convenience of pre-made ingredients often simplifies ambitious recipes. What I discovered is that while store-bought options exist and can certainly get the job done, mastering the art of making your own wrappers isn’t as intimidating as it seems. This guide will walk you through everything you need to know, whether you choose the path of convenience or decide to embark on a rewarding journey of crafting your own dough. We’ll explore both avenues, ensuring you can successfully create incredible steamed buns with a hearty meat filling right in your own home. Get ready to impress your taste buds and your dinner guests with this truly satisfying dish.
Why You’ll Love This Easy Bao Bun Recipe
Here’s the thing, many home cooks shy away from making bao buns from scratch, assuming it’s too complicated or time-consuming. What I love about this recipe is its surprising simplicity. It demystifies the process, breaking down each step into manageable parts. You’ll find yourself creating bakery-quality steamed buns right in your own kitchen. This recipe is designed to deliver that signature pillowy-soft texture, a hallmark of truly excellent bao, even if you’re a complete novice.
Building on this, the star of this dish isn’t just the wrapper; it’s the incredibly flavorful filling. I always focus on achieving a perfect balance of savory and a hint of sweetness in my ‘buns with meat’ mixture. We’re talking about juicy, seasoned pork (or your preferred protein) that complements the delicate bao wrapper beautifully. This isn’t just another dinner; it’s an experience, a journey into authentic flavors that will truly satisfy.
Beyond the delicious outcome, this recipe offers incredible versatility. In my kitchen, I constantly experiment with different fillings and modifications. For instance, if you’re wondering are bao buns gluten free, while this specific wrapper recipe uses wheat flour, the filling can easily be adapted. You can explore alternative flours for the wrappers or focus on naturally gluten-free fillings. The trick is understanding the core technique, then making it your own. This adaptability means you can cater to various tastes or dietary requirements without sacrificing quality. Furthermore, making these buns is a genuinely enjoyable process. It’s a hands-on culinary adventure that’s perfect for a weekend project or a fun activity with family. The satisfaction of seeing those perfectly steamed, plump buns emerge from the steamer is immense. You’ll notice that the effort put in truly pays off, offering a unique and impressive dish that will delight anyone lucky enough to try it. This treat quickly becomes a favorite, a testament to the joy of homemade food.
Ingredients Overview: Crafting Your Fluffy Bao Buns and Savory Filling
When considering making bao buns, the first question often revolves around the wrappers. Here’s the thing, while you absolutely can i buy bao wrappers, understanding the ingredients for homemade dough offers unparalleled freshness and a truly satisfying texture. For the dough itself, I always reach for all-purpose flour, but ideally one with a lower protein content. This prevents the buns from becoming tough and gives them that characteristic soft, pillowy feel. You’ll notice that lower protein flours yield a more tender crumb. Then there’s the yeast – I prefer instant yeast because it’s so convenient; no proofing required. Active dry yeast works just as well, but needs a little warm water to wake it up first. A touch of sugar isn’t just for sweetness; it activates the yeast, helping it thrive and produce those lovely air pockets. It also contributes to the dough’s tenderness. For an extra boost in fluffiness, baking powder is my secret weapon. It provides a second leavening agent, ensuring your buns are light as air. Hydration comes from a mix of warm milk and water. Milk adds richness and a slightly softer crumb, while water keeps it light. Finally, a little vegetable oil or neutral oil kneaded into the dough makes it incredibly pliable and gives the finished buns a smooth, almost glossy exterior. If you opt for store-bought wrappers, look for ones specifically labeled “bao buns” or “steamed buns” in the frozen aisle. Avoid dumpling wrappers, as they are typically thinner and less elastic, not designed for the fluffy texture of a bao.
The heart of this recipe lies in its savory filling, especially when crafting bao buns with meat. My go-to is ground pork, and trust me on this one, a higher fat content (around 20-30%) is crucial. This fat renders down, keeping the filling moist and flavorful, preventing it from drying out during steaming. For that quintessential umami depth, soy sauce is non-negotiable. I use a light soy sauce for everyday cooking. Building on this, oyster sauce adds a beautiful rich, slightly sweet, and complex flavor that truly elevates the pork. It provides a glossy finish to the filling too. A splash of rice wine vinegar introduces a subtle tang, balancing the richness of the pork and other sauces. The aromatic foundation comes from freshly grated ginger and minced garlic. These two ingredients are non-negotiable for authentic Asian flavors. For that distinctive nutty aroma, a drizzle of toasted sesame oil goes in right at the end. A touch of brown sugar helps to balance the savory and tangy notes, rounding out the flavor profile beautifully. The secret is a cornstarch slurry at the end. This thickens the filling, ensuring it stays cohesive inside the bun and doesn’t leak out during steaming. Using fresh, high-quality ingredients for both the dough and the filling makes all the difference in the final taste and texture of your homemade bao.
Essential Equipment You’ll Need for Perfect Steamed Buns
In my kitchen, having the right tools makes all the difference, especially when tackling something new like homemade steamed buns. You don’t need a professional setup, but a few key items will ensure your journey to fluffy, delicious bao is smooth and successful. What I discovered is that simple equipment can yield truly impressive results.
-
Steamer: This is non-negotiable for achieving that signature soft, pillowy texture. You have options here. A traditional bamboo steamer basket is my personal favorite; it allows steam to circulate beautifully and absorbs excess moisture, preventing your buns from getting soggy. Alternatively, a metal steamer insert that fits into a large pot works just as well. Just make sure the pot has a tight-fitting lid to trap the steam effectively. The key difference is that bamboo offers a slight aromatic benefit.
-
Large Mixing Bowl: For combining your dough ingredients, a spacious bowl is essential. You’ll need room for the yeast to activate and the dough to rise without spilling over. I always opt for a sturdy, non-reactive material like glass or stainless steel.
-
Rolling Pin: Even if you’re not making your own wrappers from scratch, a rolling pin is incredibly useful for gently shaping the dough. For those venturing into homemade wrappers, a small, tapered Chinese-style rolling pin offers precision, but a standard Western rolling pin works perfectly too.
-
Parchment Paper Squares: Trust me on this one, these are your best friends for preventing sticking. Cutting small squares of parchment paper to place under each bun before steaming ensures they lift off easily without tearing. You can buy pre-cut squares or cut your own from a roll.
-
Measuring Cups & Spoons: Accuracy is paramount in baking, and making bao is no exception. Precise measurements of flour, liquid, and leavening agents are crucial for the dough’s texture. I always use a digital scale for flour for the most consistent results.
-
Wok or Large Pot: This is what your steamer basket will sit in or on. Ensure it’s wide enough to accommodate your steamer without it touching the water directly, but also deep enough to hold a good amount of water for steaming. A tight-fitting lid is crucial to build up and retain steam.
-
Optional: Stand Mixer with Dough Hook: If you’re making your own dough, a stand mixer can save your arms a lot of work. The dough hook attachment kneads the dough efficiently, developing the gluten for that perfect chewiness. However, hand kneading is entirely doable and quite therapeutic.
-
Optional: Food Processor: For the filling, a food processor can quickly mince vegetables or finely chop meat, saving prep time. This is especially helpful if you’re making a large batch of buns with meat.
These tools, whether basic or advanced, will significantly streamline your bao-making process. Having them ready before you start ensures a smooth and enjoyable cooking experience.
Step-by-Step Instructions: From Dough to Delicious Bao Buns with Meat
Here are the first three steps for your bao bun recipe:
1. Prepare the Filling: Marinate and Cook the Meat. In a medium bowl, combine your chosen ground meat (pork, chicken, or beef) with soy sauce, rice vinegar, sesame oil, minced garlic, grated ginger, a pinch of sugar, and a dash of white pepper. Mix thoroughly to ensure the meat is evenly coated, then let it marinate for at least 15 minutes at room temperature, or up to 30 minutes in the refrigerator for deeper flavor. While the meat marinates, heat a large skillet or wok over medium-high heat with a tablespoon of cooking oil. Add the marinated meat and cook, breaking it up with a spoon, until it is fully browned and cooked through, about 5-7 minutes. If desired, stir in finely diced vegetables such as carrots, cabbage, or mushrooms during the last few minutes of cooking until tender-crisp, then set the cooked filling aside to cool slightly.
2. Prepare the Wrappers (Choose One): Option A: Homemade Dough - Activate Yeast and Mix Dough. In a large mixing bowl, combine warm water (105-115°F / 40-46°C) with a teaspoon of sugar and sprinkle active dry yeast over the top. Let it sit for 5-10 minutes until the yeast is foamy, indicating it’s active. Once foamy, add the all-purpose flour, baking powder, and a pinch of salt to the yeast mixture. Using a wooden spoon or your hands, mix until a shaggy dough forms and all the flour is incorporated.
3. Prepare the Wrappers (Choose One): Option A: Homemade Dough - Knead, First Rise, and Punch Down. Turn the shaggy dough out onto a lightly floured surface and knead it for 8-10 minutes until it becomes smooth, elastic, and no longer sticky. Form the dough into a ball and place it in a lightly oiled bowl, turning once to coat. Cover the bowl with plastic wrap or a clean kitchen towel and let it rise in a warm, draft-free place for 1-1.5 hours, or until it has doubled in size. Once doubled, gently punch down the dough to release the air, then turn it out onto a lightly floured surface.
-
Option B: Using Store-Bought Wrappers: If you’re opting for the convenience of store-bought bao wrappers, the first crucial step is proper thawing. Remove the frozen wrappers from their packaging and arrange them in a single layer on a plate lined with parchment paper to prevent sticking. Cover them loosely with a damp kitchen towel or plastic wrap to maintain moisture, and let them thaw at room temperature for approximately 30-60 minutes, or until they are pliable and easy to work with. Handle the thawed wrappers gently to avoid tearing, as they can be delicate.
-
Assembling the Bao Buns: Once your wrappers (homemade or store-bought) are ready and your filling is prepared, it’s time to assemble the bao buns. Take one wrapper and place about 1.5 to 2 tablespoons of your cooled meat filling in the center. For a classic pleated bao, bring the edges of the wrapper up around the filling, using your thumb and forefinger to create small, overlapping pleats as you work your way around the circumference until the top is sealed. Alternatively, for a simpler half-moon shape, fold the wrapper in half over the filling and firmly crimp the edges together with your fingers or a fork to create a secure seal.
-
Steaming the Buns: Now, it’s time to transform your assembled bao into fluffy, delectable treats. Line your steamer basket(s) with parchment paper or cabbage leaves to prevent sticking. Arrange the bao buns in the steamer, ensuring there is ample space between each bun to allow for expansion during steaming – overcrowding will lead to sticky, unevenly cooked bao. Bring water to a rolling boil in the pot beneath your steamer, then place the steamer basket(s) over the boiling water, ensuring the water does not touch the bottom of the basket. Cover the steamer and steam the buns for 10-15 minutes for small to medium bao, or 15-20 minutes for larger ones, until they are plump, soft, and cooked through, which you can verify by gently pressing one – it should spring back.
Here are steps 7 to 7 for your recipe article:
- Steam the Bao Buns: Place the prepared bamboo steamer basket (or steaming rack) into a large pot or wok with about 1-2 inches of water already boiling vigorously. Visual cue: The water should be bubbling rapidly, creating plenty of steam. Carefully lower the steamer basket with the bao buns into the pot, ensuring the water level is below the bottom of the steamer so the buns don’t get soggy. Cover the steamer tightly with its lid. Steam for 10-12 minutes, or until the bao buns are puffy, glossy, and cooked through. Troubleshooting Tip: If your bao buns appear deflated or wrinkled after steaming, it could be due to opening the lid too early during steaming (which releases trapped steam) or over-steaming (which can cause them to collapse). Ensure the lid stays on for the full steaming time and avoid steaming for longer than recommended. Serve immediately while hot.
Pro Tips & Tricks for Fluffy, Flavorful Bao Buns
Pro Tips & Tricks for Fluffy, Flavorful Bao Buns
Building on this, mastering the art of bao making involves a few key techniques that elevate your results from good to truly exceptional. In my kitchen, I’ve learned that patience and attention to detail pay off immensely. You’ll notice that truly fluffy bao buns come from a well-rested, properly handled dough. The trick is to treat your dough gently, almost coaxing it into submission. Overworking the dough is a common mistake that leads to dense, chewy buns. Instead, aim for a soft, pliable texture that springs back slowly when lightly pressed. This gentle approach ensures the gluten develops just enough for structure without becoming tough.
Here’s the thing, achieving that cloud-like texture also depends heavily on your steaming technique. A common mistake is to overcrowd the steamer, which restricts airflow and results in uneven cooking. Always leave ample space between each bun for the steam to circulate freely. Maintain a consistent, rolling boil in your steamer pot throughout the cooking process. Avoid the temptation to lift the lid prematurely; this sudden drop in temperature can cause the bao to collapse. I always set a timer and resist peeking until the recommended steaming time has elapsed. For insights on proper steaming, you can consult resources like this guide on steaming techniques. What I discovered is that a perfectly steamed bun holds its shape and feels light.
The secret is in the filling consistency. A good bao filling strikes a balance – it shouldn’t be too wet, which can make the bun soggy, nor too dry, which makes for a less enjoyable bite. I always aim for a slightly saucy but not runny mixture. This ensures the meat remains succulent and flavorful. Worth noting here, when preparing the buns with meat, ensure your filling is cooled before assembly. Hot filling can prematurely activate the yeast in the dough, leading to an undesirable texture. Parchment paper is your friend in this process. Cutting small squares and placing each bun on one before steaming prevents sticking to the steamer basket. This simple step makes transferring and serving much easier.
In practice, the resting time for your dough is crucial for both flavor and texture development. After kneading, allow the dough to rise in a warm, draft-free place until it has doubled in size. This primary fermentation builds essential flavor compounds. Furthermore, after shaping your buns, a second, shorter proofing period is necessary. This final rise, often called proofing, gives the buns their characteristic airy lightness. Finally, mastering the art of sealing your buns prevents any delicious filling from escaping during steaming. Practice makes perfect, but a tight, secure seal, whether a simple pleat or a more intricate fold, is vital for success.
Enjoyed this recipe? Share it with a friend or save it to your board for later. Leave a comment below — I love hearing how it turned out!
You May Also Enjoy





You Might Also Love These 🍽️
Recipes picked just for you based on what you’re cooking