Gluten-Free Pretzels: Your Ultimate Guide!
Wondering if pretzels are gluten free? Discover the truth, shop the best gluten free pretzels, and learn how to bake amazing homemade ones!
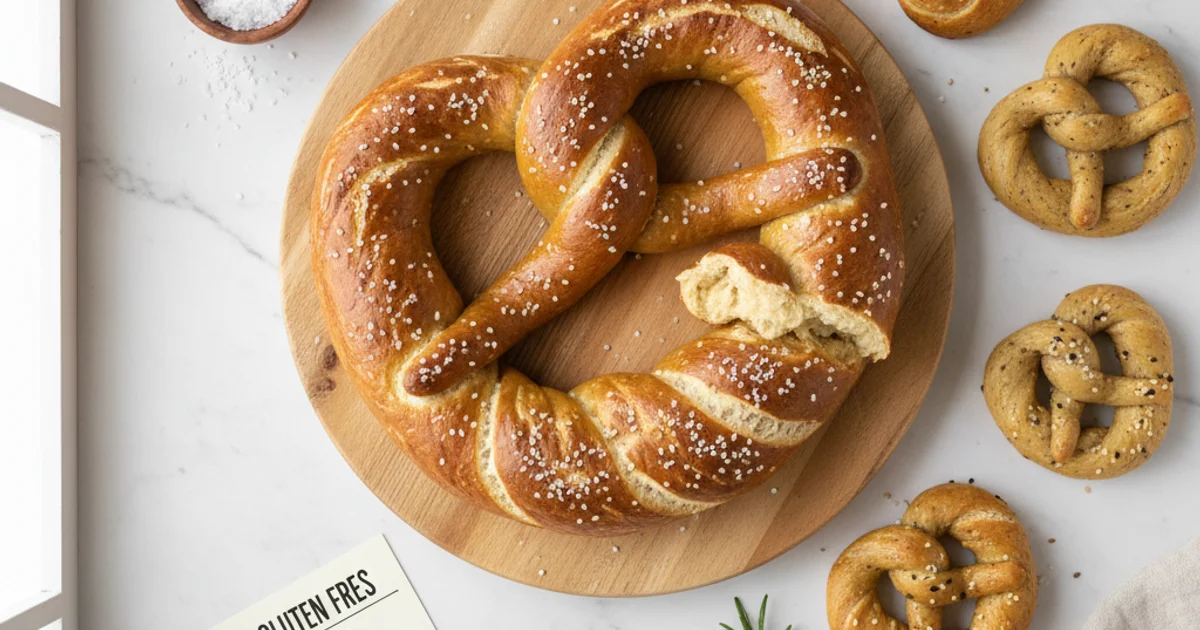
- 1Introduction: Are Pretzels Gluten Free and Why This Matters
- 2Why You’ll Love This Homemade Gluten Free Pretzels Recipe
- 3Do Pretzels Have Gluten? Understanding Commercial Ingredients
- 4Ingredients Overview: What Goes Into the Best Gluten Free Pretzels
- 5Equipment You’ll Need for Baking Success
- 6Step-by-Step Instructions for Perfect Twisted Pretzels
Ingredients
Dough Ingredients
- 1 ½ cups warm water
- 2 ¼ tsp active dry yeast
- 1 tbsp brown sugar
- 2 tbsp melted unsalted butter
- 4 cups gluten-free measure-for-measure flour blend
- 1 tsp xanthan gum (if not in blend)
- 1 ½ tsp salt
Baking Soda Bath
- 9 cups water
- ½ cup baking soda
Toppings
- 1 large egg beaten with 1 tbsp water
- Coarse sea salt or pretzel salt
Instructions
Instructions
Dissolve yeast and brown sugar in warm water and let foam for 5 minutes.
Instructions
Mix in melted butter, gluten free flour blend, xanthan gum, and salt until a cohesive dough forms.
Instructions
Divide dough into 8 equal pieces and roll each into a long rope.
Instructions
Form traditional pretzel shapes by crossing ends over each other and pressing onto the base.
Instructions
Boil water and baking soda in a wide pot; dip each pretzel for 20-30 seconds.
Instructions
Transfer to a parchment-lined baking sheet, brush with egg wash, and sprinkle with coarse salt.
Instructions
Bake at 450°F (230°C) for 12-15 minutes until deep golden brown.
Recipe FAQs
Are regular pretzels gluten free?
Do pretzels contain gluten in commercial varieties?
What are the best gluten free pretzels to buy at the store?
Can I make gluten free pretzel crisps using this recipe?
Why is the baking soda bath necessary?
Can I freeze homemade gluten free pretzels?
Gluten-Free Pretzels: Your Ultimate Guide!
Wondering if pretzels are gluten free? Discover the truth, shop the best gluten free pretzels, and learn how to bake amazing homemade ones!
Prep Time
25 min
Cook Time
15 min
Total Time
40 min
Dough Ingredients
- 1 ½ cups warm water
- 2 ¼ tsp active dry yeast
- 1 tbsp brown sugar
- 2 tbsp melted unsalted butter
- 4 cups gluten-free measure-for-measure flour blend
- 1 tsp xanthan gum (if not in blend)
- 1 ½ tsp salt
Baking Soda Bath
- 9 cups water
- ½ cup baking soda
Toppings
- 1 large egg beaten with 1 tbsp water
- Coarse sea salt or pretzel salt
Introduction: Are Pretzels Gluten Free and Why This Matters
The craving hits: that salty, chewy, perfectly browned pretzel. It’s a classic snack, deeply comforting and satisfying. But if you’re navigating the world of gluten-free eating, a common question immediately pops up: are pretzels gluten free? For many years, the answer was a straightforward no, leaving those with celiac disease or gluten sensitivities feeling left out of this beloved treat. Traditional pretzels are, unfortunately, made with wheat flour, a primary source of gluten. This means most store-bought options are off-limits, which can be a real bummer when you’re searching for a quick, safe snack.
I remember the frustration of scanning ingredient labels, only to be met with wheat, wheat, and more wheat. It felt like a culinary roadblock, especially when everyone else was enjoying warm, soft pretzels. What I discovered, after countless kitchen experiments, is that you don’t have to miss out. The landscape of gluten-free baking has evolved dramatically, offering fantastic alternatives that truly replicate the texture and flavor we all adore.
This recipe isn’t just about avoiding gluten; it’s about reclaiming a classic comfort food. We’re going to dive into how to create pretzels that are so good, even your gluten-loving friends won’t believe they’re made without wheat. Forget dry, crumbly imitations. We’re talking about perfectly chewy interiors and that signature golden-brown, slightly crisp exterior. Get ready to bake your way to pretzel perfection, safely and deliciously.
Why You’ll Love This Homemade Gluten Free Pretzels Recipe
Here’s why this homemade gluten-free pretzel recipe will become your new favorite obsession. Forget those often-disappointing store-bought versions that can be dry, crumbly, or lack that essential chewiness. This recipe is a game-changer, delivering everything you cherish in a classic pretzel: a beautiful, deep golden-brown crust, a wonderfully chewy interior, and that irresistible salty finish that makes every bite a delight. You’ll be amazed at how beautifully the dough handles, making the shaping process surprisingly simple and enjoyable, even if you’re new to baking. In my own kitchen, these quickly became a staple because they genuinely replicate the traditional pretzel experience without any gluten, proving that delicious gluten-free baking is absolutely achievable. There’s a real magic in capturing the essence of a bakery-fresh pretzel right in your own home.
Beyond the incredible flavor and texture, there’s a significant financial benefit to making these yourself. Commercial gluten-free snacks, especially those aiming for authentic taste and texture, can be quite expensive. Crafting these pretzels at home is not only significantly more economical but also yields a flavor and freshness that pre-packaged options simply cannot match. The secret to this recipe’s consistent success and ease lies in using a high-quality 1-to-1 gluten-free flour blend. This thoughtful approach simplifies your ingredient list, meaning you won’t need a pantry stocked with obscure flours, and guarantees perfect results every single time. It’s also an absolutely fantastic activity for the whole family! Kids adore helping to shape the dough, and there’s an immense sense of accomplishment and shared joy when these golden beauties emerge from the oven. It transforms snack time into a fun, interactive culinary adventure. The unparalleled satisfaction of biting into a warm, freshly baked, homemade pretzel is truly one of life’s simple pleasures.
Do Pretzels Have Gluten? Understanding Commercial Ingredients
Here’s the thing, when you grab a bag of pretzels from the store, the answer to “are pretzels gluten free” is almost always a resounding no. Traditional pretzels are fundamentally built on wheat flour. This flour, whether it’s all-purpose, bread flour, or even specialty varieties, is the primary source of gluten. It’s what gives those classic pretzels their distinctive chew and structure. Beyond the flour, many commercial pretzel recipes also incorporate malt flavoring. While malt itself can be derived from various grains, barley malt is incredibly common in pretzel production. Barley, like wheat, contains gluten. So, if you see “malt extract” or “barley malt syrup” on an ingredient list, that’s another indicator that the product does contain gluten. Understanding these core ingredients helps clarify why most conventional options are off-limits for those avoiding gluten.
The key difference is that while traditional pretzels rely heavily on gluten for their texture, the market has expanded significantly. What I discovered is that many brands now offer specific alternatives. You’ll find a growing selection of gluten free pretzel crisps and other shapes designed to mimic their wheat-based counterparts. These products carefully substitute wheat flour with a blend of gluten-free flours like rice flour, tapioca starch, or potato starch. When navigating the grocery aisles, always turn the package over. Look for clear labeling such as “certified gluten-free” or the gluten-free symbol. This certification ensures the product meets strict standards for gluten content. Without this, even products that seem naturally gluten-free might have cross-contamination risks.
A common mistake is assuming that all “natural” or “organic” pretzels are inherently gluten-free. This isn’t the case; those terms refer to other aspects of food production, not gluten content. To truly know do pretzels contain gluten, you must read the ingredient list and look for explicit gluten-free claims. For those seeking the best gluten free pretzels from a store, brands like Snyder’s of Hanover, Quinn, and Glutino have established themselves as reliable choices. They’ve perfected their recipes to deliver a satisfying crunch and flavor without any wheat. However, even with these excellent store-bought options, nothing quite compares to the fresh, warm taste of homemade. This recipe ensures you know exactly what goes into each bite, offering peace of mind and superior flavor.
Ingredients Overview: What Goes Into the Best Gluten Free Pretzels
In my kitchen, I’ve learned that understanding each ingredient is crucial for baking success. This particular recipe relies on a thoughtful selection of components, each playing a specific role in achieving that authentic pretzel experience without the gluten. We start with a high-quality gluten free measure-for-measure flour blend that already contains xanthan gum. This is non-negotiable for anyone asking, “are pretzels gluten free?” and wanting to make them at home successfully. The xanthan gum acts as a binder, mimicking the elasticity that gluten provides, which is essential for the chewiness we associate with traditional pretzels. Without it, your dough would be crumbly and difficult to work with, resulting in a texture closer to a biscuit than a pretzel. I always recommend using a reputable brand for your flour blend, as quality can vary significantly.
Building on this, active dry yeast is the leavening agent that gives these pretzels their characteristic light and airy interior. It needs warm water to activate, typically between 105°F and 115°F. Too hot, and you kill the yeast; too cold, and it won’t activate, leaving you with dense, flat pretzels. A small amount of brown sugar isn’t just for sweetness; it serves as food for the yeast, helping it to bloom and produce those essential gases that make the dough rise. This combination ensures a robust fermentation process, vital for both texture and flavor development. The slight molasses notes from the brown sugar also add a subtle depth that complements the savory pretzel profile.
Here’s the thing: melted unsalted butter brings richness and tenderness to the dough. It also contributes to a beautiful golden-brown crust during baking. While some recipes might use oil, butter provides a superior flavor and mouthfeel that truly elevates this treat. It’s incorporated directly into the dough, ensuring an even distribution of its luxurious qualities. For the signature pretzel exterior, a baking soda bath is absolutely essential. This isn’t just a quick dip; it’s a critical step that gelatinizes the starch on the dough’s surface, creating that shiny, deep brown crust and contributing to the distinct pretzel flavor. Without this alkaline bath, your pretzels would simply be soft bread sticks. This process is what distinguishes a true pretzel from other baked goods, and it’s a key reason why many wonder, “do pretzels contain gluten?” when they’re made traditionally.
The secret is to ensure your baking soda solution is strong enough to achieve that desired effect, but not so strong that it imparts an unpleasant soapy taste. Finally, a sprinkle of coarse pretzel salt after the bath adds that iconic savory finish. The large crystals adhere well to the wet dough, providing bursts of saltiness with every bite. This simple addition is a hallmark of authentic pretzels and completes the flavor profile perfectly. Each ingredient, from the flour blend to the salt, works in harmony to create the best gluten free pretzels you’ll ever taste.
Equipment You’ll Need for Baking Success
Building on this, having the right tools makes all the difference when tackling a new baking project, especially with gluten-free flours. In my kitchen, I’ve learned that a few key pieces of equipment can elevate your homemade pretzels from good to truly exceptional. These aren’t just suggestions; they are game-changers for ensuring your dough develops the right texture and your pretzels achieve that coveted golden-brown crust. Using standard tools might work, but for bakery-quality results, investing in these specific items is truly worth it. It simplifies the process and significantly improves the final product.
Here’s the thing, gluten-free dough behaves differently than traditional wheat-based dough. It can be stickier and less elastic, which means your hands and a simple bowl might not cut it. That’s where a stand mixer with a dough hook attachment becomes indispensable. This powerful tool handles the mixing and kneading with ease, ensuring all ingredients are thoroughly combined without overworking the delicate gluten-free flours. It creates a smooth, consistent dough, which is crucial for shaping those classic pretzel twists. I always recommend using a stand mixer for this recipe; it saves time and guarantees a better dough structure.
The next essential item is a wide, shallow pot for the all-important baking soda bath. The width is key here; it allows you to submerge several pretzel pieces at once without overcrowding, ensuring an even coating. A shallow depth means less water is needed, bringing it to a boil faster. This bath is what gives pretzels their characteristic chewy crust and deep color, so a proper setup is non-negotiable. Trust me on this one, trying to boil pretzels in a small, deep pot is a messy and inefficient endeavor.
You’ll also need a slotted spatula for safely transferring the pretzels from the boiling bath to the baking sheets. The slots allow excess water to drain away, preventing soggy bottoms and promoting that perfect crust development. This simple tool prevents splashes and helps maintain the pretzel’s shape. Finally, baking sheets lined with high-quality parchment paper are crucial. This prevents sticking, which can be a common issue with gluten-free doughs, and ensures easy cleanup. I always use parchment paper; it guarantees your pretzels release cleanly, preserving their beautiful shape.
Step-by-Step Instructions for Perfect Twisted Pretzels
Alright, let’s get those gluten-free pretzels twisted and baked to perfection! This recipe is designed to help you create chewy, golden-brown pretzels that will have everyone asking for more. Forget those days of wondering, “are pretzels gluten free?” – with this recipe, the answer is a resounding YES!
-
Activate the yeast and prepare your dough for success: In a large mixing bowl, combine 1 ½ cups warm water (think bathwater warm, between 105-115°F – too hot will kill the yeast, too cold won’t activate it), 1 tablespoon granulated sugar (this is the yeast’s food!), and 2 ¼ teaspoons active dry yeast. Give it a gentle stir and let it sit for 5-10 minutes. You’ll know it’s ready when the mixture is gloriously foamy and smells slightly yeasty. Now, add 4 cups of your favorite gluten-free all-purpose flour blend (it’s crucial that your blend contains xanthan gum for structure, or add ½ teaspoon separately), 1 teaspoon fine sea salt, and 2 tablespoons of melted unsalted butter to the yeast mixture. Using a stand mixer fitted with a dough hook on low speed, or a sturdy wooden spoon if mixing by hand, combine until a shaggy dough forms. Increase the mixer speed to medium (or continue kneading vigorously by hand) for 5-7 minutes. You’re looking for a dough that’s smooth, elastic, and no longer sticky to the touch. Lightly grease your bowl with a touch of olive oil, place the dough in, turn it once to coat, cover it snugly with plastic wrap, and let it rise in a warm, draft-free spot for about 1 hour, or until it has delightfully doubled in size.
-
Divide and gently roll your dough into graceful ropes: Once your dough has puffed up beautifully, gently punch it down to release the air – a satisfying moment! Turn the dough out onto a lightly floured surface (remember to use gluten-free flour here to prevent sticking). Divide the dough into 12 equal pieces. For best results, use a kitchen scale for precision, aiming for roughly 2.5-3 oz per piece. Take one piece of dough and, with the palms of your hands, gently roll it back and forth on your floured surface. Apply even, light pressure to form a long, thin rope, approximately 18-20 inches in length and about ¼ to ½ inch in thickness. This gluten-free dough can be a little delicate, so be patient and avoid tearing. If it resists, let it rest for a minute, then continue. Repeat this process with all remaining dough pieces.
-
Twist into classic shapes or create fun bites: Now for the fun part – shaping! For traditional pretzel twists, take one of your long ropes and form it into a U-shape. Cross the ends over each other twice, then bring those ends down and firmly press them onto the bottom curve of the U-shape to create that iconic pretzel knot. Don’t be afraid to press firmly to ensure they stay put during baking. For easy pretzel bites (perfect for little hands or dipping!), simply cut each rope into 1-inch pieces using a sharp knife or a dough cutter.
-
The magical baking soda bath and perfect bake: Preheat your oven to 425°F (220°C) and line two large baking sheets with parchment paper. In a wide, shallow pot, bring 8 cups of water to a rolling boil, then carefully stir in ½ cup of baking soda. Reduce the heat to a gentle simmer. This is the crucial step for that classic pretzel crust and flavor! Carefully transfer one pretzel (or a few bites) at a time into the simmering baking soda solution. Let it submerge for approximately 30 seconds per side. Using a slotted spoon, carefully remove the pretzel, allowing any excess liquid to drip off, and place it back onto your parchment-lined baking sheet. Repeat this process with all your pretzels and bites. Once all have been dipped, sprinkle them generously with coarse sea salt (or your preferred topping like everything bagel seasoning).
-
Bake to golden perfection and cool: Transfer your baking sheets to the preheated oven. Bake for 12-15 minutes, or until your gluten-free pretzels achieve a rich, deep golden-brown color and a slightly firm, irresistible texture. The baking time can vary slightly depending on your oven, so keep an eye on them!
-
Cool and serve warm: Once baked, remove the pretzels from the oven and transfer them to a wire rack to cool slightly. While they are tempting to eat immediately, letting them cool for a few minutes improves their texture. Serve warm with your favorite dips – think mustard, cheese sauce, or even a sweet glaze!
Storage Tips: These gluten-free pretzels are best enjoyed fresh, warm from the oven. If you have any leftovers, store them in an airtight container at room temperature for up to 2 days. To refresh, simply pop them in a toaster oven or microwave for a few seconds until warm and soft again. You can also freeze baked pretzels for up to 1 month. Thaw at room temperature and reheat as desired.
Enjoyed this recipe? Share it with a friend or save it to your board for later. Leave a comment below — I love hearing how it turned out!
You May Also Enjoy





You Might Also Love These 🍽️
Recipes picked just for you based on what you’re cooking