Krimpet Magic: Homemade Butterscotch Bliss!
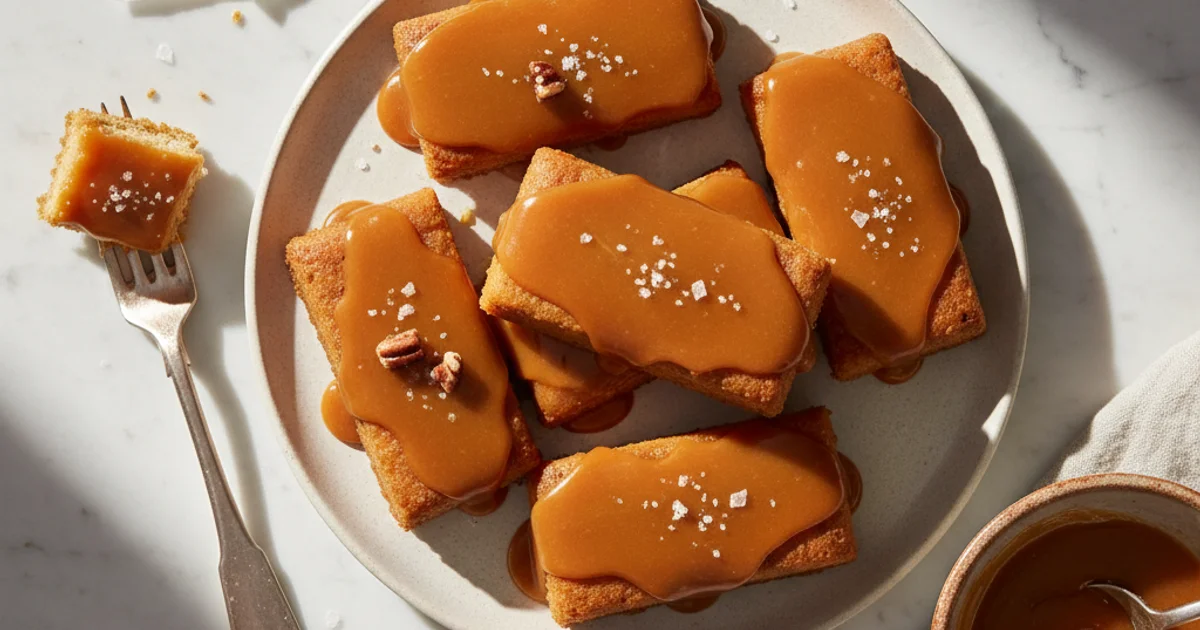
Recreate the iconic taste of Butterscotch Krimpets at home! This recipe guides you through making these soft, sweet krimpet cakes with a rich butterscotch topping.
- 1Introduction: Unlocking the Sweet Nostalgia of Butterscotch Krimpets
- 2Why You’ll Fall in Love with This Homemade Butterscotch Krimpet Recipe
- 3Ingredients Overview: Crafting Your Perfect Butterscotch Krimpets
- 4Essential Equipment You’ll Need for Your Homemade Krimpets
- 5Step-by-Step Instructions: Baking and Glazing Your Butterscotch Krimpets
- 6Pro Tips & Tricks for Perfect Butterscotch Krimpets Every Time
- 7Pro Tips & Tricks for Perfect Butterscotch Krimpets Every Time
Ingredients
For the Cake
- 1 ½ cups all-purpose flour
- 1 cup granulated sugar
- 1 ½ tsp baking powder
- ½ tsp baking soda
- ¼ tsp salt
- 2 large eggs, room temperature
- 1 cup milk, room temperature
- ½ cup unsalted butter, melted and cooled
For the Butterscotch Glaze
- ½ cup unsalted butter
- 1 cup packed light brown sugar
- ½ cup heavy cream
- 1 tsp vanilla extract
- Pinch of salt
Instructions
Instructions
Preheat oven and prepare baking pan.
Instructions
Whisk dry cake ingredients together.
Instructions
Combine wet cake ingredients.
Instructions
Add wet to dry ingredients, mix until just combined.
Instructions
Pour batter into pan and bake.
Instructions
Cool cake completely on a wire rack.
Instructions
Prepare butterscotch glaze by melting butter and brown sugar.
Instructions
Stir in heavy cream, simmer until thickened.
Instructions
Remove from heat, stir in vanilla and salt.
Instructions
Pour warm glaze over cooled cake, spread evenly.
Instructions
Allow glaze to set before slicing into krimpets.
Recipe FAQs
Why is my homemade krimpet cake dry?
My butterscotch glaze isn't setting up, what went wrong?
Can I make these butterscotch krimpets gluten-free?
How do I get neat, clean slices when cutting the krimpets?
What's the difference between butterscotch and caramel?
Can I use granulated sugar instead of brown sugar for the butterscotch glaze?
Krimpet Magic: Homemade Butterscotch Bliss!
Recreate the iconic taste of Butterscotch Krimpets at home! This recipe guides you through making these soft, sweet krimpet cakes with a rich butterscotch topping.
Prep Time
25 min
Cook Time
30 min
Total Time
55 min
For the Cake
- 1 ½ cups all-purpose flour
- 1 cup granulated sugar
- 1 ½ tsp baking powder
- ½ tsp baking soda
- ¼ tsp salt
- 2 large eggs, room temperature
- 1 cup milk, room temperature
- ½ cup unsalted butter, melted and cooled
For the Butterscotch Glaze
- ½ cup unsalted butter
- 1 cup packed light brown sugar
- ½ cup heavy cream
- 1 tsp vanilla extract
- Pinch of salt
Introduction: Unlocking the Sweet Nostalgia of Butterscotch Krimpets
There’s a certain magic in revisiting childhood favorites. For many, the mere mention of butterscotch krimpets conjures up vivid memories of lunchboxes and afternoon snacks. I always found that distinct, slightly chewy cake topped with its impossibly smooth, amber glaze utterly captivating. Yet, as an adult, I often discover that store-bought versions don’t quite live up to the idealized memory. They lack that fresh-baked warmth and the nuanced flavor only homemade can provide. What I discovered is that recreating these beloved treats from scratch is not only surprisingly simple but incredibly rewarding. You get to control the quality of every ingredient, ensuring a superior taste and texture that mass-produced versions simply can’t match. This recipe isn’t just about baking; it’s about reclaiming a piece of nostalgia, elevating it, and sharing that joy with others. You’ll notice that the process is designed to be approachable, even for novice bakers, allowing you to achieve those perfectly soft cakes and that rich, authentic butterscotch topping with confidence. The satisfaction of biting into a homemade version, knowing every component was made with care, is truly unparalleled. This dish brings that comforting, familiar flavor back to life, but with an elevated, fresh-from-the-kitchen appeal.
Why You’ll Fall in Love with This Homemade Butterscotch Krimpet Recipe
What I discovered is that many people associate this treat with childhood memories. This recipe offers a unique opportunity to recreate those cherished moments. You’ll find the process incredibly rewarding, far beyond just the taste.
Here’s the thing: store-bought versions often fall short. They lack the depth of flavor and the soft, cake-like texture that makes a homemade krimpet truly special. My recipe prioritizes fresh, high-quality ingredients. This ensures every bite bursts with authentic butterscotch goodness. I always aim for that rich, buttery caramel note.
A common mistake is thinking homemade baked goods are complicated. This recipe simplifies the steps, making it accessible even for novice bakers. You won’t need any specialized equipment. Just basic kitchen tools are sufficient. Trust me on this one; the results will surprise you.
The key difference is the ability to customize. Do you prefer a less sweet glaze? Or perhaps a bolder butterscotch punch? This recipe empowers you to adjust those elements to your liking. It’s about tailoring the experience to your personal preference. This level of control is impossible with pre-packaged items.
In practice, this dish becomes a delightful centerpiece for any gathering. Sharing these freshly baked treats elicits smiles and sparks conversations. They are perfect for an afternoon tea or a cozy family dessert. The natural, wholesome ingredients mean no artificial aftertaste. This focus on purity makes the treat even more appealing. You’ll notice that the aroma alone fills your home with warmth.
Ingredients Overview: Crafting Your Perfect Butterscotch Krimpets
Here’s the thing, achieving that quintessential soft crumb and irresistible butterscotch topping for this recipe starts with understanding your ingredients. Every component plays a vital role in creating the iconic texture and flavor we all crave. I always prioritize quality, as even small differences can significantly impact the final outcome of your homemade treats.
For the cake base, all-purpose flour provides the essential structure. It’s the backbone of your krimpets, giving them their shape without being overly dense. Granulated sugar isn’t just for sweetness; it also contributes to the tenderness of the cake by interfering with gluten development. You’ll notice that the right balance here leads to a moist, delicate crumb. Baking powder and baking soda are your leavening agents, working together to create those tiny air pockets that make the krimpets light and airy. The trick is ensuring they are fresh; expired leaveners mean flat krimpets. A pinch of salt might seem minor, but it’s crucial for balancing and enhancing all the other flavors, preventing the cake from tasting bland. Eggs bind everything together, adding richness and contributing to the cake’s structure and moisture. I prefer large eggs for consistent results. Milk provides necessary moisture, helping to create a tender crumb and activating the leavening agents. Whole milk often yields the best texture due to its fat content. Finally, melted butter or a neutral oil adds moisture and flavor, contributing to that soft, melt-in-your-mouth texture. I find butter imparts a richer taste, but oil makes for an incredibly moist crumb.
The key difference for the butterscotch glaze lies in its carefully selected components. Brown sugar is non-negotiable here; its molasses content gives the butterscotch its characteristic deep, caramel-like flavor and rich color. Using white sugar just won’t yield the same depth. Unsalted butter provides richness and helps emulsify the sauce, preventing it from separating. Trust me on this one, real butter makes all the difference. Heavy cream is essential for that luxurious, silky texture and creamy body. Don’t be tempted to use half-and-half or milk; they lack the fat content needed for a truly decadent glaze. Vanilla extract adds a warm, aromatic note that complements the butterscotch beautifully. I always use pure vanilla extract for the best flavor. A tiny pinch of salt in the glaze is what actually works to cut through the sweetness and amplify the complex butterscotch notes, making it truly irresistible. When selecting ingredients, opting for high-quality, fresh components will elevate your homemade krimpets from good to truly exceptional. For instance, using a good quality brown sugar with a noticeable molasses aroma will make your butterscotch sing.
Essential Equipment You’ll Need for Your Homemade Krimpets
You’ll want to gather a few key items before you begin. Having the right tools makes the baking process much smoother and more enjoyable. I always lay out all my equipment beforehand. This prevents frantic searches mid-recipe.
Baking Pans: An 8x8 or 9x13 inch square or rectangular baking pan is essential. This shape is crucial for achieving the characteristic krimpet squares or rectangles after baking. You’re looking for a pan that will give you a relatively thin cake layer, perfect for absorbing that rich butterscotch topping. A too-deep pan will result in a cake that’s too thick.
Mixing Bowls: You’ll need at least two medium-sized mixing bowls. One is for your dry ingredients, ensuring they are well combined before adding to the wet. The other will hold your wet ingredients. Separating these initially helps prevent overmixing the batter later, which can lead to a tough cake.
Whisk or Electric Mixer: For the cake batter, a simple whisk often suffices. It helps incorporate air and thoroughly combine ingredients. If you prefer, an electric hand mixer can speed up the process, especially for creaming butter and sugar. For the butterscotch topping, a whisk is perfect for keeping it smooth and lump-free.
Saucepan: A medium saucepan is critical for crafting the luscious butterscotch glaze. Choose one with a heavy bottom to ensure even heating and prevent scorching. This is where the magic of the topping comes to life.
Measuring Cups and Spoons: Precision is paramount in baking. Accurate measuring cups for dry ingredients and liquids, along with a full set of measuring spoons, will ensure the correct ratios. Eyeballing measurements can significantly alter the final texture and flavor of your krimpets.
Spatula or Offset Spatula: A flexible rubber spatula is great for scraping down bowl sides and folding ingredients gently. An offset spatula, however, is particularly useful for spreading the warm butterscotch glaze evenly over the cooled cake. Its angled blade makes this task much easier.
Wire Rack: Once baked, the cake needs to cool completely. A wire rack allows air circulation around all sides, preventing a soggy bottom. Cooling thoroughly is vital before applying the glaze; otherwise, the glaze will melt right off.
Parchment Paper: Lining your baking pan with parchment paper is a simple step that saves a lot of hassle. It ensures easy removal of the baked cake from the pan. This also makes cleanup a breeze, as you won’t have cake stuck to the pan.
Step-by-Step Instructions: Baking and Glazing Your Butterscotch Krimpets
Here are steps 1 to 3 of the instructions for your Homemade Butterscotch Krimpets:
-
Cake Preparation: Preheat your oven to 350°F (175°C). Lightly grease and flour a 9x13 inch baking pan, or line it with parchment paper for easy removal. In a large bowl, sift together the all-purpose flour, baking powder, baking soda, and salt, then set aside. In a separate medium bowl, whisk together the granulated sugar, melted unsalted butter, eggs, and vanilla extract until well combined. Gradually add the wet ingredients to the dry ingredients, mixing with a spatula or whisk until just combined, being careful not to overmix the batter.
-
Baking: Carefully pour the prepared batter evenly into the greased and floured (or parchment-lined) 9x13 inch baking pan. Bake for 25-30 minutes, or until a wooden skewer or toothpick inserted into the center of the cake comes out clean.
-
Cooling: Allow the cake to cool in the pan for 10-15 minutes before carefully inverting it onto a wire rack to cool completely.
-
Prepare the Butterscotch Glaze: In a medium saucepan, combine the brown sugar, butter, heavy cream, and salt over medium heat. Stir continuously until the sugar dissolves and the butter melts, then bring the mixture to a gentle simmer. Continue to cook, stirring occasionally, for 5-7 minutes, or until the glaze thickens slightly and coats the back of a spoon, reaching a temperature of approximately 220°F (104°C) if using a candy thermometer.
-
Glaze and Set: Once the cake is completely cool, carefully pour the warm butterscotch glaze evenly over the entire surface of the cake. Use an offset spatula or the back of a spoon to gently spread the glaze to the edges, ensuring a smooth and consistent coating. Allow the glazed cake to sit at room temperature for at least 30 minutes, or until the butterscotch glaze has fully set and is no longer sticky to the touch.
-
Slice into Krimpets: For clean and precise cuts, use a sharp, thin-bladed knife that has been run under hot water and wiped dry before each slice. Cut the cake into individual rectangular krimpets, approximately 2 inches by 3 inches, cleaning the knife between each cut to prevent sticking and ensure neat edges.
Pro Tips & Tricks for Perfect Butterscotch Krimpets Every Time
Pro Tips & Tricks for Perfect Butterscotch Krimpets Every Time
Here’s the thing: achieving bakery-quality results at home often comes down to a few critical techniques. One of the most common errors I see home bakers make is overmixing the batter. When you incorporate too much air or develop the gluten excessively, your cake will turn out tough and dense instead of light and tender. Mix just until the ingredients are combined, with no dry streaks of flour remaining. This gentle approach ensures a delicate crumb, which is exactly what you want in this treat.
Building on this, mastering the glaze consistency is paramount for a professional finish. If your glaze is too thin, it will run off the cakes without coating them properly. A glaze that’s too thick will be clumpy and difficult to spread smoothly. The secret is to add liquid (milk or cream) slowly, one teaspoon at a time, until it flows like thick syrup but still coats the back of a spoon. If it becomes too thin, simply whisk in a little more powdered sugar until it reaches the desired texture. In my kitchen, I always aim for a consistency that drips slowly, not quickly.
Worth noting here, cooling is absolutely crucial before you even think about glazing. Applying warm glaze to warm cakes will result in a messy, melted disaster. The glaze will simply soak into the cake or run off completely, leaving you with a sticky, uneven coating. Allow the cakes to cool completely on a wire rack, which can take at least an hour, sometimes longer depending on your kitchen’s temperature. This patience pays off with a beautiful, set glaze.
What I discovered, for clean slices, a little trick goes a long way. After the glaze has set, you can achieve wonderfully neat edges by using a warm knife. Run a sharp knife under hot water, wipe it dry, and then make your cuts. Repeat this warming process for each cut. Alternatively, briefly chilling the glazed cakes in the refrigerator for 15-20 minutes can also firm up the glaze, making it easier to slice without smudging. This attention to detail elevates the presentation of your treats.
The key difference is that ingredient temperature matters more than you might think. Using room temperature ingredients for your cake batter, especially butter and eggs, creates a smoother emulsion. This leads to a more uniform batter and a finer crumb structure in the finished cake. Cold ingredients don’t blend as effectively, often resulting in a lumpy batter and a less consistent texture. I always set out my butter and eggs at least an hour before I plan to bake. For more in-depth information on the science behind ingredient temperatures in baking, you can explore resources like Serious Eats.
Here’s what actually works for testing for doneness: rely on both visual cues and the classic toothpick test. Your cake should be golden brown around the edges and spring back lightly when gently pressed in the center. Insert a wooden skewer or toothpick into the center of the cake; if it comes out clean, with no wet batter attached, your cake is done. If it still has wet crumbs, bake for a few more minutes and retest. Trust me on this one, underbaked cakes are disappointing.
Enjoyed this recipe? Share it with a friend or save it to your board for later. Leave a comment below — I love hearing how it turned out!
You May Also Enjoy





You Might Also Love These 🍽️
Recipes picked just for you based on what you’re cooking