Gluten-Free Lemon Chess Bars: Zesty Perfection
Delicious gluten-free recipe.
- 1Discovering the Delight of Lemon Chess Bars: A Gluten-Free Twist
- 2Why This Zesty Gluten-Free Chess Bars Recipe Will Be Your New Favorite
- 3Ingredients Overview: Crafting Your Gluten-Free Lemon Perfection
- 4Essential Equipment for Baking Perfect Gluten-Free Chess Bars
- 5Step-by-Step Instructions: Your Guide to Delicious Gluten-Free Lemon Chess Bars
- 6Pro Tips & Tricks for Baking the Best Gluten-Free Lemon Chess Bars
Ingredients
Ingredients
- Gluten-Free Flour Blend
- Granulated Sugar — Just a touch of sugar in the crust is important. It adds a subtle sweetness. This also contributes to the desired tender crumb. It helps with browning, creating golden edges.
- Cold Butter (or Dairy-Free Alternative)
- Eggs
- Granulated Sugar
- Fresh Lemon Juice & Zest
- Sweet Rice Flour (Glutinous Rice Flour)
- Melted Butter (or Dairy-Free Alternative)
- Vanilla Extract — A touch of vanilla enhances and rounds out the overall flavor profile. It provides a warm undertone. This complements the bright lemon. It prevents the lemon from being overly sharp.
Instructions
Equipment You'll Need
Here's what I use to make this recipe perfectly every time:
Gluten-Free Lemon Chess Bars: Zesty Perfection
Delicious gluten-free recipe.
Prep Time
15 min
Cook Time
25 min
Total Time
40 min
Ingredients
- Gluten-Free Flour Blend
- Granulated Sugar — Just a touch of sugar in the crust is important. It adds a subtle sweetness. This also contributes to the desired tender crumb. It helps with browning, creating golden edges.
- Cold Butter (or Dairy-Free Alternative)
- Eggs
- Granulated Sugar
- Fresh Lemon Juice & Zest
- Sweet Rice Flour (Glutinous Rice Flour)
- Melted Butter (or Dairy-Free Alternative)
- Vanilla Extract — A touch of vanilla enhances and rounds out the overall flavor profile. It provides a warm undertone. This complements the bright lemon. It prevents the lemon from being overly sharp.
Discovering the Delight of Lemon Chess Bars: A Gluten-Free Twist
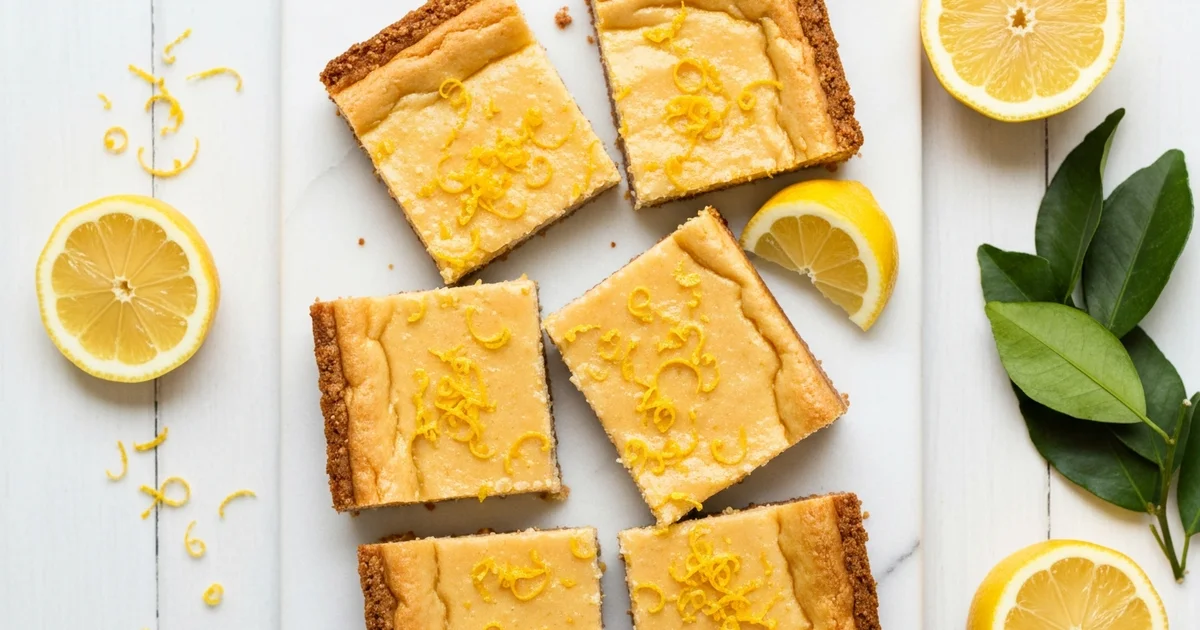
Are you searching for a dessert that marries classic comfort with a bright, zesty twist, especially one that fits specific dietary needs? The vibrant punch of lemon is always a welcome flavor, but finding genuinely satisfying gluten-free options can often feel like a culinary quest. In my kitchen, the comforting charm of Southern baking often calls to me. Lemon chess bars hold a special place, beloved for their distinctively gooey, almost translucent lemon custard filling. That rich, tangy sweetness paired with a tender, crisp crust creates an irresistible harmony.
This particular chess bars recipe was meticulously developed to be completely gluten-free, ensuring no compromise on that signature gooey texture or rich flavor. I promise, you won’t miss a thing! You’ll find the filling maintains its perfect, luscious consistency, offering a genuine option for anyone seeking delicious gluten free bars that truly deliver. The sheer vibrancy of the lemon essence beautifully cuts through the sweetness, offering a refreshing, balanced flavor profile. This makes it an absolute standout as a gluten free summer dessert, perfect for elevating any warm afternoon gathering with its perfectly golden squares and crisp edges. The secret lies in achieving that iconic, slightly set custard without relying on traditional wheat flours in the filling, paired with a perfectly buttery, tender base. Ready to experience this delightful, tangy-sweet indulgence yourself? Let’s get baking!
Here’s how to create these delightful gluten-free lemon chess bars in your own kitchen:
Yields: 12-16 bars Prep time: 20 minutes Bake time: 30-35 minutes Chill time: 2 hours minimum
Step 1: Prepare the Crust & Preheat. Preheat your oven to 350°F (175°C). Lightly grease an 8x8 inch (or 9x9 inch) baking pan and line it with parchment paper, leaving an overhang on two sides for easy removal. In a medium bowl, combine your gluten-free all-purpose flour blend, granulated sugar, and melted butter (for a dairy-free option, use an equal amount of melted coconut oil or a plant-based butter alternative). Press the mixture evenly into the bottom of the prepared pan.
Step 2: Par-bake the Crust. Bake the crust in the preheated oven for 10-12 minutes, or until lightly golden. Remove from the oven and set aside while you prepare the filling.
Step 3: Whisk the Zesty Filling. In a separate large bowl, whisk together the eggs, granulated sugar, lemon juice, lemon zest, sweet rice flour, and a pinch of salt until well combined and smooth. Don’t overmix; just ensure all ingredients are thoroughly incorporated.
Step 4: Bake to Perfection. Carefully pour the lemon filling over the warm, par-baked crust. Return the pan to the 350°F (175°C) oven and bake for 25-30 minutes, or until the center is just set with a slight jiggle, and the edges are lightly golden. Avoid overbaking to maintain that signature gooey texture.
Step 5: Cool, Chill, & Enjoy! This is where patience truly pays off! Once baked, remove the bars from the oven and let them cool completely on a wire rack at room temperature. This gradual cooling is crucial for the custard to fully set. After cooling for at least an hour, transfer the pan to the refrigerator and chill for a minimum of 2 hours, or ideally 4 hours, before slicing. Chilling firm up the bars, making them easier to cut into clean squares. Once thoroughly chilled, use the parchment paper overhangs to carefully lift the entire slab of bars from the pan onto a cutting board. Slice into desired square or rectangular portions. Dust with a little powdered sugar just before serving for an extra touch of elegance. Store any leftover Lemon Chess Bars in an airtight container in the refrigerator for up to 5 days. For longer storage, individual bars can be frozen for up to 2 months; simply thaw in the refrigerator before serving.
Why This Zesty Gluten-Free Chess Bars Recipe Will Be Your New Favorite
Building on this, you’ll discover a truly unforgettable flavor profile. I always aim for perfect harmony in my kitchen. This chess bars recipe perfectly balances tart lemon with a rich, sweet custard. It delivers a bright bar experience.
What I love about this treat is its sophisticated taste. It offers the comforting essence of a lemon custard pie. You get that same delightful citrus burst. Yet, it avoids the complexities of traditional pie crusts. This makes it an ideal choice for busy bakers.
Here’s the thing, achieving elegant desserts doesn’t require a culinary degree. This recipe is surprisingly simple to prepare. It asks for basic baking skills. You will find minimal hands-on time. This makes it perfect for both beginners and seasoned pros. It satisfies cravings for a good seed citrus treat without stress.
In practice, this recipe shines in its dietary adaptability. It is specifically crafted as gluten free bars. You can easily make straightforward variations. Instructions for dairy free lemon bars are included. This ensures everyone at your table can enjoy it.
The secret is using readily available substitutions. You won’t compromise on texture or taste. Many traditional recipes can be difficult to adapt. This particular treat was developed with flexibility in mind. It delivers a satisfying experience for diverse dietary needs.
Beyond its adaptability, this dessert is perfect for any occasion. These bars are always a crowd-pleaser. They suit casual family treats perfectly. They are also elegant enough for potlucks. You can serve them at celebratory gatherings.
They travel exceptionally well, too. This makes them a fantastic alternative. They are much lighter than many heavier desserts. Think of the refreshing appeal of lemon meringue pie bars, simplified. You get all the zest with none of the fuss.
This treat truly offers the best of all worlds. It marries convenience with exceptional flavor. It provides a delightful option for sugar and wheat free desserts. You will find yourself reaching for this recipe again and again. It truly becomes a new favorite.
Ingredients Overview: Crafting Your Gluten-Free Lemon Perfection
In my kitchen, understanding each ingredient’s role is key to baking success. This particular gluten free bars recipe relies on specific components. They come together for that unforgettable texture and vibrant taste. Building on this, let’s explore what makes this treat truly special.
For the Crust: The Foundation of Flavor
A tender, crumbly crust is essential for any great bar cookie. For this recipe, we aim for a perfect balance. It needs to be sturdy enough to hold the luscious filling. Yet, it should also melt in your mouth.
- Gluten-Free Flour Blend: I always recommend a quality all-purpose blend. Brands like Krusteaz Gluten-Free All-Purpose Flour work wonderfully. This blend provides structure without the gluten. It ensures a beautifully tender and crumbly crust.
- Granulated Sugar: Just a touch of sugar in the crust is important. It adds a subtle sweetness. This also contributes to the desired tender crumb. It helps with browning, creating golden edges.
- Cold Butter (or Dairy-Free Alternative): Trust me on this one, cold butter is non-negotiable. Cut it into small cubes for best results. This creates pockets of steam during baking. This process yields a flaky, irresistible crust. For a dairy-free option, Earth Balance butter ingredients are an excellent substitute. It performs similarly to regular butter in this application.
In practice, working quickly with the cold butter prevents it from warming too much. This preserves its flakiness. The goal is pea-sized pieces of butter in the flour mixture.
For the Filling: The Zesty Custard Dream
The filling is where the magic truly happens. It transforms simple ingredients into a bright, custardy delight. The interplay of sweet and tart is what gives lemon custard pie its charm. This filling mirrors that delicious complexity.
- Eggs: Eggs are crucial for the filling’s structure and richness. They create the signature smooth, custardy texture. Without them, the filling wouldn’t set properly. They also contribute to the golden color.
- Granulated Sugar: This balances the vibrant tartness of the lemon. It’s a key component for sugar and wheat free desserts. You can explore suitable sugar substitutes here. Options like erythritol or allulose work if you adjust quantities. However, traditional sugar offers the best caramelization.
- Fresh Lemon Juice & Zest: The undeniable star of this dish! I always use fresh lemon zest strain for maximum aromatic brightness. Avoid the white pith when zesting. That part can introduce bitterness. For planning, a medium lemon typically yields 2-3 tablespoons of juice. This is crucial for that tangy kick. What I love about this is the bright, uplifting flavor.
- Sweet Rice Flour (Glutinous Rice Flour): This is my secret weapon for the filling. It’s often overlooked in conventional recipes. It plays a crucial role in thickening the custard. It also contributes to a unique gooey, slightly chewy texture. This is what makes sweet rice flour recipes so special. It delivers a consistency that cornstarch or arrowroot starch simply can’t replicate. While you can use a substitute for arrowroot starch or cornstarch, the texture will be slightly different. Sweet rice flour offers superior stability and chewiness.
- Melted Butter (or Dairy-Free Alternative): Melted butter adds richness and ensures a smooth, glossy custard. It helps emulsify the filling ingredients. This prevents a gritty texture. A bar oil substitute for dairy-free needs works well here.
- Vanilla Extract: A touch of vanilla enhances and rounds out the overall flavor profile. It provides a warm undertone. This complements the bright lemon. It prevents the lemon from being overly sharp.
The secret is ensuring all wet ingredients are at room temperature. This helps create a smooth, homogenous filling. It prevents the eggs from scrambling when combined.
Essential Equipment for Baking Perfect Gluten-Free Chess Bars
In my kitchen, having the right tools makes all the difference. Baking gluten-free bars demands precision. Every piece of equipment plays a crucial role. This ensures consistent results for this delectable chess bars recipe.
A 9x13 inch baking pan is non-negotiable for achieving the perfect bar thickness. Trust me on this one; consistency is key. Parchment paper is equally vital for easy removal. I always leave a generous overhang on the sides.
Worth noting here, if you lack parchment paper, some parchment paper alternatives exist.
- Lightly greasing and flouring your pan can work in a pinch.
- Aluminum foil, also greased, is another option.
- However, for truly effortless lifting and clean edges, parchment paper is superior.
You’ll notice that preparing this sugar and wheat free dessert requires separate bowls. I use at least two large mixing bowls. An electric mixer, either handheld or stand, is highly recommended. It creams butter and sugar for the crust beautifully. A sturdy whisk helps combine dry ingredients and smooth out the filling. For that bright, zesty flavor, a zester or microplane is essential. It helps achieve a fine lemon zest strain without bitterness. A citrus juicer is also invaluable to maximize how much juice can you get from one lemon.
Accuracy is paramount in gluten-free baking.
- Measuring cups ensure precise flour and sugar amounts.
- Measuring spoons are critical for extracts and leavening agents.
- These tools prevent mishaps and guarantee the desired texture.
A rubber spatula is perfect for scraping down bowls and gentle folding. Finally, a cooling rack is crucial for this lemon custard pie-like treat. It allows air to circulate, preventing sogginess and ensuring even cooling.
Step-by-Step Instructions: Your Guide to Delicious Gluten-Free Lemon Chess Bars
First things first, let’s get that oven ready! Preheat your oven to 350°F (175°C). Grab your 9x13 inch baking pan and line it with parchment paper, leaving a generous overhang on the sides. This little trick is your secret weapon for lifting the bars out later with absolute ease.
In a large bowl, whisk together your favorite gluten-free flour blend and sugar. Now, cut in the cold butter (or a dairy-free butter alternative like chilled vegan butter sticks) using a pastry blender or your fingertips until the mixture resembles coarse crumbs. Press this buttery mixture evenly into the bottom of your prepared pan to form the crust. Pop it into the preheated oven to par-bake for 10-12 minutes, or until it’s lightly golden and set.
While the crust is doing its thing, let’s get that glorious lemon filling ready! In a separate bowl, whisk the eggs and sugar together until they’re light and fluffy. Stir in the freshly squeezed lemon juice and the fragrant lemon zest. Next, gently fold in the melted butter (or an equivalent amount of melted coconut oil or dairy-free butter alternative) and the sweet rice flour (or your chosen thickener) until the mixture is perfectly smooth and utterly lump-free. This ensures that silky, melt-in-your-mouth texture we’re aiming for!
Once your crust is par-baked, carefully take it out of the oven. Immediately and gently pour the prepared lemon filling evenly over the warm crust. Return the pan to your preheated oven (still at 350°F / 175°C) and bake for another 25-30 minutes. You’ll know they’re perfect when the lemon filling is beautifully set, the edges are a lovely golden hue, and the center has just a slight, delicate jiggle when you gently shake the pan.
The hardest part is waiting, I promise! Once baked, remove the pan from the oven. Let these glorious gluten-free lemon chess bars cool completely at room temperature for at least 1-2 hours. This initial cooling period is crucial for setting. Once they’ve reached room temperature, transfer the pan to the refrigerator and chill for a minimum of 2 hours, or ideally overnight. This extended chilling time is non-negotiable for achieving that perfectly firm, sliceable filling and an exquisite, dense texture. Trust me, it’s worth the wait!
Once thoroughly chilled, use the parchment paper overhang to carefully lift the entire slab of bars from the pan onto a cutting board. With a sharp, warm knife (run under hot water and wiped dry between cuts), slice the bars into 12-16 squares, or your desired size. For an extra touch of elegance, dust them lightly with powdered sugar just before serving. These zesty and sweet lemon chess bars are best enjoyed chilled, and they make a delightful treat for any occasion. Store any leftover bars in an airtight container in the refrigerator for up to 5-7 days, or freeze them for longer enjoyment – simply thaw in the fridge before serving for a taste of sunshine whenever you need it!
Pro Tips & Tricks for Baking the Best Gluten-Free Lemon Chess Bars
Here’s the thing about transforming a good dessert into an exceptional one: often, it’s in the subtle details. Achieving that signature custardy filling and perfectly set structure for your gluten-free lemon chess bars requires a few expert insights. Over my years in the kitchen, these pointers have consistently elevated this treat, ensuring a consistent win every single time. Trust me on this one; these small adjustments make a world of difference.
-
Don’t Overbake for that Iconic Jiggle: The true magic of any chess bar lies in its luscious, almost gooey center. You’ll notice that the edges of your bars should appear set and lightly golden brown. However, the very center needs to retain a slight, delicate jiggle when gently nudged. This indicates perfection. It’s important to remember that the filling continues to set and firm up significantly as it cools. Pulling the baking dish from the oven at this precise moment prevents a dry, crumbly texture. An overbaked chess bar loses its custardy charm.
-
Harness the Power of Fresh Lemon: I always insist on using fresh lemons for both the juice and the zest in this recipe. The vibrancy and aromatic oils from real fruit are simply unparalleled. For maximum flavor and aroma, employ a fine zester or microplane for your lemon zest strain. Carefully avoid grating the bitter white pith beneath the bright yellow skin. To answer “how much juice can you get from one lemon,” I always roll each lemon firmly on the counter for about 10-15 seconds. This simple trick helps break down the membranes inside, yielding significantly more juice once you slice and squeeze them. For more tips on getting the most out of your citrus, check out this guide on maximizing lemon juice.
-
Embrace Sweet Rice Flour for Texture: What I discovered over many baking experiments is that while various thickeners can be used, sweet rice flour recipes are truly superior for this specific application. Its unique properties are key to achieving the desired gooey, slightly chewy texture that makes chess bars so special. This finely milled flour, also known as glutinous rice flour, has a high starch content. This contributes to an unparalleled smooth, custardy consistency. It provides a different mouthfeel than a standard flour or even a typical substitute for arrowroot starch or cornstarch, which can sometimes result in a firmer, less yielding filling. This distinctive quality is what sets truly excellent dairy-free lemon bars apart.
-
Chill Time is Absolutely Crucial: This tip might test your patience, but it’s non-negotiable for beautiful slices. Resist the urge to cut into your warm bars immediately after they cool on the counter. The filling, even if it has set some, needs more time to firm up completely. Allow them to cool fully at room temperature, then transfer the entire pan to the refrigerator. Chill for at least 2-4 hours, or even overnight if you have the time. This extended chilling solidifies the filling. It ensures you get those clean, crisp slices without any messy crumbling. This makes them perfect for serving at any gathering.
-
Parchment Paper Magic is Your Best Friend: In my kitchen, parchment paper is an absolute essential for almost all bar recipes. I always line my baking pan with it, making sure to leave a generous overhang on the sides. This simple step is pure genius. Once the bars are completely cooled and chilled, you can easily use the parchment paper overhang to lift the entire slab of bars out of the pan. This prevents any sticking and makes clean-up incredibly easy. It’s truly superior to relying on common parchment paper alternatives, such as just greasing the pan or using flour. This small detail ensures your bright bar comes out perfectly every time.
Enjoyed this recipe? Share it with a friend or save it to your board for later. Leave a comment below — I love hearing how it turned out!
You May Also Enjoy





You Might Also Love These 🍽️
Recipes picked just for you based on what you’re cooking