Authentic Gluten-Free Pierogi Bliss!
Craving delicious pierogi but need a gluten-free option? This easy recipe delivers authentic flavor and perfect texture. Learn how to make gluten-free pierogies today!
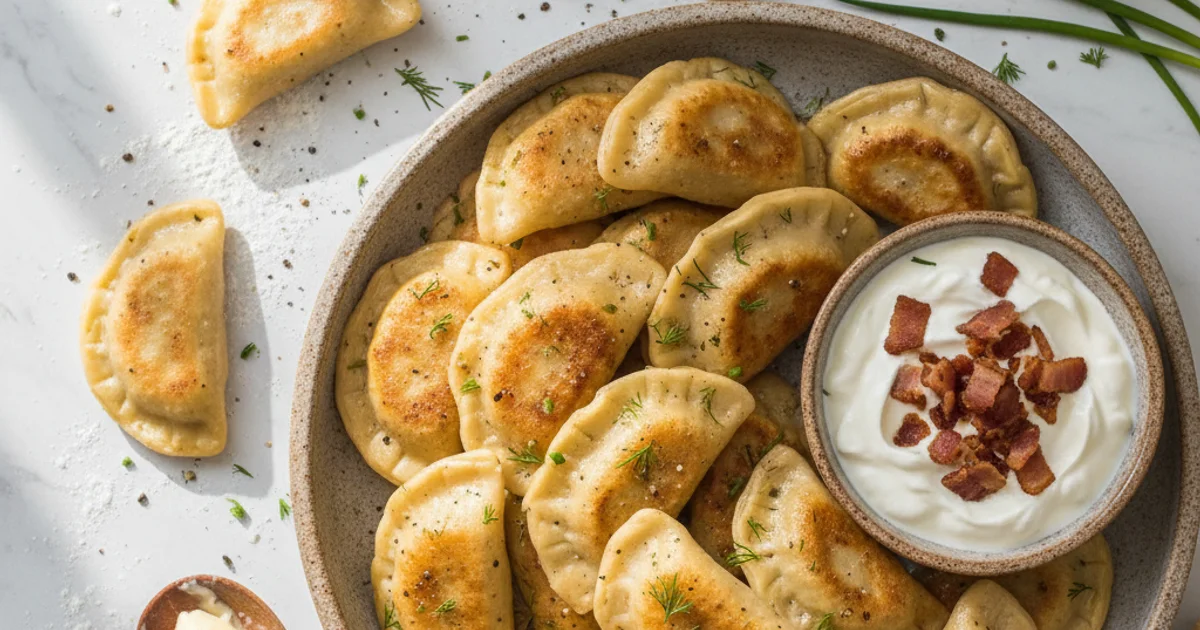
- 1Introduction: Savoring Authentic Pierogi, Gluten-Free Style
- 2Why You’ll Absolutely Love This Gluten-Free Pierogi Recipe
- 3Ingredients Overview: Crafting Your Delicious Gluten-Free Perogies
- 4Essential Equipment for Making Homemade Gluten-Free Pierogi
- 5Step-by-Step Instructions: Crafting Your Perfect Gluten-Free Perogies
- 6Pro Tips & Tricks for Irresistible Gluten-Free Pierogies
Ingredients
For the Gluten-Free Dough
- 2 cups (280g) gluten-free all-purpose flour blend (with xanthan gum)
- 1/2 teaspoon salt
- 1 large egg
- 1/2 cup (120g) sour cream or plain Greek yogurt
- 1/4 cup (60ml) warm water, plus more as needed
For the Potato & Cheese Filling
- 2 large Russet potatoes, peeled and quartered
- 1/2 cup (120g) shredded sharp cheddar cheese
- 2 tablespoons unsalted butter, melted
- 1/4 cup (60ml) milk or cream
- 1/4 teaspoon salt
- 1/8 teaspoon black pepper
For Serving
- 4 tablespoons unsalted butter
- 1 large onion, thinly sliced
- 2 strips bacon, cooked and crumbled (optional)
- Fresh dill or chives, chopped (for garnish)
Instructions
Instructions
Prepare the potato and cheese filling: boil potatoes, mash with cheese, butter, milk, salt, and pepper. Set aside to cool.
Instructions
Make the gluten-free dough: whisk flour and salt. In a separate bowl, whisk egg, sour cream, and warm water. Add wet to dry ingredients and mix until a shaggy dough forms.
Instructions
Knead the dough: on a lightly floured surface, knead for 5-7 minutes until smooth and elastic. Cover and let rest for 30 minutes.
Instructions
Roll and cut the dough: divide dough. Roll one portion thinly (1/8 inch thick). Cut out 2.5-3 inch circles.
Instructions
Fill and seal pierogi: place a teaspoon of filling in the center of each circle. Fold dough over and crimp edges tightly to seal.
Instructions
Boil the pierogi: bring a large pot of salted water to a gentle boil. Cook pierogi in batches for 3-5 minutes, until they float and are tender.
Instructions
Pan-fry and serve: melt butter in a large skillet. Add sliced onions and cook until caramelized. Add boiled pierogi and cook until golden brown. Serve with bacon and fresh herbs.
Recipe FAQs
Why is my gluten-free pierogi dough crumbly?
Can I make these pierogies without a stand mixer?
What's the best way to prevent the pierogi from bursting while boiling?
How do I know when the gluten-free pierogi are cooked through?
Can I bake or air-fry these gluten-free perogies instead of boiling and pan-frying?
Is it possible to make a vegan gluten-free pierogi using this recipe?
Authentic Gluten-Free Pierogi Bliss!
Craving delicious pierogi but need a gluten-free option? This easy recipe delivers authentic flavor and perfect texture. Learn how to make gluten-free pierogies today!
Prep Time
60 min
Cook Time
25 min
Total Time
85 min
For the Gluten-Free Dough
- 2 cups (280g) gluten-free all-purpose flour blend (with xanthan gum)
- 1/2 teaspoon salt
- 1 large egg
- 1/2 cup (120g) sour cream or plain Greek yogurt
- 1/4 cup (60ml) warm water, plus more as needed
For the Potato & Cheese Filling
- 2 large Russet potatoes, peeled and quartered
- 1/2 cup (120g) shredded sharp cheddar cheese
- 2 tablespoons unsalted butter, melted
- 1/4 cup (60ml) milk or cream
- 1/4 teaspoon salt
- 1/8 teaspoon black pepper
For Serving
- 4 tablespoons unsalted butter
- 1 large onion, thinly sliced
- 2 strips bacon, cooked and crumbled (optional)
- Fresh dill or chives, chopped (for garnish)
Introduction: Savoring Authentic Pierogi, Gluten-Free Style
For anyone who grew up with the comforting warmth of homemade pierogi, the thought of giving them up due to dietary changes can be truly disheartening. That tender dough, the savory fillings, the golden pan-fried onions – it’s more than just food; it’s a taste of heritage and family gatherings. What I discovered, however, is that embracing a gluten-free lifestyle doesn’t mean sacrificing these cherished culinary traditions. I spent years experimenting, often frustrated by gummy textures or doughs that crumbled at the slightest touch, yearning for that authentic experience. Many store-bought alternatives simply don’t capture the essence of what pierogi should be, leaving a void where a satisfying, hearty meal once stood.
Here’s the thing: you don’t have to settle for less. This recipe is the culmination of countless trials, designed to bring back the joy of making and eating truly exceptional gluten-free pierogi right in your own kitchen. We’re talking about a dough that’s pliable, easy to work with, and cooks up beautifully, holding its shape while staying wonderfully tender. No more bland, crumbly disappointments. My goal was to create a recipe that delivers all the classic flavor and texture you remember, making this beloved comfort food accessible to everyone, regardless of dietary needs. Prepare to rediscover the simple pleasure of a perfectly crafted pierog.
Why You’ll Absolutely Love This Gluten-Free Pierogi Recipe
Here’s the thing, many people believe that going gluten-free means sacrificing the textures and flavors of beloved comfort foods. With this recipe, that simply isn’t true. I’ve spent years perfecting a dough that defies expectations. It rolls out smoothly and encases the filling without tearing, giving you that satisfying chew you associate with classic pierogi.
What I discovered is the secret lies in a precise blend of flours and a specific hydration level. This combination prevents the dough from becoming crumbly or overly sticky, common pitfalls in gluten-free baking. You’ll notice that the dough remains pliable even after resting, making shaping a breeze. This allows for a truly authentic experience, from the first touch of the dough to the last bite of the cooked pierogi.
In practice, this recipe delivers on taste as well as texture. The fillings, whether savory potato and cheese or sweet fruit, truly shine. They are perfectly complemented by the delicate wrapper. This isn’t just a gluten-free alternative; it’s a dish that stands on its own. It satisfies even the most discerning palate. You won’t feel like you’re missing out on anything.
The key difference is that I’ve focused on technique, not just ingredients. This ensures the best possible outcome. Preparing these gluten free perogies might seem like a project, but my step-by-step guidance makes it entirely approachable. Even if you’ve never made pierogi before, you’ll find success here. This recipe is also incredibly versatile. You can easily swap out fillings to suit your cravings or dietary needs. It’s a fantastic way to enjoy a traditional dish that everyone at your table, gluten-sensitive or not, will genuinely enjoy. They are truly a crowd-pleaser.
Ingredients Overview: Crafting Your Delicious Gluten-Free Perogies
Here’s the thing, the foundation of any truly exceptional pierogi lies in its ingredients. Getting the right balance, especially with a gluten-free flour blend, is absolutely crucial for achieving that characteristic tender chewiness without crumbling. I always recommend using a high-quality, pre-mixed gluten-free all-purpose flour blend, like King Arthur Measure for Measure or Bob’s Red Mill 1:1 Baking Flour. These blends are specifically formulated with a combination of flours (rice, tapioca, potato) and often include xanthan gum, which is vital for mimicking gluten’s elasticity. Without xanthan gum, your dough will be brittle and difficult to work with. If your chosen blend doesn’t contain it, add about ½ teaspoon per cup of flour to ensure your dough holds together beautifully.
Eggs play a dual role in this recipe. They act as a binder, helping the dough come together and providing structure, which is particularly important in gluten-free pierogies. Additionally, they contribute a subtle richness and a lovely golden hue to the finished dough. I use large eggs, as their consistent size makes recipe scaling easier. Sour cream or plain full-fat Greek yogurt is another non-negotiable ingredient for the dough. It introduces a delicate tang and, more importantly, adds moisture and tenderness, preventing the dough from becoming dry or tough. This acidity also helps activate some of the starches in the gluten-free flour, leading to a more pliable dough.
Warm water is essential for hydrating the flour blend effectively. Using warm, not hot or cold, water helps the starches absorb liquid more readily, resulting in a smoother, more workable dough. Just a pinch of salt in the dough enhances all the other flavors. For the classic potato and cheese filling, I prefer using Russet potatoes because they are starchy and bake up light and fluffy, perfect for mashing smoothly. Waxy potatoes can make the filling gummy. For the cheese, a sharp cheddar provides a wonderful flavor contrast, but farmer’s cheese or even a mild provolone can work. The secret is to ensure your filling isn’t too wet or too dry; it needs to be firm enough to handle but still creamy. Sautéed onions and a touch of butter are essential for seasoning the potato filling, bringing out its savory depth.
Building on this, for serving, you’ll want more butter and thinly sliced onions, slow-caramelized until golden brown. This traditional topping adds an irresistible sweetness and savory crunch that complements the soft pierogi perfectly. Sometimes I add crispy crumbled bacon to the topping for an extra layer of flavor and texture. This combination of ingredients, carefully chosen and prepared, ensures that even without gluten, your perogies will be authentic and satisfying. Every component contributes to the overall success of this recipe.
Essential Equipment for Making Homemade Gluten-Free Pierogi
In my kitchen, having the right tools makes all the difference, especially when tackling a recipe like this. You don’t need a professional setup, but a few key items will simplify the process considerably. What I discovered is that even simple tasks become much more enjoyable when you’re not fumbling for the right equipment. This preparation ensures a smooth workflow from start to finish.
Here’s the thing: while you can make this recipe with minimal tools, certain items significantly reduce effort and improve consistency. A large mixing bowl is non-negotiable for combining your dough ingredients without spills. For those who frequently bake, a stand mixer fitted with a dough hook is a true workhorse; it handles the kneading, which can be quite a workout by hand. I always recommend a good rolling pin for achieving that perfectly thin, even dough that’s crucial for tender gluten free perogies. For shaping, a round cookie cutter, about 2.5 to 3 inches in diameter, creates uniform pieces, which cook more evenly. You’ll also need a large pot for boiling, ensuring your pierogi have ample space to cook without sticking together. A slotted spoon is essential for carefully transferring them from the boiling water. Finally, a large skillet is perfect for achieving those golden-brown pan-fried exteriors. For the filling, a potato masher or ricer ensures a smooth, lump-free texture. And to prevent any sticking, parchment paper or a generously floured surface is a must. A kitchen scale is an optional but highly recommended tool for precise flour measurements, leading to consistent results every time you make gluten free perogies.
Step-by-Step Instructions: Crafting Your Perfect Gluten-Free Perogies
Here are the first three steps for your pierogi recipe:
-
Preparing the Gluten-Free Dough: In a large mixing bowl, thoroughly combine all your dry ingredients: the gluten-free all-purpose flour blend, xanthan gum (if not already in your blend), salt, and any other specified dry components, ensuring they are evenly distributed. Gradually add the wet ingredients, starting with the eggs and then slowly incorporating the warm water or milk, mixing continuously until a shaggy dough forms. Turn the dough out onto a lightly floured surface and knead it for 5-7 minutes until it becomes smooth, elastic, and pliable, indicating proper gluten development for a gluten-free dough. Cover the dough with a clean kitchen towel or plastic wrap and allow it to rest at room temperature for at least 30 minutes, which helps the starches hydrate and the dough become easier to work with.
-
Crafting the Delicious Filling: Begin by preparing your chosen filling ingredients according to the recipe’s specifications, whether it’s boiling and mashing potatoes, sautéing onions, or crumbling cheese. Ensure all ingredients for the filling are cooked, cooled, and finely prepared as needed before combining them. In a medium-sized bowl, gently mix all the prepared filling ingredients together until they are evenly incorporated and well-seasoned to your taste, making sure the mixture is firm enough to hold its shape but not dry.
-
Set aside the prepared filling, covered, while you proceed with rolling out the dough.
-
Once the potatoes are fork-tender, drain them thoroughly and return them to the pot over low heat for a minute or two to evaporate any excess moisture, then mash them until smooth.
-
In a large bowl, combine the mashed potatoes with the softened cream cheese, melted butter, and your preferred seasonings (such as salt, pepper, and a pinch of garlic powder), mixing well until fully incorporated and creamy.
-
Allow the potato and cheese filling to cool completely, or at least to a temperature that is comfortable to handle, before proceeding to the next step.
-
H3: Filling and Sealing Your Gluten-Free Pierogies: Place a generous spoonful of your cooled filling (about 1-2 teaspoons, depending on pierogi size) into the center of each dough circle, being careful not to overfill.
-
Fold one half of the dough circle over the filling to meet the other edge, forming a crescent shape, then firmly crimp the edges together with your fingers or a fork to create a secure seal. To prevent bursting during cooking, ensure there are no air pockets by gently pressing around the filling before sealing, and make sure the edges are completely sealed without any gaps.
-
H3: Boiling the Pierogi to Perfection: Bring a large pot of lightly salted water to a rolling boil over medium-high heat.
-
Bring a large pot of generously salted water to a gentle boil, ensuring there’s enough room for the pierogi to move freely without sticking.
-
Carefully drop the pierogi into the boiling water in small batches, avoiding overcrowding, and cook them until they float to the surface and are tender to the bite, which typically takes 2-3 minutes.
-
Finishing Touches: Pan-Frying for Golden Goodness:
Once boiled, transfer the pierogi to a hot pan with melted butter or a drizzle of oil and sauté them over medium heat until they achieve a beautiful golden-brown crust on both sides, and for an extra layer of flavor, consider adding finely diced onions or crispy bacon bits to the pan during this step.
Pro Tips & Tricks for Irresistible Gluten-Free Pierogies
Here’s the thing: working with gluten-free dough can feel different. It lacks the elastic quality of traditional wheat flour, so your approach needs to adjust. I always advise paying close attention to texture. When mixing, aim for a dough that’s pliable but not sticky. If it feels too wet, add a tiny bit more flour, a teaspoon at a time. Conversely, if it’s too dry and crumbly, a splash of water can bring it together. Overworking gluten-free dough can make it tough, so mix just until combined. This careful handling ensures your gluten-free perogies will have that tender bite we all crave.
Worth noting here, resting the dough is not optional; it’s essential for this recipe. After mixing, cover your dough and let it sit for at least 30 minutes, or even an hour. This allows the flours to fully hydrate, resulting in a much more manageable and less crumbly dough. You’ll notice that it becomes smoother and easier to roll out. This step is a small investment of time that pays off significantly in the final texture of your gluten-free pierogies. I find this resting period also deepens the flavor profile of the dough itself.
To prevent sticking, I always have a few tricks up my sleeve. A lightly floured surface is key, but don’t overdo it. Too much flour can dry out your dough. Instead, I prefer to roll out sections of dough between two sheets of parchment paper. This method virtually eliminates sticking and makes transferring the cut circles much easier. For boiled pierogi, place them on a cooling rack lined with parchment paper after shaping. This prevents them from sticking to the surface while you work on the rest.
The secret is ensuring a tight seal on each pierogi. A common mistake is not pressing firmly enough, leading to fillings escaping during boiling. After placing your filling, fold the dough over and press the edges together with your fingers. For an extra secure seal, you can gently crimp the edges with the tines of a fork. This not only looks pretty but also creates a robust barrier, keeping all that delicious filling inside. Trust me on this one; a well-sealed pierogi is a happy pierogi.
When it comes to boiling your gluten-free perogies, avoid overcrowding the pot. This is crucial for even cooking and preventing them from sticking together. Boil them in small batches, giving each pierogi enough space to float freely. Overcrowding drops the water temperature too quickly, leading to gummy results. For detailed guidance on proper boiling techniques, consult resources like The Kitchn’s guide to boiling pasta. This ensures each pierogi cooks perfectly.
Finally, always ensure your filling is completely cool before adding it to the dough. Warm filling can make the dough soft and difficult to work with, increasing the chances of tearing or becoming sticky. A chilled filling also helps maintain the shape of the pierogi during assembly. For flavor enhancers, don’t shy away from adding roasted garlic, caramelized onions, or a sprinkle of fresh dill to your potato and cheese filling. These small additions elevate the overall taste of this dish.
Enjoyed this recipe? Share it with a friend or save it to your board for later. Leave a comment below — I love hearing how it turned out!
You May Also Enjoy





You Might Also Love These 🍽️
Recipes picked just for you based on what you’re cooking