Ultimate Gluten-Free Naan: Soft, Chewy Perfection!
Craving soft, pillowy naan? This easy gluten free naan recipe delivers the perfect texture and flavor without the gluten. Say goodbye to store-bought gf naan bread!

Ingredients
For the Naan Dough
- 1 cup warm water (105-115°F / 40-46°C)
- 1 tsp active dry yeast
- 1 tbsp granulated sugar
- 1/2 cup plain whole milk yogurt (dairy or dairy-free)
- 2 tbsp olive oil (plus more for cooking)
- 2 cups gluten-free all-purpose flour blend (with xanthan gum)
- 1 tsp baking powder
- 1/2 tsp salt
For Brushing (Optional)
- 2 tbsp melted ghee or unsalted butter
- 1 clove garlic, minced (optional)
- 2 tbsp fresh cilantro, chopped (optional)
Instructions
Instructions
Combine warm water, sugar, and yeast in a large bowl. Let sit for 5-10 minutes until foamy.
Instructions
Stir in yogurt and olive oil into the yeast mixture.
Instructions
In a separate bowl, whisk together gluten-free flour blend, baking powder, and salt.
Instructions
Gradually add dry ingredients to wet, mixing until a sticky, shaggy dough forms. Do not overmix.
Instructions
Cover the bowl with plastic wrap or a clean towel and let rise in a warm place for 30-60 minutes, or until slightly puffy.
Instructions
Divide the dough into 6 equal portions. Lightly flour your work surface or use parchment paper.
Instructions
Roll each portion into an oval or teardrop shape, about 1/4 inch thick.
Instructions
Heat a cast iron skillet or non-stick pan over medium-high heat until very hot.
Instructions
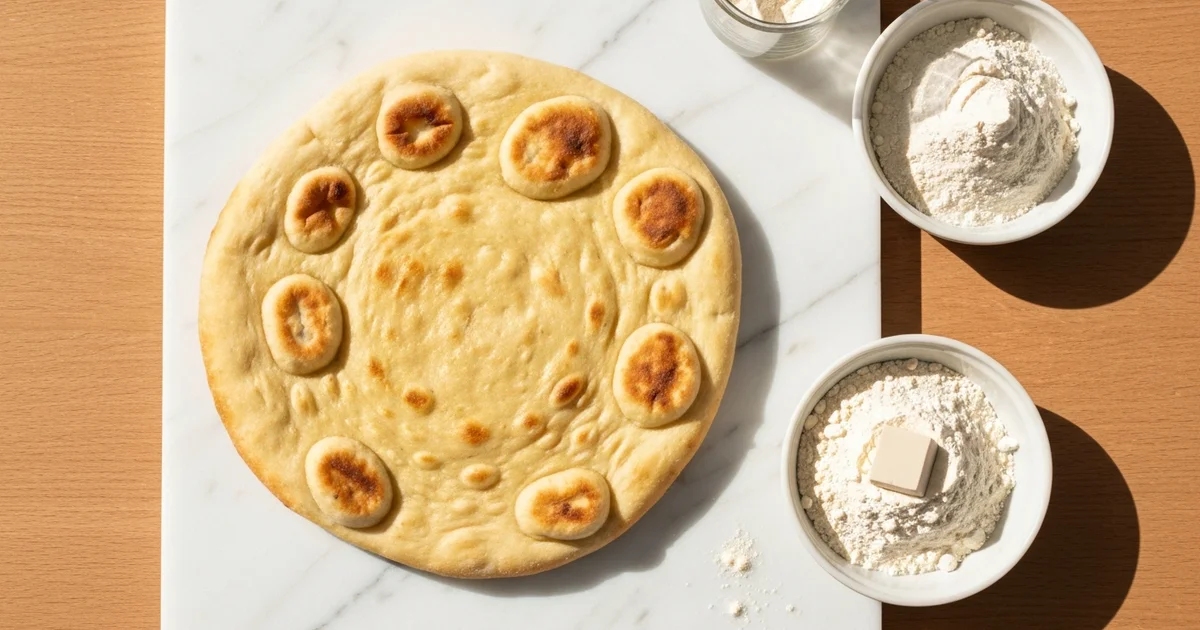
Place one naan onto the hot skillet. Cook for 2-3 minutes until bubbles form on the surface and the underside is golden brown. Flip and cook for another 1-2 minutes until the second side is golden and slightly charred.
Instructions
Remove from skillet and immediately brush with melted ghee/butter. If desired, sprinkle with minced garlic and chopped cilantro.
Instructions
Repeat with remaining naan. Serve warm.
Recipe FAQs
Is naan gluten free?
Does naan bread have gluten?
What is GF naan made of?
Can I make gluten free naan dairy free?
Why isn't my gluten free naan puffing?
How do I reheat gluten free naan?
Ultimate Gluten-Free Naan: Soft, Chewy Perfection!
Craving soft, pillowy naan? This easy gluten free naan recipe delivers the perfect texture and flavor without the gluten. Say goodbye to store-bought gf naan bread!
Prep Time
15 min
Cook Time
20 min
Total Time
35 min
For the Naan Dough
- 1 cup warm water (105-115°F / 40-46°C)
- 1 tsp active dry yeast
- 1 tbsp granulated sugar
- 1/2 cup plain whole milk yogurt (dairy or dairy-free)
- 2 tbsp olive oil (plus more for cooking)
- 2 cups gluten-free all-purpose flour blend (with xanthan gum)
- 1 tsp baking powder
- 1/2 tsp salt
For Brushing (Optional)
- 2 tbsp melted ghee or unsalted butter
- 1 clove garlic, minced (optional)
- 2 tbsp fresh cilantro, chopped (optional)
Finally! A Perfect Gluten Free Naan That’s Soft & Chewy
The aroma of warm, pillowy naan bread signals comfort and culinary adventure. We all recognize its soft, slightly blistered texture. It’s perfect for scooping up vibrant curries or soaking up savory sauces. This bread holds a special place in kitchens worldwide.
For those navigating gluten sensitivities or celiac disease, enjoying this staple often becomes a distant memory. A common question arises: “is naan gluten free?” The traditional answer, unfortunately, is almost always no. This reality can be truly disheartening for anyone seeking that authentic Indian dining experience at home.
I always hear stories of disappointment with commercially available gluten-free alternatives. Many store-bought or even homemade versions fall short of expectations. They often result in dry, crumbly, or unpleasantly rubbery flatbreads. These offerings simply lack the pliable chew and signature puff that makes traditional naan so beloved.
What I discovered after countless kitchen experiments is a method that truly delivers. This recipe is the culmination of years of testing and refinement. It promises to transform your perception of what gluten free naan can be. You will achieve that satisfying softness and characteristic stretch without any gluten.
Here’s the thing: this isn’t just another flatbread. This particular recipe consistently puffs beautifully on the griddle. It develops those delightful golden-brown edges we all crave. You’ll notice that characteristic airy texture and a truly satisfying chew in every single bite. It rivals its traditional counterpart in both flavor and texture.
Why This Gluten Free Naan Bread Will Be Your New Favorite
Creating a truly exceptional gluten free naan can often feel like a culinary puzzle, frequently ending in dense or brittle disappointments. But what if I told you that quest ends here? This recipe isn’t just good; it consistently delivers on every front, promising to become a staple in your kitchen and a guaranteed crowd-pleaser.
First and foremost, prepare for an Unparalleled Texture. This isn’t merely any flatbread; it’s a gluten free naan that boasts an incredibly soft, wonderfully pillowy texture that’s pure delight. You’ll immediately notice its perfect pliability, making it ideal for gracefully scooping up hearty curries, rich dips, or vibrant chutneys without a hint of crumbling. It impressively holds its shape, maintaining that satisfying chewiness that’s so often elusive in gluten-free alternatives.
Next, you’ll appreciate its Effortless Preparation. Forget the intimidating, complex techniques often associated with gluten-free baking. This gluten free naan recipe is refreshingly straightforward, designed for success no matter your skill level. With clear, simple steps, achieving consistently fantastic results has never been less intimidating, inviting even novice bakers to confidently create delicious naan from scratch.
Beyond its incredible texture and ease, the Rich, Satisfying Flavor truly sets this naan apart. It masterfully captures that quintessential, slightly tangy and subtly savory taste profile you crave from traditional naan. This isn’t just a neutral vehicle for other flavors; it’s a delicious experience in itself, perfectly complementing everything from spicy curries and robust stews to herby hummus or a simple garlic butter. The aroma alone as it cooks will transport you!
Another reason this recipe shines is its Incredible Versatility & Convenience. This gf naan is a true culinary chameleon, ready to transform into mini pizzas, act as a delightful side for a comforting lentil stew, or simply be enjoyed on its own with a sprinkle of sea salt. It’s also remarkably adaptable, easily modified for dairy-free diets with straightforward ingredient swaps. What elevates it further as a favorite is its excellent keeping quality. Batch-bake a double recipe, and you’ll have delicious, fresh-tasting naan ready for quick meals throughout the week, making it an incredibly convenient component for thoughtful meal planning.
Finally, anticipate a Crowd-Pleaser for Everyone. Prepare to impress, because this gluten free naan consistently earns rave reviews from everyone who tries it, including those who regularly enjoy gluten. Its authentic taste and texture are so spot-on that most won’t even realize it’s gluten-free. This makes it an absolute dream for gatherings, ensuring that no one feels left out and everyone leaves satisfied, often asking for the secret to your incredible naan.
The Secret Behind The Best GF Naan: Key Ingredients Explained
Building on this, mastering the texture of truly soft, chewy gluten free naan is an art. It relies heavily on understanding each ingredient’s purpose. In my kitchen, every element plays a critical role.
Here’s the thing, crafting the perfect texture requires precise ingredients. Each one contributes uniquely to the final result.
Gluten-Free All-Purpose Flour Blend: This flour forms the dough’s essential foundation. I always choose a quality mix with xanthan gum for crucial structure and elasticity. Just
whole foods almond flourwon’t achieve soft, pliable texture; rice and tapioca flours are key. They contribute to both browning and the signature chew.Active Dry Yeast: This tiny powerhouse creates all the airy pockets within the dough. It needs the right warmth and some sugar to activate properly. You’ll visibly see the dough rising beautifully when the yeast is happy. This active fermentation is non-negotiable for lift.
Warm Water or Milk: The precise temperature of this liquid is paramount for success. It must awaken the yeast without accidentally killing it. This liquid also perfectly hydrates the various gluten-free flours. Achieving the right consistency is crucial here.
Plain Yogurt (Dairy or Dairy-Free): The true secret to incredible tenderness and moisture lies here. Yogurt adds a subtle tang, which enhances the overall flavor. It genuinely helps the dough stay soft longer. This ingredient mimics gluten’s role in moisture.
Sugar or Honey: This isn’t just for sweetness in this dish, though it adds a hint. It acts as essential food for the active yeast. This encourages robust fermentation and a lovely golden crust. Trust me, it makes a difference.
Oil (Olive, Vegetable, or Ghee): A touch of oil brings wonderful richness and necessary pliability. It significantly aids in preventing sticking during cooking. I often reach for olive oil for its complementary flavor. This ingredient also helps achieve a smooth dough.
Baking Powder or Baking Soda: These agents provide an extra, quick burst of lift. They create those characteristic puffy bubbles during cooking. This gives the resulting bread a much lighter texture. It’s a fantastic backup leavening.
Salt: Never skip the salt; it meticulously balances all the flavors. It helps to carefully control the yeast’s activity. This results in a more evenly textured bread.
Essential Tools for Perfect GF Naan (No Special Equipment Required!)
For perfect gluten-free naan, you might be surprised to learn that fancy gadgets are entirely optional! Forget the myth that complex recipes require specialized equipment. My goal is always to make delicious, authentic flatbread accessible to every home cook, and this gluten-free naan recipe is a prime example. You almost certainly have everything you need in your kitchen already, making this endeavor both simple and budget-friendly. You won’t need to track down obscure items or invest in pricey appliances. Achieving that signature puff and incredible texture is absolutely possible with standard kitchen essentials.
Here are the straightforward tools you’ll need:
Large Mixing Bowl: Essential for comfortably combining your dry and wet ingredients without spills, and it provides ample space for the dough to rest and rise.
Whisk or Sturdy Spoon: A whisk is perfect for aerating and thoroughly integrating dry ingredients, which is especially important in gluten-free baking. A strong spoon works well for mixing in wet ingredients and bringing the dough together.
Measuring Cups & Spoons: Precision is key in gluten-free baking. Accurate measurements are crucial for the right hydration and a consistent, desirable texture every time.
Rolling Pin: To achieve uniform thickness, a rolling pin is indispensable for shaping your individual naan pieces. A classic wooden one works beautifully; just remember to lightly flour your surface or use parchment paper to prevent sticking.
Non-Stick Skillet or Cast Iron Pan: This is where your naan transforms! A heavy-bottomed pan, whether non-stick or cast iron, is vital for retaining high heat and creating that beautiful golden-brown char and characteristic puff.
Spatula or Tongs: For safe and easy flipping of your naan on the hot pan. Tongs provide a secure grip, while a wide spatula can also effectively manage and transfer the dough.
Optional, but Recommended Tools:
Pastry Brush: If you love your naan brushed with melted butter or ghee for an extra layer of flavor and a beautiful sheen, a pastry brush distributes it perfectly evenly.
Kitchen Scale: For the highest level of accuracy, particularly with gluten-free flours where weight is often more reliable than volume, a digital kitchen scale is invaluable. It eliminates guesswork and significantly enhances consistency in your baking results.
The beauty of this recipe lies in its simplicity and the minimal investment required. The pan choice, while not specialized, does play a significant role in the final outcome; a well-heated cast iron or quality non-stick pan ensures that satisfying sizzle and perfect cook. Before you begin mixing, take a moment to gather all your tools. This simple act of mise en place streamlines the entire process, reduces stress, and ensures a smooth, enjoyable baking experience from start to finish.
How to Make Delicious Gluten Free Naan: A Simple Guide
In practice, crafting the perfect flatbread requires precision and a touch of patience. Follow these steps closely to ensure your dough transforms into golden, pillowy goodness. Every stage is designed for optimal texture and flavor.
Activate the Yeast: In a medium bowl, combine 1/2 cup warm water (or milk), 1 teaspoon sugar, and 2 1/4 teaspoons active dry yeast. Stir gently to dissolve the sugar. Let this mixture sit for 5-10 minutes until it becomes frothy. This bubbling action confirms your yeast is alive and ready to work its magic for this recipe.
Mix Wet Ingredients: To the activated yeast mixture, add 1/4 cup plain yogurt and 2 tablespoons oil. Whisk these wet components together until they are just combined. This creates a rich, hydrating base for your dough.
Combine Dry Ingredients: In a separate large bowl, whisk together 2 cups gluten-free all-purpose flour blend, 1 teaspoon salt, and 1 teaspoon baking powder. Ensure all dry ingredients are thoroughly distributed. Proper aeration helps achieve a lighter dough consistency.
Form the Dough: Gradually pour the wet yeast mixture into the dry ingredients. Mix with a spoon or your hands until a sticky, shaggy dough forms. Unlike wheat dough, this gluten-free dough will be quite soft. Avoid overmixing, just combine until no dry streaks remain.
Rest the Dough: Cover the bowl tightly with plastic wrap or a clean, damp kitchen towel. Place the covered bowl in a warm, draft-free spot. Allow the dough to rest for 30 to 60 minutes. During this time, the dough will become noticeably puffier.
Divide and Shape: Gently turn the risen dough out onto a lightly gluten-free floured surface or a piece of parchment paper. Divide the soft dough into 6-8 equal portions. Lightly flour your hands and roll each portion into an oval or teardrop shape, about 1/4 inch thick. Work gently to preserve air pockets.
Cook the Naan: Heat a cast-iron skillet or heavy non-stick pan over medium-high heat. Once the pan is hot, place one shaped dough piece into it. Cook for 1-2 minutes until large bubbles form on the surface, resembling tiny puffy air pockets. Flip the dough using tongs. Cook the other side for another 1-2 minutes until golden brown spots appear and the bread is fully puffed. For more on the science of baking, consult Wikipedia’s page on baking.
Finish and Serve: Remove the cooked gf naan from the skillet immediately. Brush generously with melted ghee or butter. For an aromatic touch, sprinkle with freshly minced garlic or chopped fresh cilantro. Serve this delightful bread warm to fully enjoy its soft and chewy texture.
Mastering Your Gluten Free Naan Recipe: Expert Tips for Success
Here’s the thing, gluten-free dough behaves differently. It often presents as much stickier than its wheat counterpart. Resist the strong urge to add extra flour. A slightly tacky dough is exactly what you want. This texture is vital for achieving that desired softness. Over-flouring leads to a dense, dry result.
Unlike traditional doughs, excessive handling won’t develop gluten structure here. There is no gluten to develop. Overworking this dough can actually make it quite tough. Gentle mixing and shaping are always my preference. Treat it with care to maintain its delicate texture.
The secret to puffy flatbreads lies in your pan’s temperature. A very hot skillet is absolutely crucial. I always preheat my cast iron pan on medium-high. This intense initial heat helps the dough puff up quickly. You want that satisfying sizzle when it hits the pan.
Rolling out this recipe requires a specific approach. I find parchment paper works wonders for non-stick rolling. A very lightly floured surface can also be used. Aim for even thickness, around ¼ inch. If too thick, it won’t cook through properly. Too thin, and it risks becoming overly crispy.
The finishing touch elevates these flatbreads significantly. Immediately after cooking, brush them generously. Melted ghee, rich butter, or good olive oil are excellent choices. This step locks in moisture and adds incredible depth of flavor. Trust me on this one, do not skip it.
These flatbreads cook surprisingly fast. Overcooking is a common pitfall. It will lead to dry, stiff results. Keep a close watch on them. Look for lovely golden spots forming. A slight puffing indicates it’s ready. Remove them from the heat promptly.
Sometimes, the flatbreads might not puff as expected. There are a few factors to check for this.
Pan temperature: Ensure your skillet is scorching hot.
Dough thickness: Uneven or overly thin dough can prevent puffing.
Yeast activity: Old or inactive yeast is a frequent culprit. You can check yeast activity easily before starting.
Elevate the taste profile of this dish even further.
Incorporate finely minced garlic into the dough mixture.
Fresh chopped cilantro adds a vibrant, herby note.
Sprinkle nigella seeds on top before cooking for an authentic aroma. These additions transform it into something truly special.
Enjoyed this recipe? Share it with a friend or save it to your board for later. Leave a comment below — I love hearing how it turned out!
You May Also Enjoy





You Might Also Love These 🍽️
Recipes picked just for you based on what you’re cooking