Perfect Gluten-Free Bread, No Fuss!
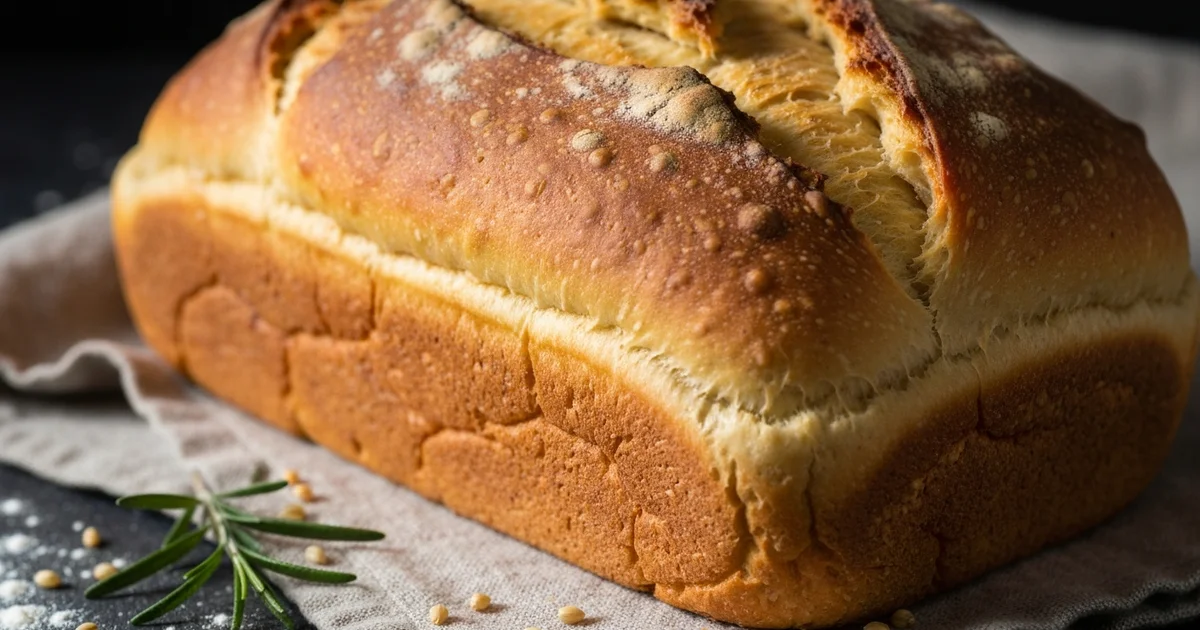
Discover what bread is gluten free with our easy bread machine recipe! Perfect for home cooks, this guide ensures a soft, delicious gluten-free loaf every time.
- 1Introduction: Navigating the World of Gluten-Free Bread
- 2Why You’ll Love This Easy Gluten-Free Bread Machine Recipe
- 3Understanding Your Ingredients: The Heart of Gluten-Free Bread Making
- 4Essential Equipment for Gluten-Free Bread Baking Success
- 5Step-by-Step Instructions for Your Perfect Gluten-Free Loaf
- 6Pro Tips & Troubleshooting for Your Best Gluten-Free Bread
Ingredients
Wet Ingredients
- 1 ½ cups warm water (Ensure water is between 105-115°F (40-46°C). Too hot or cold can kill the yeast.)
- ¼ cup olive oil or melted butter (For a vegan option, use a plant-based butter like Country Crock Plant Butter or a neutral-flavored oil.)
- 2 tbsp apple cider vinegar (Adds a slight tang and helps with the structure and rise of gluten-free bread.)
Dry Ingredients
- 2 ¾ cups gluten-free bread flour blend (High-quality blends like King Arthur Measure for Measure Gluten-Free Flour or Bob's Red Mill Gluten-Free 1-to-1 Baking Flour work best for this recipe.)
- ¼ cup psyllium husk powder (Crucial for providing elasticity and structure to gluten-free bread, mimicking gluten. Use powder, not whole husks.)
- 2 tbsp granulated sugar or honey (Feeds the yeast and contributes to browning and flavor. Can use maple syrup for vegan.)
- 1 ½ tsp salt (Balances flavor and controls yeast activity.)
- 1 ½ tsp instant yeast (Red Star Organic Instant Yeast or any high-quality instant yeast is suitable for bread machines. Do not use active dry yeast without proofing.)
Instructions
Add Wet Ingredients to Bread Pan
Carefully pour the 1 ½ cups of warm water, ¼ cup of olive oil (or melted butter/plant butter), and 2 tablespoons of apple cider vinegar into the bread machine pan. Ensure the paddle is correctly inserted.
Layer Dry Ingredients
Evenly layer the dry ingredients on top of the wet ingredients in the following order: 2 ¾ cups of gluten-free bread flour blend, ¼ cup of psyllium husk powder, 2 tablespoons of granulated sugar, and 1 ½ teaspoons of salt. Create a small well in the center of the dry ingredients, avoiding the liquid below.
Add Yeast
Add 1 ½ teaspoons of instant yeast directly into the well you made. It's important that the yeast does not immediately come into contact with the liquid or salt, as this can prematurely activate or inhibit it.
Select Cycle and Start Baking
Place the bread pan into the bread machine. Select the 'Gluten-Free' cycle on your bread machine. If your machine doesn't have a specific gluten-free setting, choose a 'Basic' or 'Sweet' setting with a longer bake time (ensure it includes a double rise and bake cycle). Press start.
Check Internal Temperature
Once the bread machine cycle is complete, carefully remove the pan. For accuracy, insert an instant-read thermometer into the center of the loaf. The internal temperature of the bread should be between 200-210°F (93-99°C) to ensure it is fully cooked. If it's not, you may need to run a short 'Bake Only' cycle for an additional 10-15 minutes, if your machine allows.
Cool Completely
Immediately remove the baked loaf from the bread pan and place it on a wire cooling rack. Allow the bread to cool completely for at least 2-3 hours before slicing. Slicing gluten-free bread while warm can result in a gummy texture.
Equipment You'll Need
Here's what I use to make this recipe perfectly every time:
- Bread Machine — This appliance automatically kneads, proofs, and bakes the gluten-free dough, making the process effortless for a perfect loaf. → Buy Now
- Digital Kitchen Scale — Precisely weighing gluten-free flours and other ingredients ensures accurate ratios, which is crucial for the delicate balance and texture of gluten-free bread. → Buy Now
- Dry Measuring Cups and Spoons — Accurate measurement of both dry and liquid ingredients is essential for the correct texture and rise of gluten-free bread, even when using a scale for flours. → Buy Now
- Rubber Spatula — A spatula is helpful for scraping down the sides of the bread machine pan to ensure all ingredients are incorporated evenly into the gluten-free dough. → Buy Now
- Wire Cooling Rack — Allowing the gluten-free loaf to cool completely on a wire rack prevents sogginess and ensures a crisp crust and better overall texture. → Buy Now
Recipe FAQs
What kind of bread is gluten free?
Can I make this recipe in a regular oven instead of a bread machine?
Why is my gluten-free bread dense or gummy?
What's the best gluten-free flour blend for bread?
How do I know if my gluten-free bread is fully baked?
Can I add protein powder to my bread machine gluten-free bread?
Perfect Gluten-Free Bread, No Fuss!
Discover what bread is gluten free with our easy bread machine recipe! Perfect for home cooks, this guide ensures a soft, delicious gluten-free loaf every time.
Prep Time
10 min
Cook Time
200 min
Total Time
210 min
Wet Ingredients
- 1 ½ cups warm water (Ensure water is between 105-115°F (40-46°C). Too hot or cold can kill the yeast.)
- ¼ cup olive oil or melted butter (For a vegan option, use a plant-based butter like Country Crock Plant Butter or a neutral-flavored oil.)
- 2 tbsp apple cider vinegar (Adds a slight tang and helps with the structure and rise of gluten-free bread.)
Dry Ingredients
- 2 ¾ cups gluten-free bread flour blend (High-quality blends like King Arthur Measure for Measure Gluten-Free Flour or Bob's Red Mill Gluten-Free 1-to-1 Baking Flour work best for this recipe.)
- ¼ cup psyllium husk powder (Crucial for providing elasticity and structure to gluten-free bread, mimicking gluten. Use powder, not whole husks.)
- 2 tbsp granulated sugar or honey (Feeds the yeast and contributes to browning and flavor. Can use maple syrup for vegan.)
- 1 ½ tsp salt (Balances flavor and controls yeast activity.)
- 1 ½ tsp instant yeast (Red Star Organic Instant Yeast or any high-quality instant yeast is suitable for bread machines. Do not use active dry yeast without proofing.)
Introduction: Navigating the World of Gluten-Free Bread
Many home bakers grapple with the challenge of finding a truly satisfying gluten-free loaf. The demand for gluten-free options has surged, driven by health needs and dietary choices. Yet, the supermarket shelves often offer limited and disappointing choices. I always hear common complaints about texture and flavor.
Here’s the thing: most store-bought options, whether a “frozen gluten free bread” or a simple slice, often fall short. They can be crumbly, dense, and frankly, quite expensive. Finding a good gluten free bread substitute that feels like real bread can feel like a quest. It leaves many wondering what bread is gluten free that actually tastes good.
In my kitchen, I’ve spent years perfecting the art of gluten-free baking. The disappointment of dry, flavorless loaves is a memory I’m determined to help you avoid. What I discovered is that a bread machine can be your secret weapon. It simplifies the entire process.
This method delivers a soft, springy loaf with a beautiful crust. You get the control and freshness that store-bought versions simply cannot match. Say goodbye to those days of settling for less. This homemade approach transforms your expectations for what bread is gluten free. Get ready to bake a loaf that will truly delight you.
Why You’ll Love This Easy Gluten-Free Bread Machine Recipe
Here’s the thing: mastering gluten-free bread can feel like a quest. Many gluten free bread machine recipes yield a dense, crumbly loaf. That is simply not what anyone wants from their homemade bread. What I discovered is that this specific recipe breaks that mold.
You’ll notice that this loaf offers an unbeatable texture and taste. We achieve a wonderfully soft, airy crumb, unlike typical hockey puck gluten-free loaves. Imagine tearing into a slice with that perfect chew, rather than a dry, brittle texture. This recipe ensures a satisfying experience every single time. It truly redefines expectations for what bread is gluten free when made at home.
Beyond the delightful outcome, you’ll love the effortless preparation involved. In my kitchen, busy mornings demand efficiency. This bread machine gluten free bread recipe requires minimal hands-on time. You simply add the ingredients, press a button, and let the machine do the hard work. This convenience allows you to tackle other tasks while your bread bakes.
This approach makes fresh, homemade bread a reality, even on hectic weekdays. Gone are the days of endless kneading or complex rising schedules. The bread machine handles the mixing, kneading, rising, and baking. This saves you valuable time and effort. It consistently delivers beautiful results without fuss.
Furthermore, this recipe is incredibly cost-effective. Buying specialty gluten free foods bread from the grocery store adds up quickly. Those small loaves often come with a high price tag. Making your own at home drastically reduces your weekly food budget. You control the ingredients, preventing unnecessary additives.
Think about the savings over just a few months. Investing in quality gluten-free flour like King Arthur Measure for Measure becomes worthwhile. You get more bread for your money. This makes maintaining a gluten-free diet more affordable. It’s a smart choice for any budget-conscious household.
This recipe also shines in its customizable and versatile nature. You can easily adapt it to suit different dietary needs or flavor preferences. Want to add some seeds or herbs? Go for it. Later, we’ll even explore a potential low carb bread recipe for bread machine variations. The base is robust enough for many delicious tweaks.
Consider adding a tablespoon of psyllium husk powder for added fiber. Or perhaps some dried cranberries for a touch of sweetness. The adaptable nature of this recipe means you are never stuck with just one option. It encourages culinary creativity in your own kitchen. This flexibility ensures your bread always suits your mood.
Finally, you can count on reliable results with this specific method. I always get frustrated by common issues like why isn’t my dough rising in other gluten free bread in bread maker attempts. This recipe is meticulously developed to prevent those disappointments. It guides you to success consistently. We focus on proper ingredient ratios and techniques.
Trust me on this one: consistent success is paramount. Following these steps helps avoid the dreaded “brick” loaf. You’ll achieve that ideal internal temperature bread done baking every time. This ensures a beautifully risen, perfectly baked loaf. That is the true joy of baking at home.
Understanding Your Ingredients: The Heart of Gluten-Free Bread Making
Crafting exceptional gluten-free bread hinges entirely on understanding each ingredient’s unique contribution. Unlike traditional baking, where wheat gluten bread provides structure, we rely on a specific ballet of components to achieve that satisfying crumb and rise. My decade in the kitchen has taught me that substitutions are possible, but knowing the “why” behind each addition is truly empowering for any home baker.
Gluten-Free Flour Blend The foundation of any successful loaf is a high-quality gluten-free bread flour blend. Standard all-purpose gluten-free flours often contain too much starch, leading to a gummy texture or poor rise. I always recommend using blends specifically formulated for bread, which balance starches with protein-rich flours. Brands like King Arthur Measure for Measure or Bob’s Red Mill Gluten-Free Flour (also known as Bob’s Gluten Free Flour or Bob’s Mill Gluten Free Flour) are my top picks for consistent results. These blends are meticulously crafted to mimic the properties of traditional wheat flour, providing a robust structure for what type of bread is gluten free. Using an inferior blend will make it difficult for your loaf to hold together or achieve a good volume.
Psyllium Husk Powder Here’s the thing: Psyllium husk powder is absolutely crucial for gluten-free bread. It acts as a super-binder, providing the elasticity and structure that gluten usually offers. Without it, your bread would likely crumble into pieces rather than slice neatly. I’ve found Trader Joe’s psyllium to be a reliable and accessible option. While a psyllium husk substitute like ground flaxseed or chia seeds can work in a pinch (psyllium vs chia often comes up), psyllium husk powder offers the best binding power and chewiness, making it essential for a sturdy loaf.
Yeast (Active Dry or Instant) Yeast is the magical leavening agent that gives bread its rise and airy texture. I generally opt for Red Star Organic Instant Yeast for bread machines because it doesn’t require pre-proofing. This means you can add it directly to your flour mixture. Understanding what is breadmaker yeast simply refers to its optimal performance in a machine setting, often instant yeast. While a gluten free diet yeast isn’t a special product, ensuring your yeast is fresh and properly activated by warm liquid is critical, or you’ll find yourself asking why isn’t my dough rising.
Sweetener (Sugar/Honey) Sugar, honey, or even maple syrup serve a dual purpose in this recipe. Firstly, they feed the yeast, accelerating its activity and contributing to a better rise. Secondly, a touch of sweetness enhances the bread’s flavor profile and helps create a beautiful golden-brown crust. Much like the subtle sweetness in a honey wheat bread machine recipe, a little sweetener here significantly improves the overall taste and appearance of your gluten-free loaf, balancing the inherent earthiness of some GF flours.
Fats (Oil/Butter) Adding a fat like olive oil or melted butter is essential for moisture and tenderness. In my kitchen, fats prevent gluten-free bread from becoming dry and crumbly, which is a common challenge. If you’re aiming for vegan and gluten free bread, plant-based options like those found in country crock plant butter ingredients work wonderfully, imparting a soft crumb and contributing to a richer crust development.
Liquid (Warm Water/Milk) The liquid—usually warm water or milk—is pivotal for hydrating the flour and activating the yeast. The trick is getting the temperature just right: too hot will kill the yeast, too cold will inhibit its activity. I always aim for a temperature between 105-115°F (40-46°C) for optimal yeast performance, which ensures a lively and consistent rise.
Salt Salt isn’t just for seasoning; it plays a vital role in controlling yeast activity and strengthening the crumb structure. It also significantly enhances the overall flavor of your bread, preventing it from tasting bland. Without salt, yeast can over-ferment, leading to a weak structure and a less flavorful loaf.
Acid (Apple Cider Vinegar) The secret is to use a touch of acid, like apple cider vinegar. This might sound unusual for bread, but in gluten-free baking, vinegar and gluten free flours interact to improve the crumb structure and aid in the rise. It helps to break down proteins in the flour, resulting in a lighter, less dense loaf. You won’t taste it in the final product, but you’ll certainly notice its impact on the bread’s texture.
Optional: Xanthan Gum Worth noting here: Many commercial gluten-free bread flour blends already contain xanthan gum. However, if your chosen blend does not, you’ll need to add it. Xanthan gum acts as a binder, working alongside psyllium husk to prevent the bread from crumbling and giving it a more cohesive texture. It’s crucial for achieving a sliceable loaf.
Optional: Egg Replacer / Aquafaba For those avoiding eggs, whether for gluten and egg free bread or vegan and gluten free bread, effective substitutes are available. I’ve had great success with aquafaba, the liquid from a can of chickpeas, typically using an aquafaba to egg ratio of three tablespoons per egg. Alternatively, a commercial egg replacer powder or even aquafaba powder mixed with water can provide the necessary binding and moisture, ensuring your loaf is tender and well-structured.
Essential Equipment for Gluten-Free Bread Baking Success
Baking a truly excellent gluten-free loaf requires more than just good ingredients. The right tools make all the difference in achieving that perfect texture and rise. In my kitchen, success often hinges on having the essential equipment ready. This is especially true for gluten free bread machine recipes.
Here’s what actually works for setting yourself up for gluten-free bread baking success.
-
Bread Machine: This appliance is the true hero of our recipe. It controls temperature and mixing perfectly for gluten-free doughs. These doughs often behave quite differently from traditional wheat-based ones. Many models are designed for a
2 lb bread loaf pansize.You’ll notice that using a bread machine simplifies the process greatly. It removes much of the guesswork inherent in gluten-free baking. This machine helps create a consistent environment for proofing and baking. It’s the ideal choice for a stress-free
gluten free bread machine recipe. -
Measuring Cups & Spoons: Accuracy is paramount in gluten-free baking. Unlike traditional baking, small variations can significantly impact results. Dry ingredients, especially flours, need precise measurement. Wet ingredients also require careful attention.
What I love about this is the reliability it brings. Investing in a good set ensures consistency every time. This precision helps achieve the desired crumb and texture. It is vital for any
gluten-free bread flourmixture. -
Rubber Spatula: This simple tool is surprisingly indispensable. It helps scrape down the sides of the bread machine pan. This ensures all
powder mixeringredients are fully incorporated. No streaks of unmixed flour will remain.Trust me on this one; a good spatula prevents dry spots in your dough. It also helps in carefully handling the delicate gluten-free batter. This ensures a uniform mix for a better rise.
-
Kitchen Scale (Highly Recommended): While not strictly required, a digital kitchen scale elevates your accuracy. Weighing flours and other dry ingredients is more precise than volumetric measures. This is crucial when using specialized ingredients. Think of
psyllium husk powderorking arthur measure for measureflours.Worth noting here, exact weights prevent dense or crumbly loaves. Many professional bakers rely on weight for consistent results. It truly makes a noticeable difference in the final product.
-
Digital Meat Thermometer: This might seem unusual for bread, but it’s critical. It allows you to check the
internal temperature bread done baking. Gluten-free breads can look done on the outside while still being undercooked inside. You’ll notice that theinternal temp of bread when doneis key.The trick is reaching 205-210°F (96-99°C) for perfect doneness. This ensures a fully cooked loaf with no gummy center. Knowing
what temp should bread beguarantees success. This helps confirmwhat should the internal temperature of bread be. -
Loaf Pan (If Baking in Oven): While this recipe focuses on a bread machine, some prefer oven baking. For oven use, a
pullman loaf pancreates square, uniform slices. A standardlong loaf panorfarmhouse pansalso works well. These pans provide structure for the rising dough.If you choose this method, be sure your pan is the right size. It should be compatible with your recipe’s yield. This choice gives you more control over the final shape of the loaf.
-
Stand Mixer (Alternative/Optional): Some
stand mixer recipesexist for gluten-free bread. If you’re not using a bread machine for mixing, akitchenaid commercial mixercan handle the heavy dough. It provides thorough mixing before oven baking. However, for a simplegluten free bread in bread makerapproach, it is not needed.This tool is fantastic for hands-off mixing. It develops the dough structure effectively. Just remember, this specific recipe is optimized for a bread machine. Every piece of equipment supports the path to a beautifully baked loaf.
Step-by-Step Instructions for Your Perfect Gluten-Free Loaf
Here are steps 1 to 3 for your recipe article:
-
Preparation: Begin by gathering all your ingredients and measuring them precisely; accuracy is paramount in gluten-free baking. Lightly grease the bread machine pan, or if you’re using a
loaf pan pullmanfor a more rectangular shape, grease it thoroughly as instructed by your bread machine’s manual, especially if it’s a model that doesn’t include the pan directly in the machine’s baking chamber. -
Loading the Bread Machine: Load the ingredients into your bread machine pan in the correct order, which is crucial for
bread machine gluten free bread recipesuccess: start with all the liquids (water, milk, oil, eggs), followed by the dry ingredients (flours, sugar, salt, xanthan gum), and finally, place the yeast last, ensuring it sits on top of the dry ingredients and is kept separate from the salt, which can inhibit its activation. -
Selecting the Cycle: Choose the ‘Gluten-Free’ cycle on your bread machine; this specific setting is important because it typically features a single, shorter knead, a longer rise time to accommodate the slower activation of gluten-free flours, and a specific baking temperature and duration optimized for gluten-free dough, which often behaves differently from traditional wheat-based dough. If your bread machine lacks a dedicated gluten-free cycle, you can adapt by using a ‘Rapid Bake’ or ‘Basic’ setting and manually intervening to stop any second knead cycle, which can deflate gluten-free dough, ensuring you also monitor the bake for doneness.
-
Monitoring the Dough: During the initial mixing phase, observe your gluten-free dough. It will naturally be much stickier and wetter than traditional wheat-based dough, which is perfectly normal for gluten-free recipes. If you notice ingredients sticking to the sides of the bread machine pan, gently use a rubber spatula to scrape them down during the first mixing cycle to ensure even incorporation. This ensures all ingredients are properly mixed for a consistent loaf.
-
Baking and Cooling: Allow your bread machine to complete its entire baking cycle, resisting the urge to open the lid prematurely. To confirm doneness, it is crucial to check the internal temperature of the bread when done; it should register between 200-210°F (93-99°C) using an instant-read thermometer inserted into the center of the loaf. This
internal temperature bread done bakingis your reliable indicator. Immediately after the cycle finishes, carefully remove the hot loaf from the bread machine pan and transfer it to a wire rack to cool completely. Cooling is vital because it allows the internal structure of the gluten-free bread to set fully, preventing a gummy texture and ensuring a pleasant, sliceable crumb. Do not slice the bread until it has fully cooled, which can take 1-2 hours depending on the loaf size.
Pro Tips & Troubleshooting for Your Best Gluten-Free Bread
Here’s the thing about baking gluten-free bread: it’s often seen as a challenge. Many home bakers grapple with flat loaves or gummy textures. But with a few simple adjustments and some insider knowledge, you can achieve consistently impressive results every single time. Trust me on this one; I’ve baked hundreds of loaves.
Precision is absolutely paramount in gluten-free baking. Unlike traditional wheat dough, gluten-free bread flour mixtures are less forgiving. I always recommend using a kitchen scale for measuring your dry ingredients, especially flour. Volume measurements can vary significantly, leading to inconsistencies in your gluten-free bread recipe for bread machine. Even a slight deviation can impact the final crumb.
Warm liquids are crucial for yeast activation. The ideal temperature for your water or milk should be between 105-115°F (40-46°C). If the liquid is too hot, it will kill the yeast, and if it’s too cold, the yeast won’t activate properly. This is a common reason why isn’t my dough rising. Always check with a thermometer for accuracy.
A common mistake is to peek during the rise cycle. I always advise against opening the bread machine lid too soon. The consistent temperature and humidity inside the machine are vital for a proper rise. Disturbing this environment can cause the dough to collapse, impacting the final texture of your loaf. Let the machine do its work without interruption.
In practice, gluten free bread dough will look and feel very different from traditional wheat dough. It’s usually much stickier, resembling a thick batter rather than a kneadable dough. Don’t expect to handle it like a regular dough. This consistency is perfectly normal for gluten free bread in bread maker recipes. Embrace the stickiness; it’s part of the process.
For those baking at higher elevations, high altitude bread recipe adjustments might be necessary. Generally, you may need slightly less yeast and sometimes more liquid. The lower air pressure can cause dough to rise too quickly. While a bread machine mitigates some of these issues, it is still something to keep in mind. Consider a minor reduction in yeast if you live above 3,500 feet.
If you find yourself asking, “why isn’t my dough rising?”, troubleshoot a few key areas. First, check your yeast’s expiration date; old yeast is often the culprit. Second, ensure your liquids were at the correct temperature. Too much salt or sugar can also inhibit yeast activity. Finally, even bob’s gluten free flour can expire, so check those dates.
The secret is to conquer that often-dreaded gummy texture. This issue frequently stems from underbaking or insufficient cooling. Your bread needs to reach a proper internal temperature bread done baking point, typically around 200-210°F (93-99°C). Use an instant-read thermometer inserted into the center of the loaf. For more detailed insights on bread doneness, you can refer to Healthline’s guide on internal temperatures.
Once baked, let your loaf cool completely on a wire rack before slicing. This allows the internal starches to set, preventing a gummy making machine texture. Incorporating ingredients like psyllium husk into your recipe can also significantly improve the structure and reduce gumminess. It provides extra fiber and mimics some of the elasticity of gluten.
Enjoyed this recipe? Share it with a friend or save it to your board for later. Leave a comment below — I love hearing how it turned out!
You May Also Enjoy


You Might Also Love These 🍽️
Recipes picked just for you based on what you’re cooking